Followers

Sunday, August 31, 2014

How to make deep folds

Hello everyone!
It's Vili here today and I want to show you my way of making deep contrasting folds.
As you've may already noticed I use from really dark to really light shades. I colour pretty confidently without worrying for the final result.
I chose Mo's Alisa With Roses because her dress is suitable for my aims. I coloured the skin. the hair and the basket beforehand and now I'm starting with the detailed explanations:


I'm thinking of making the dress in the pink-purple range so I chose these colours:

 
I always start with the lightest colour in order to 'wet' the place I'm colouring:


After that I mark the places where the folds are with the darkest colour: 


I continue with a lighter tone:

And a lighter one:


With the lightest colour I fill the most protruding sections:


If I think a place should become lighter, I slightly touch it with the Colorless Blender. These are mostly the sectors with many folds, like the one around the waist: 


After I have finished colouring the picture I put a contour. Here I don't mind about the direction of light and don't look for the places with the most thick shadows. I try to make the picture look more contrasting on the main background. I place contour all around the image:


I  put in some darker tones:


Then comes a careful 'washing' of the two colours with the lightest grey:


And the picture is ready:


And this is the card which I made with this image:


Have a lovely day and thanks for stopping by!

Vili  xxxx

Copics used:
Skin: Е 000, E11, E51, E93
Hair: E31, E33, E35, E37, E29
 Clothes: RV10, RV63, RV66, RV69
 Shadows: W0, W3, W5

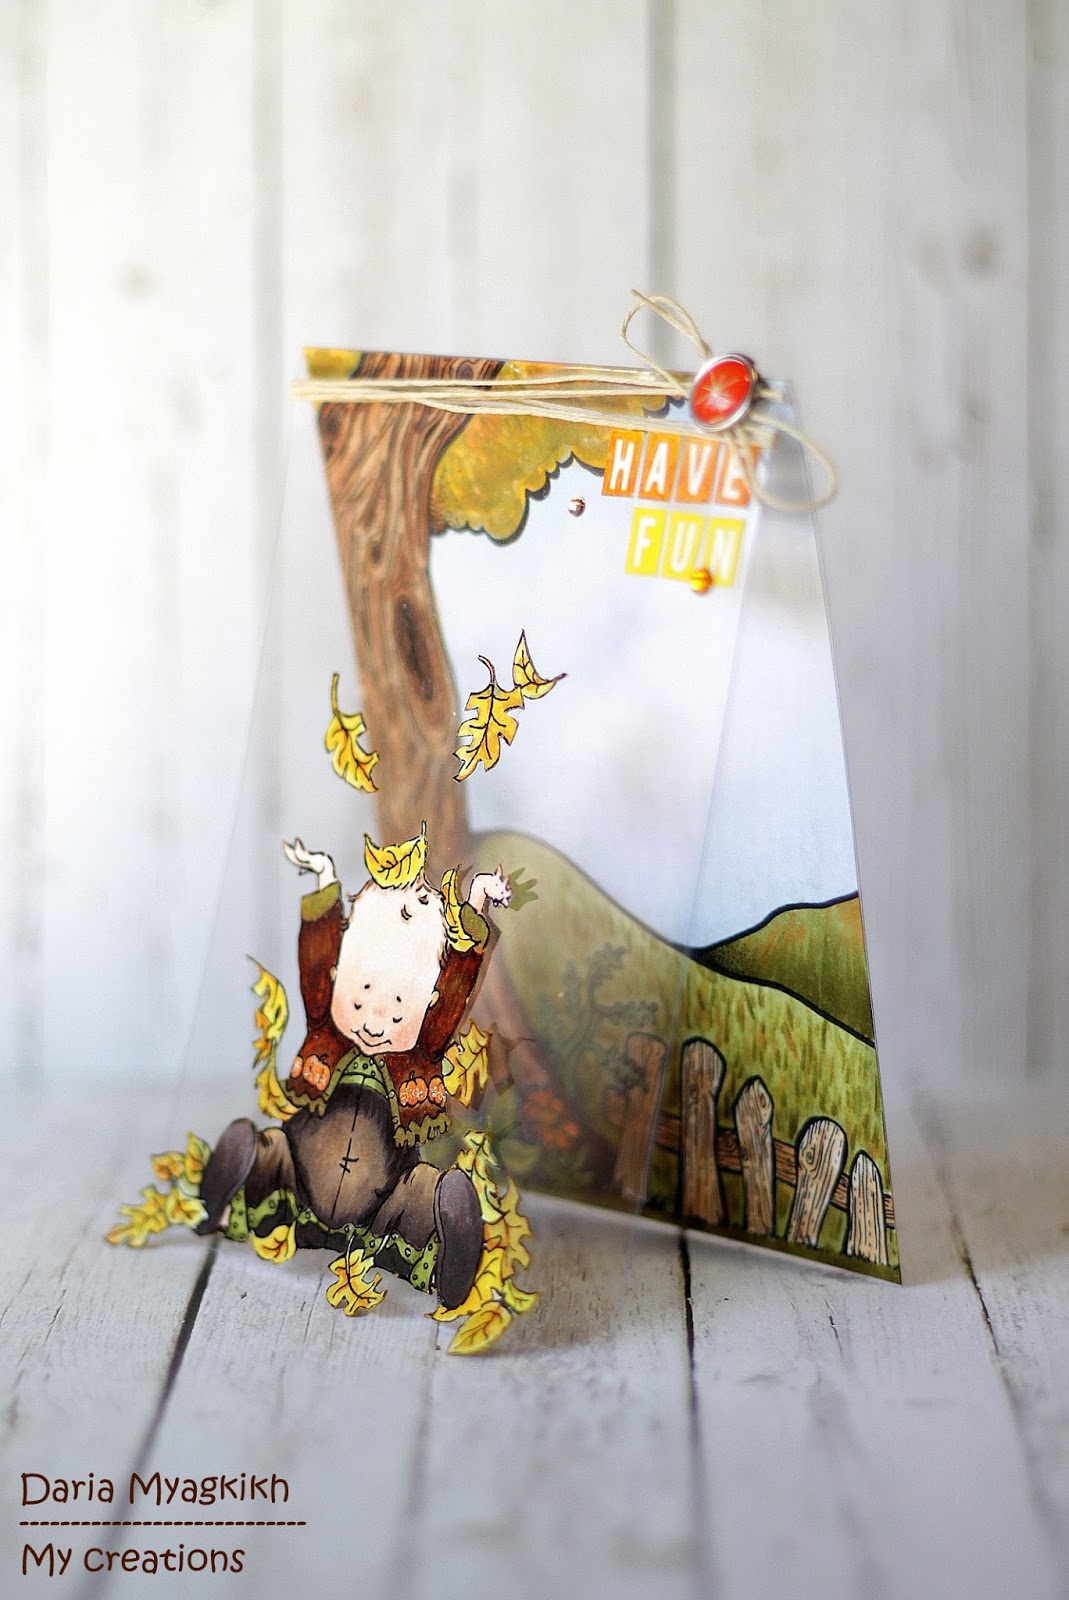
Autumn Fun card from Daria Myagkikh

Hi everybody!
To be honest I was waiting for this day whooooooole summer. Know why?
Because I just adore Autumn! It is the most beautiful, joyful, cozy season of all.
Also I find it very inspriring. That is why I decided to dedicte my card to it!

I used splendid digi stamp from Mo Manning - Kai as a main character and image from Lilyboo Designs - Old Tree for the background.


As usual I used an accetate as a body for my project.


As both of the images are rather "busy" I decided not to use a lot of embalishment.
Just coloring :))
So I took Accetate and create a body for the card. Than cut and colored the background scene and attached it inside the card with doubleside tape. Than I colored lovely boy, cut and glued with glue dots. Than added sentiment, couple of jems and brads. That's it!


The key numbers for image are:

            Skin  - E000, E01, E11, E50, R11 (for cheeks)
Clothes
 - E53, E44,E47,E49,E99, YR14, YG93, YG 95
Leaves
 - Y19,Y21,Y26,Y32, YR12,YR14, YG93
Grass
 - G0000, YG93, YG 95, YR 12
Tree
 -  E34, E37, E39, Y19,Y21,Y26,Y32, YR12,YR14, YG93
Sky 
- B0000, C00, C1
Fence 
- E34, E44,E47, C1


Wishing you a great day and very creative mood!


Thursday, August 28, 2014

happily ever after......

Today it is my turn again to share a copic marker project. We had a lot of rain the last few weeks so I was getting in an autumn mood already which resulted in a lot of toadstools on my project (LOL).

The background is made with Dylusions ink, stamps and stencils.The cute little fairy on the large toadstool is an old digi by Emerald fairies. All the other toadstools are by Dylusions. 


I  used a limited palette of colours. I love the look of monochrome cards or AJ pages, allthough this tag is not completely monchrome using both red and orange. 
I stamped all the images on special copic paper and used the following colours:
E000,00, 21,11
BV00
YR 07, 14, 15, 16
R17, 32, 35, 59

have a nice day 
see you next month

Miranda


Tuesday, August 26, 2014

My new favorite

Hi all copicfans,
today it's me Rozzan that will inspire you.
I have had a hard time finding inspiration during the summer, but now the weather is changing and it's time to go inside for some colouring. 

I have found some new and tough stamps online.
"Moxie Girl" is the name and I think they have amazing hair to colour.


Do you like the earrings? I used some pearl string and for the hanging chain from her pocket I used liquid pearls.


When I do the hair I usually starts with a light colour where I want the darkest shadows to be,
then I go from the dark to light and then back to the dark again.


These are the copics I used:
Skin: E000,00,11,13
Hair: E40,W3,5,7
Mouth: E04
Blue: B91,93,97,99
Yellow: Y23,26
Grey: C1,5,7
Red: E08,19
White: C0,5


Monday, August 25, 2014

"Always thinking of you" Copic artwork by Suki Manga Art

Dear Copic friends,
For the entry of today I created a fan art inspired in Sailor Moon (character created by Naoko Takeuchi).
I grew up watching this anime when I was a child, so I love so much this character.
I hope you like it  ^____^
As usual, I started to colour eyes and skin:
Skin: E000 - E00 - E11 - R20
Eyes: B000 - B00 - B12 - B05


Then I used red and burgundy colours for the clothes and continue with the first base for her hair and light grey to add shadows on the white clothes:
Clothes: R29 - R59 - R000 - 0 (Blender) - C1 - C3 - C5
Hair: Y80 - E11 - Y38 - YR02


Next step is to add all blue colours for the picture. I used same copic markers for clothes and for the starry sky:

Clothes and sky: B29 - B99 - B45 - B00 - B000 - B05 - 0 (Blender)


All the shine effects are made by no coloring the paper (just used the colour of the paper), regarding little spots and fine lines I made them using a white ink pen.

Thank you for enjoying my artworks ( * 3*)/
See you on my next entry!

Suki Manga ^^


Twitter: @Suki_Manga


Friday, August 22, 2014

Winner of Challenge 31

Hello dear Copic Fans,
It's me again, Barbara/Kreativmonster,
for the Copic Marker Europe Blog Challenge.

Here comes the winner of
Challenge 31, "Big Hair", it is....

#10 Paperbabe


Congratulation, Paperbabe Kim! Please send us an email to copiceurope@gmail.com

with your request for 3 Copic Sketch markers.

Big Hugs
Barbara/Kreativmonster
for
CME team

Wednesday, August 20, 2014

New Challenge


Hello dear Copic Fans,
It's me again, Barbara/Kreativmonster for the
Copic Marker Europe Blog Challenge.

I am very happy, that "Big Hair" found more response, that's great!
The winner will be announced on Friday, 22th August 2014.


This time, it will be very easy for all of you, our new Challenge is 

"Anything goes with Copics"


My inspiration for you is this card with a sad girl from Saturated Canary telling you Good-Bye, because I am leaving this blog and this challenge: 


I really loved to prepare this challenge for you every month, but my "real" job is eating me up alive, so I have to reduce my activities in my sparce free time and have decided to concentrate on administrating the German Copic Blog.
It is breaking my heart to leave this wonderfull team of talented and gifted ladies, especially as I have been in this team from the beginning of this blog, but I can't help it. 


As I do not own a sentiment-stamp saying Good-Bye, I wrote it with BG75.

These are the Copics I used:
Skin:E50. E51. E01, E02
Hair: E50, E51, E31, E33
Top: YR00, YR01, YR02, N3, BG72, BG78
Skirt: BG70, BG71 (selfmade), BG72, BG75, BG78, N3
Balloon: BG70, BG71 (selfmade), BG72, E07, E08, E09
Airbrush: BG70, BG72, BG75


So now, it's your turn! Show us your work, and you can win
3 sketch markers of your choice.
Please be aware that only entries from those living in Europe, North Africa and the Middle East are possible.

To enter visit our Challenge page and enter your link in Mr Linky
before the end of  16. September 2014 (23:55).


The winner will be announced 19. September 2014.

We are looking forward to see your creations!
Hugs and Good-Bye
Barbara/Kreativmonster
for CME team

Sunday, August 17, 2014

Hair tutorial from Daria Myagkikh

Hi everybody!


Today it is my turn to create a tutorial for you. I am very excited as it is my first Copic tutorial!
So I decided to show you my way of coloring hair - as I find it most relaxing, interesting and enjoyable thing to color :)


So for this post I decided to use image from Artist Catzilla (you can see her library over here)


I start coloring all pictures with the skin because of two reasons.
1. It is the most noticable part of the picture (the first thing you will look at is a face). So if I made any mistake there I would not use spoiled image.
2. Skin is lighter than the hair (Almost all the characters that I color are brunettes). So if you accedently touch dark hair with your light marker - a bit of dark color will stay on the tip. You may not notice it and when you continue coloring skin - you will have a blur right in the middle of characters face. :)


Any way let's start creating our hairstyle :) This lady will be a brunette (as usual in my case he-he)... I would say with dark walnut color.

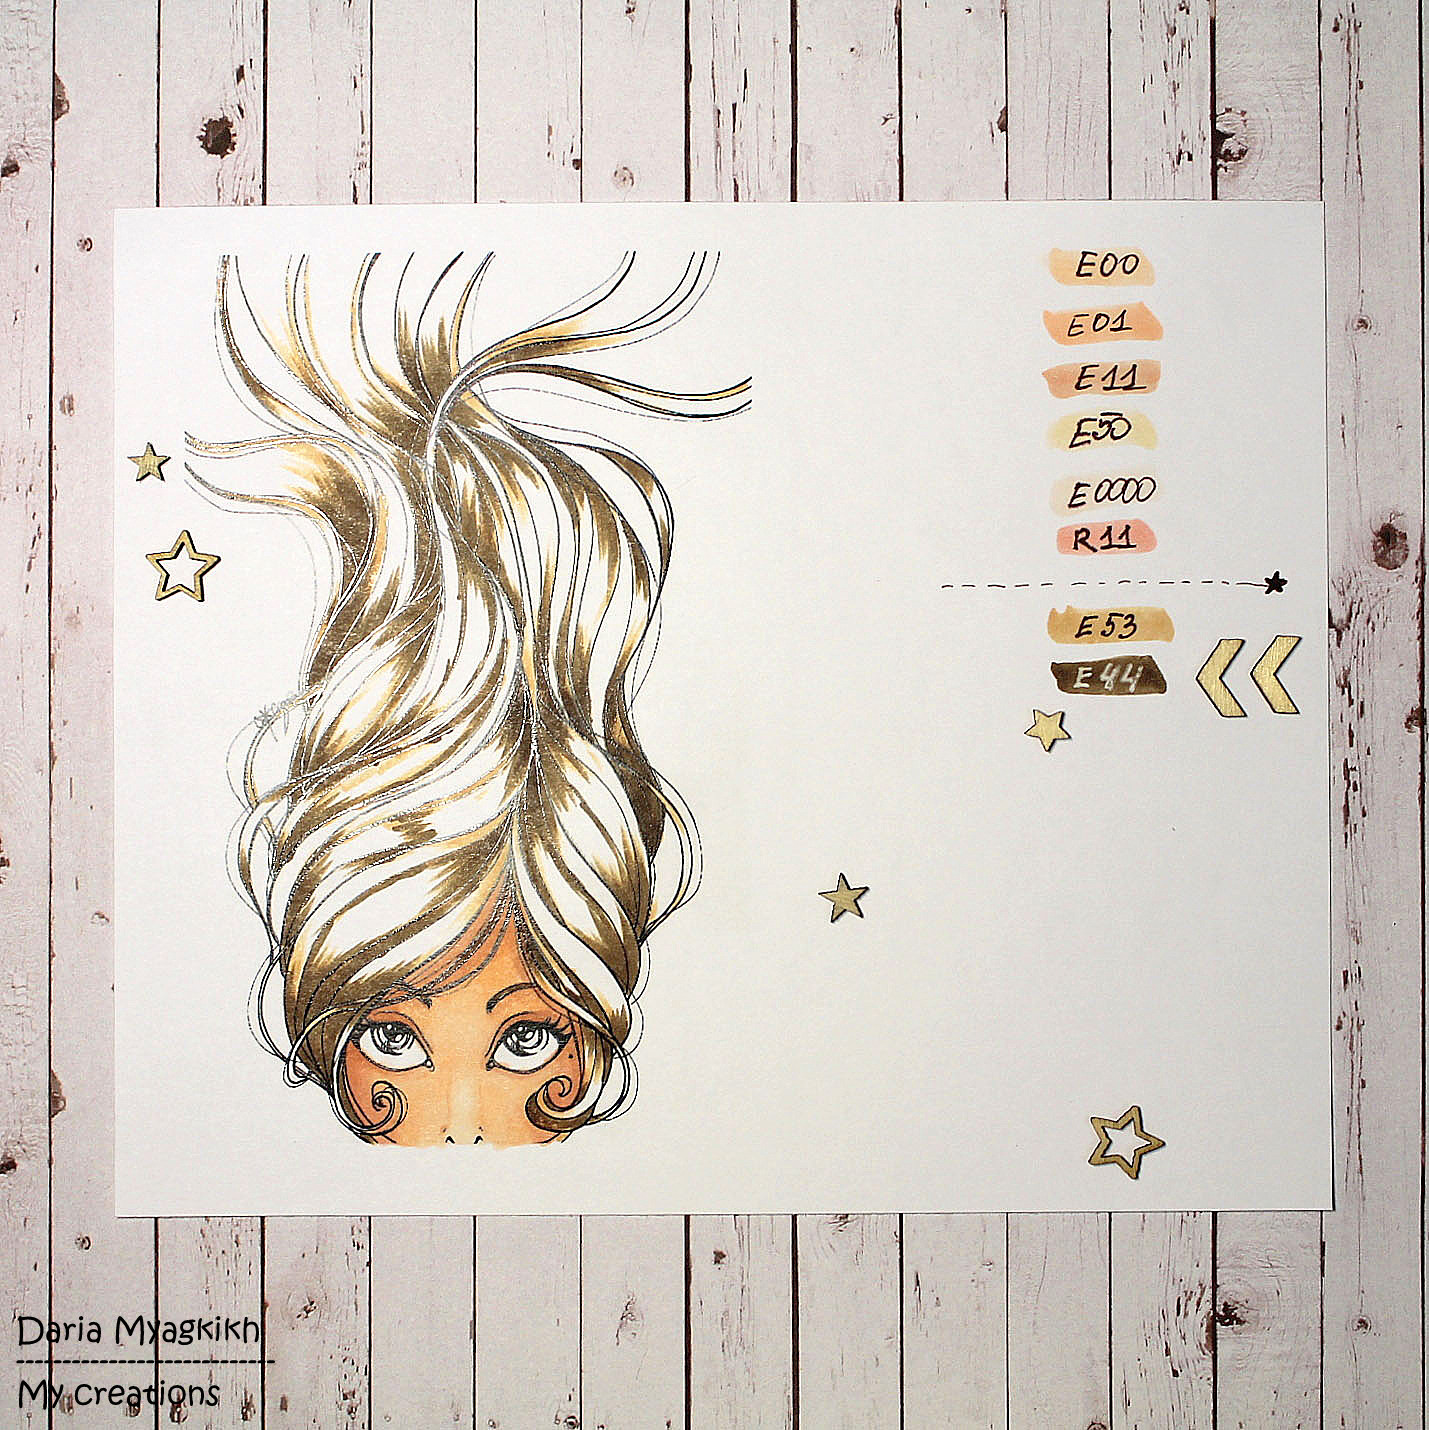
I use a classic way of coloring - "from light to dark". So I started with the lightest color - E53.  With the flicking motions I added color to those places which would be the darkest. Do not rush to color every bit. If you are not sure - just leave it blank. 


Than if you are happy with the result start adding darker shades.

Е44 и Е47


So we have the structure of our future hairstyle. I like it! :)
That means that we can continue adding more colors.
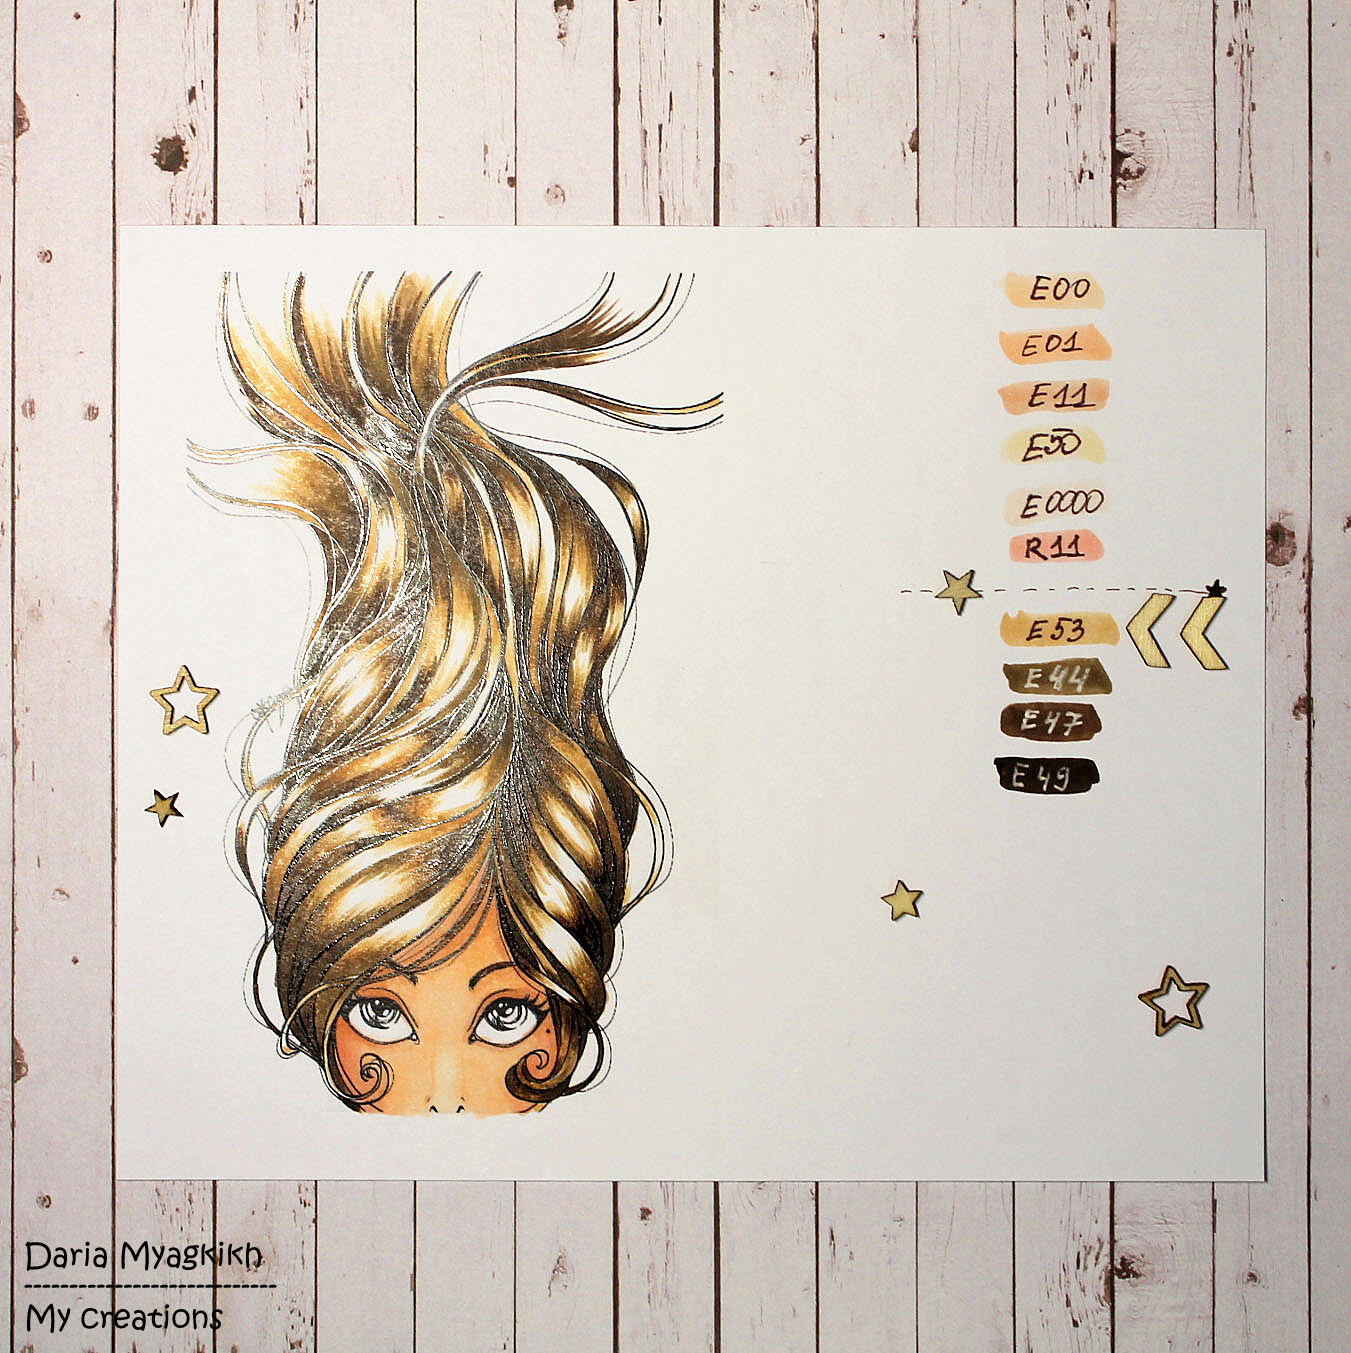
And again - from light to dark:


Е53, Е44


This time I will add E49 for more deep dark brown.


After that I would like to soften strong contrast. I use Е53, Е44 again. :) 


Finally we have our brunette girl ready...but do you remember - we decided that it will be dark walnut color. So I used E79 for this purpose and final touch - Е53 to gather all shades together.


And....the only thing that is left is to create a card...Here what I came up with:


Easy and Fun! :)
Hope you will find my tutorial helpful and interesting!
Have a great day and bunch of inspiration!
Daria Myagkikh

Thursday, August 14, 2014

Winter in August!


Hello everyone! It's Delphine here today with some Christmas inspiration and a bit of airbrushing with my Copics. It's never too early to start on those Christmas cards, isn't it!


The image I used is a Paperbabe Stamps called Dillon Frost Sprite. I stamped Dillon in Memento Tuxedo Black Ink and masked my image. When I want to airbrush something, I always start with the background because if things do not turn as I want, I can easily start again. I used three different blues here though you really cannot tell from my photo, going from the lightest to the darkest - again, if your background is not dark enough, you can always make it darker, but not lighter. Once I was satisfied with my background, I took the mask away and coloured Dillon in Copics. I added a bit of glitter tape and a Make It Crafty snowflake chipboard painted in white acrylic and applied white paint from a pen around my image for a more frosty look and a few snowflakes. 


Skin: E000, 00, 01, 11, 23, R20
Hair: E47, 53, 55
Eyes: BG02, 05
Sweatshirt: BG01, 02, 05, 07, 09
Trousers: E41, 42, 43, 44
Snow: C0, 1, 3
Background: B37, 66, 69

That's all from me today, thank you very much for your visit, have a lovely day! Hugs, 
Delphine xx

Tuesday, August 12, 2014

Dashing Through The Snow

Hello Everyone,

I have a christmas card to share with you and it's only August, lol, I blame Lili of the Valley myself for bringing out such cute stamps, lol.

This little chap is dashing through the snow or hurtling more like.  I have used the new Marianne Design Window Die to make a winter scene.


I made an Aperture with the window and added accetate so I could attach the snow die cuts.  The tree is also a Marianne Design die with some snow tex added for texture.

This is what it looks like on the inside.  It's very difficult to photograph as the accetate reflects the light.


Here is the little chap with a little chunky white frantage dotted around.


All the papers used are from Michelle Roos Digital Paper Collection and I used Winter Frost.  

The next picture looks wonky but it's not really, just the angle that I took the picture from.


Copics Used:-

Skin E00, E000, E11, E04 Blush R20
Blues B91, B93, B95, B97
Snow/White BG0000, BG000, C5, C3, C1
Browns E53, E50, E49, E47, E44, E43, E40, E31, E25

Hugs Tracy x
Follow Me on Pinterest