Followers

Thursday, February 27, 2014

Lisbeth with Bird

Hi Everyone,

I have another Little Darlings image to share with you.  Again this was made for CHA at the end of last year when I was struggling to colour with the RSI in my arm, so not my best.  Also, a very clean and simple card for me, lol.

The image is called Lisbeth with Bird and the sentiment added to the little die cut clouds is from the vintage sentiment set Release 1, Vintage Birthday.  The backing paper is from the Petals and Lace 6 x 6 paper pad.


The shape was made using Go Kreate Dies, love these.


This is the first time I have used the cloud die, can't believe I bought it and had forgotten about it, lol.


Copics Used:-
Skin E00, E000, E11, Blush R20
Browns E25, E31, E50, E47
Reds R32, R35, R37, R59

Hugs Tracy x

Follow Me on Pinterest

Monday, February 24, 2014

a little late

Hello,
I am a little late to introduce three new Design Team members, 
you all have some work from them on the blog.

But still I am  happy be able  to introduce the new stars in our team.

At first Miranda van den Bosch, she is my countryman, we are happy to have a well known mixed media artist in our midts.
 She will learn us how to use our copics in Art Journaling, Mixed Media projects and ofcourse in coloring images. Her hair is as colourful as her art.
Miranda , Welcome!

Miranda van den Bosch
 This what Miranda tell us about herself.

“Hi my name is Miranda and I live in the Netherlands.
I’m a mixed media artist and art journaller.
I used to draw and paint a lot. Mainly animals and elves. About 5 years ago I discovered stamping and got addicted ever since. I love playing with stamps, ink, paints and all kind of materials. You can call me a true art supply junkie. In november 2013 I discovered the fun of using copics in my art and I fell in  love with the gorgeous colours and the versatility of the markers.
I work a lot with stencils and with my copic airbrush you can make the most wonderful backgrounds…which I will show you in my postings on the Copic Marker Europe blog”.


**********
The second lady is  a new Copic Instructor from sunny Italy, the girl with the  laughing face

 Sandra Omarini

We are glad to have this talented Italian lady in our team, she will surprise us with nice colouring and we hope tutorials , she made together with her husband Maurizio, also a copic Instructor.
Welcome Sandra !!

Sandra introduces herself as follows:

I’m Sandra , I’m Italian and since many years creative hobbies are my passion.
But I have  discovered that one of my favourite technique  is Copic colouring and card making, that is the reason why I love to became Copic Instructor for Italy.
To be DT member of the Copic Marker Europe Blog is a dream that comes true, is a really a great honour and a unique experience!

I will do my best  to share this passion with all of you  and I hope you enjoy my projects.

I love Copic Markers, they are so gorgeous, it’s possible get a lot of shades and use them is really funny . 

Copic passion is contagious  and has to be shared!!


**********
Cristina Valenzuela

Also from Spain we have DT member now, we are so happy to have Cristina Valenzuela with us. she is our Copic Instructor for Spain . 
She creates beautiful cards with a lot of different images.

Her is what Cristina want you to know about her:

Hi, this is Cristina Valenzuela and I am ... wait, do I have to tell my age? 
Well, let's say I was born on May 1st ... I've got a four-year-old girl, Elena, who likes tearing up papers, the buttons containers ... and taking anything she Finds from my scrap room.


I've got a husband, HernĂ¡n, who've seen how all scrap papers and stuff have invaded the house and taken all over the place. I live near Barcelona, in Spain. I love spending the day between colours and papers.

Since I think I have not said yet, it is a pleasure for me to greet all of you and I am very glad to be here and be DT from Copic Europe


I hope we will see a lot of beautiful and inspirational posts from these ladies.

Regards Diny

Sunday, February 23, 2014

An Airbrush tutorial by Miranda

Hi, it's Miranda again and today it's my turn to publish. 
And even better I have a little tutorial for you to share.

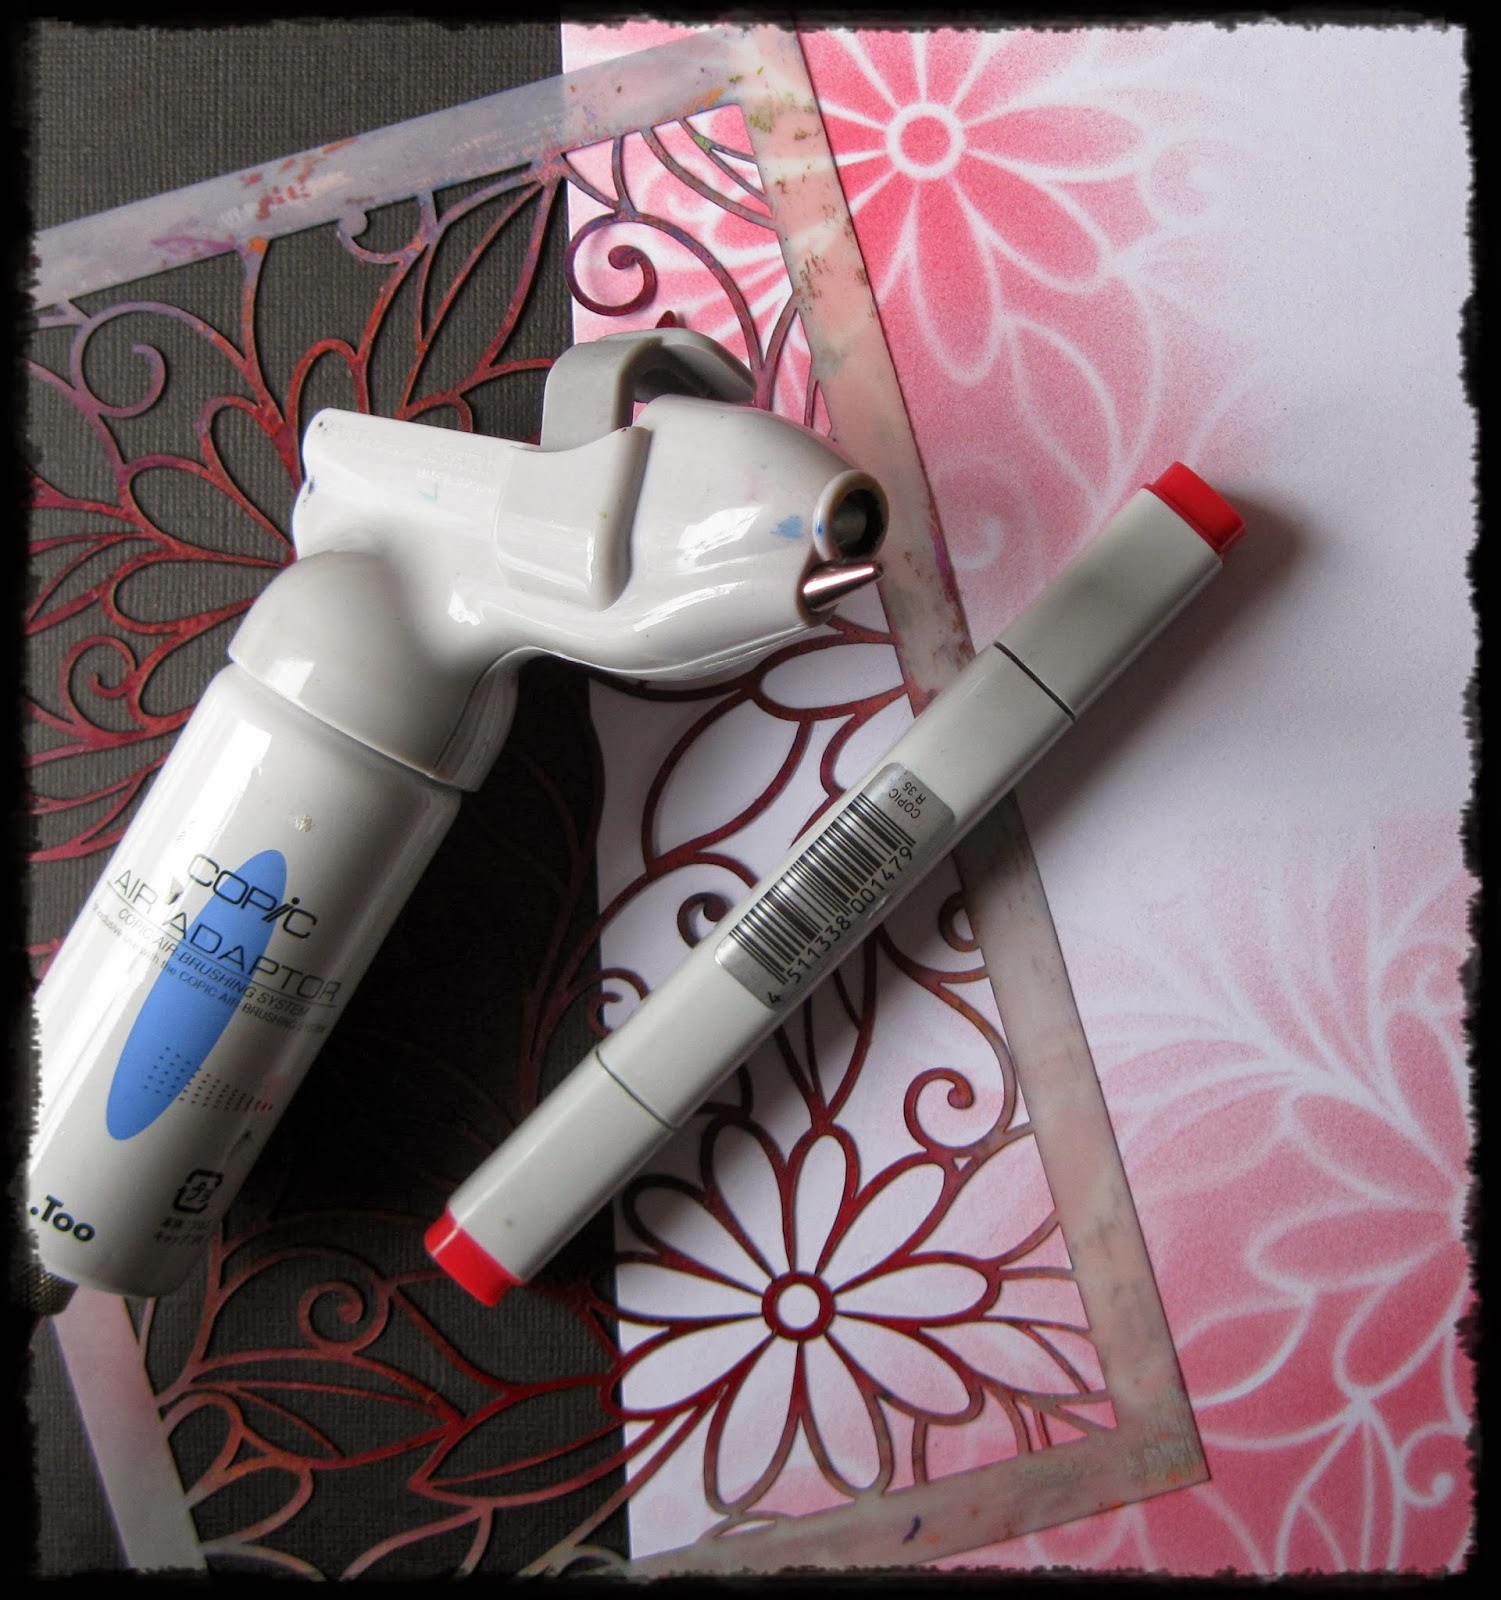
I love to work with my copics and airbrush, because you can make such wonderful backgrounds in a very easy way. Let me show you how:


Step 1:
Choose a template that you like (I used the flower by Dutch Doobadoo)  and some copic colours (RV11, R24 and R59). 
Put your marker with the chiselpoint in the airbrush and spray some ink through the template. If you keep your marker close to the template the colour will be more intense than if you keep a little distance. This way you can make variations in light and dark hues. 
Be careful not to spray ink to close to the edge of the stencil because that will give you a ugly kind of border in the middle of your project. 


Step 2:
Repeat with another colour.


Step 3:
And again I picked another colour. 
Because the alcohol inks are transparant you can make some lovey layers. 


step 4:
For my last layer I used another template (Diamond by Dutch Doobadoo) and another colour (YG07).
Red and Green are opposite each other in the colourwheel. When using inks or paints red and green would normally turn muddy, but the alcohol ink in the copics dry immediately after using. This gives us a great advantage over ink or paints, you can use it more easily on your project. Allthough you still have to be a little careful when layering it on dark red places because of the transparancy of the ink. It will look a bit muddy in such places. 


Step 5:
Another fun way of using the templates is not adding another colour, but bleach out some colour by using the activator. Just spray a little activator through the stencil and see what happens. 


Step 6:
I also like stamping with copics. Just add the copic ink with the chiselpoint on your stamp.
Spray a little activator on the stamp. Not too much otherwise your stamp will smudge. I like to keep a distance of about 20 cm or spray some activator in the air and move the stamp through the activatormist. 


Step 7
I used 2 different stamps and 2 stencils. I never use more than 3 different stencils on small projects as it might look to heavy. 


Step 8:
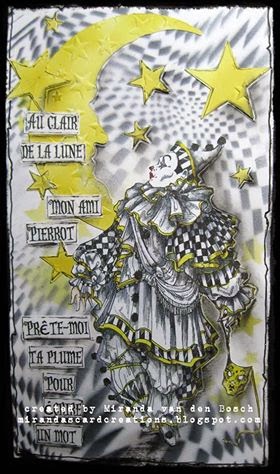
Use your background in a project. I used it to make a card for my mum's birthday. 
I used an image by Aurora wings. Colours I used for colouring the image are: 
E00, E02, E13, BV00, RV11, R0000, R24, R59,Y0000, YG07, YG17 and G94.
The flowers are from the hobby craftshop and are coloured with my airbrush too. 


I hope you liked my tutorial. If you have any questions about this technique please let me know.

have a fabulous day

hugs
Miranda


Saturday, February 22, 2014

Do not postpone, enjoy today


Hello copic fans,

It's my turn today (Wenda) to show you a card, I made one with a digi from Wee Stamps
The circle and the leaves I made with the melting pot and finished with Stampendous

The image is 6 x 6 cm, So it was not easy to colour.


The colors used are:
Hair :  E37 - YR24 - Y26 - Y15 - Y21 
Skin : R22 - R20 - E11 - E00 - E000
Purple / Red : R89 - R85 - R83 - R81
Green : YG97 - YG17 - YG13 - YG11
Flowers : R85 - R00 - R0000
Background : B00 - B000 - B0000

I hope you got new inspirations to make your own cards.

Have a nice day.

Friday, February 21, 2014

Winner of Challenge 25

Hello dear Copic Fans,
It's me again, Barbara/Kreativmonster,
for the Copic Marker Europe Blog Challenge.
To me, it looks like as if Valentine has been more inspiration for you than challenge, we had sooo many lovely entries, that it was hard to make a choice! Thank you so much for that!

And now, here comes the winner of
Challenge 25, "Valentine", it is....


Congratulation, Craftyanny! Please send us an email to copiceurope@gmail.com
with your request for 3 Copic Sketch markers.

Hugs
Barbara/Kreativmonster
for
CME team

Thursday, February 20, 2014

Wishing You Sunshine!


Hello everyone! It's Delphine here today with a little scene to wish you sunshine! 


For this scene, I used 3 stamps by CC Designs. First, I stamped the character Olivia's Brella, masked her to stamp the Puddle and added the clouds and sun from the Cloudy Skies Set. The sentiment is from the Rainy Day Set. To avoid having a low, flat horizon behind my character, I mimicked bushes with my Copics. 


Skin: E0000, 000, 00, 02, 11
Hair: E55, 74, 79
Boots and top: V01, 04, 06, 09, RV52, 63, 66
Skirt: E40, 41, 42, 43
Umbrella: B34, 37, 39, C1, 3, Y32, 35, 38
Grass: G28, YG25, 17, 46, 67
Bushes: G28, 40, 43, 46, YG03
Sky: BG000
Clouds and Sun: BV20, C00, 0, 1, Y000, 00, 11

I hope I managed to bring a little sunshine to you! Thank you very much for your visit, have a lovely day! Hugs,
Delphine xx

Wednesday, February 19, 2014

New Challenge

Hello Copic Fans,
It's me again, Barbara/Kreativmonster for the
Copic Marker Europe Blog Challenge.

Thank you for the lovely entries to our Valentine Challenge, they were just gorgeous!

Here is our new challenge for you:

Colouring Ground

Interesting challenge, isn't it?

Here are some inspirational projects from our talented DT-Ladies:

Angie:


Delphine:

Diana/DeeDee:

Wenda:

So now, it's your turn! Show us your work, and you can win
3 sketch markers of your choice.
Please be aware that only entries from those living in Europe, North Africa and the Middle East are possible.

To enter visit our Challenge page and enter your link in Mr Linky
before the end of 18th March 2014.

The winner will be announced 21st of March 2014.

We are looking forward to see your creations!
Hugs
Barbara/Kreativmonster
for CME team

Tuesday, February 18, 2014

Izzy's Stroll

Hi Everyone,

Not my usual style I'm afraid.  When I made this card for CHA last month I was struggling with RSI in my arm, so it was really painful but as it was for CHA it needed to be done, so I'm sorry my colouring isn't up to its usual standard.

The image is the new release by Candibean called Izzy's Stroll and is available from  Little Darlings Rubber Stamps.  I have also used the Petals and Lace  6x6 paper pad also available from Little Darlings.


The sentiment is from the new release also, it comes in a set and is called Vintage Affections Vintage Birthday.


Copic Markers:-
V17, V15, V12, V00
YG67, YG63, G99, G20
E00, E000, E11, R20
C5, C3, C1, C00
E25, E31, E50


Hugs Tracy x

Follow Me on Pinterest

Sunday, February 16, 2014

Coloring Jeans Tutorial

Hello! I'm Cristina Valenzuela  and I am a new member of the Copic Marker Europe Blog's designteam .

It's my turn to teach a simple tutorial on coloring jeans.
I chose a stamp by Elisabeth Bell for my step by step coloring .

Often I have been asked how to color jeans.
One of the best options are the Copic colors from, the color family B ( blues ) and the nineties numbers ( 91, 93 , 95, 97 and 99 ) .

I'm going to color this picture using these colors, a piece of jeans fabric and Activator .

First, I color everything I want to lookt like jeans with the lighter shade B91 .


 Then I add the shadows with darker B97 . I'm going to color from dark to light on a colored base and a clear color.

 Blending on B97 to B95 .

 Blending on B95 to B93 .


 And finally, apply Activator to a piece of jeans fabric and affixed it on my colored jeans  to give it texture and realism.

And this is the result! I hope you find it useful and practice a lot.


One more tip for a much more realistic result: Color everything as shown above, but before printing the fabric of jeans cover the image with W3. This has the effect of dirty or worn jeans. Finally apply the Activator with the piece of jeans fabric as before.
(This example image is from Sureya)


Copic colors that I used:
Jeans: B91 , B93 , B95 , B97 .
Shirt: R00 , R11.
Skin: E21 , E11 , E02 , E00 .
Bear : E51 , E53 , E55 , E57 , E44 .
Hair: E41 , E43, E44 , E47 .
Reds : R59 , R35 , R32 .
Head Band : C0, C1 and R35 .

Hugs and Kisses!

Saturday, February 15, 2014

Birthday Flowers

Hello, dear Copic Fans,
today, it is Barbara/Kreativmonster for you. My card for today is a mixture of colouring and air-brush and it shows one more time the versatility of Copic Markers.
I stamped the beautiful image from IndigoBlu with "Gray Flannel" from Memento and coloured it.
Then I cut out a mask, covered my colourwork and sprayed R01, R11 and BG93 around the image with the airbrush.
I used these Copic Markers
Flowers: R01, R11, R12 and R14, BG93 for the core
Leaves: BG90, BG93, BG96
Shadows: T2


This card is for my boss, she likes my "usual" cards with coloured images, so I hope she will like this style, too.
Big Hugs
Barbara/Kreativmonster

Friday, February 14, 2014

You're a Sun-sational friend


Goodmorning dear readers,

Happy Valentines day to all of you, I hope you're spoiled today.


I have made this card for you, Using my Copic Airbrush machine


First I stamped the image with versafine onyx black on my DCP papier
And I masked the flowers.
I airbrushed the background with yellow orange purple and red colors
When I was satisfied I removed the mask from the flowers and color them
With R59 R46 R43 the leaves with G46 G43          


On the wire in the stamped image I glued Indigo Blue flakes and also in the corners
This wonderful stamp is also from IndigoBlu the sentiment is an old one.

I hope you like the card especially for you on the nice beautiful day,
thank you for leaving your comment


Thursday, February 13, 2014

From the Heart


Hello! I am Cristina Valenzuela with someCopic inspiration. 
It's my first contribution to the blog of Copic Europe, I am very happy to be here!

For my card I used an image from The Paper Shelter. I love this stamp! 


 I created a card with Shabby Chic style. 
The metal parts, wood and papers are treated with white paint to create a harmony. To unify these papers with colored image, I spotted a refill (RV34), I put some in a spray. 

Hope you like it! 


Copic colors that I used:
Hair: E41, E42, E43, E44, E47 Roses: V91, V93
Skin: E000, E00, E21, E11, R11, E02
Eyes: BG72, BG75, BG10
Background: BG0000, BG000, RV32
Clothing and Shoes: RV91, RV93, RV95, R000 and BG72, BG75
Column: C0, C1, C3, C5

Hugs and kisses!