Followers

Monday, April 26, 2021

Spotlight on Copic Yellows & a Tiddly Inks video!

Hello everyone! It's Delphine here today to share some Yellow inspiration! At the end of every month, I  post a card featuring one colour family and I picked Ys for today's post. I really like focussing on one colour family, I am clearly NOT a Yellow person and rarely use them, so it's nice to push myself out of my comfort zone! 

There are 12 Y Ciao and 20 Y Sketch markers. My card today uses Y02, 06, 11, 15, 21, 35, 38. You don't need to have ALL markers to get good results, just pick a few and use them for different parts of your image, or just by changing one marker in your combo:) Here is my final card:


The image I used is by Tiddly Inks, called Wryn Ducky Dance. Of course, thinking of yellows, my first thought went to ducks ;) I printed my image and die cut it with an MFT die, then coloured it in Copics. The DPs I used are by Doodlebug.

You can see the whole colouring process below:

Just a few tips and remarks:

- Note how I shaded my Yellow with a light BV on my ducks, a purplish colour works well for shading yellow.
- I put a bit of yellow here and there to have some harmony in my whole image: a touch of yellow on her boots, as if they were slightly tinted by all the yellow around, a bit of Y21 in the background, of course a yellow umbrella with some markers already used for the ducks (Y38, and Y15 replaced by Y35) and a couple more for a nice slight difference (Y06, 02). I also put a touch of yellow highlight in Wryn's hair.
- I matched my yellow markers with BV markers, yellow and purple are complementary so will always work well together. You find complementary colours on the colour wheel, they are opposite each other;)
- For the rain, don't be afraid to add a few strokes of any light blue colour across your image - it's a bit scary, but you will get a nice suggestion of falling rain. Also, you can add a few lines with a white gel pen, which I did in the bottom part of my image to suggest rain, and I also added a bit of white on the ground if you look closely :)

Here is a close up on the image and the list of all Copics I used:


Skin: BV00, E000, 00, 11
Hair: E35, 39, Y21
Clothes: BV08, 13, 17 
Boots: E31, 33, 35, 39, Y11
Umbrella: E33, 39, Y02, 06, 35, 38
Ducks: BV02, E33, 35, Y11, 15, 38
Ground: B60, E41, 43
Background: E31, 33, 50, Y21
Rain: B60


That's all from me today, thanks for stopping by! Hugs,
Delphine xx

Thursday, April 22, 2021

Cicci color a horse

 Hi Friends

Cicci here posting from Sweden. 

Today Im going to make a little horse. It was a very little horse a drew and it was a long time that I did such a little drawing. Sometimes I think its so much easier to color big with Copic Markers!! Ok lets get started- I try the best I can with this little little horse:0))

I did a horse in grey some years ago and you found it in the blog, and that was in A4 size!

Another horse by Cicci

Copic Combo

E53 E51 Y21 E95 E99 E00


Step 1
Draw a horse or use a stamp
Start to color with Y21

Step 2
Start with Y21

Step 3
Add E53

Step 4
Add and blend with E51

Step 5
Add E95


Step 6
Add E99

Step 7 

Blend all over with Y21


Step 8
Add and Blend with E51

Step 9
Add more E53

Step 9
Blend with E51

Step 10
Add a little E57

Step 11
Blend with E53


 DONE!!
You can go over with more of the darker color and 
blend it out if you want to 
have a darker brown

If you want more yellow in the color you just add more of E21 or some Yellow marker.
Just use what you like and have fun!!!!

Have a wonderful Day 

HUGS and SMILES!!


Sunday, April 18, 2021

Happy Day

 Hi Everyone, it's Faye here today :)

I decided I would like to colour this bear from the Colorado Craft Company Happy Day set on kraft card. I love the effect of copics on kraft card, they look much 'dirtier' and more grungey than when you use white card.

Aside from this, there are a couple of things to note...

Firstly, when you use copics on a cardstock with a loose weave such as kraft card, the card is thirsty! You will literally feel the card 'suck' the ink from your marker. Take this into account when laying the ink if you are normally quite heavy handed when you colour.

Secondly, wait for the ink to dry before you decide if you need to add more layers of shading. The ink really changes colour when it has dried on kraft card. When it's wet, it will look darker than you would normally expect. But you also can't see the graduation of shading as much as you would be able to notice on a lighter card. Wait. Let it dry. Then adjust. If you go for it while the ink is still wet, you won't be getting an accurate judgement and you may find you keep adding and adding shading that you don't need, which you will then need to correct when it has dried and you see what you've been left with.

You can watch me colour this bear on my You Tube Channel by clicking the logo below...


Copics Used...
Bear; E41, E42, E43, W3, W5
Bear Nose; E44
Grass; G02, YG45, G07, W5
Flower; YR23, YR27

Thanks so much for stopping by... Have a great day,

Wednesday, April 14, 2021

Anime Girl in Spring


Hello everyone

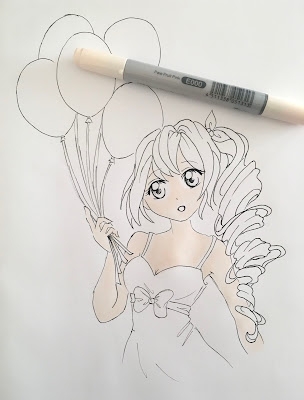
I wish to introduce myself, I am Antonella I love to draw manga or anime.

Here I try to introduce a girl using spring colors.


To create my drawings I always use copic multiliners.


For the base of the complexion use E000


I continue the complexion with E00


To give depth to the complexion and to color the cheeks and mouth I use E93


For the eyes I use C-1


I decided to color the eyes blue, use B000 and B93


For hair base use W-1


To give volume to hair use W-3


W-7 for shaded hair parts


B000 to finish hair


Use B000 to color the dress


B32 for dress shadows


B45 for dress folds


Y000 for flakes


YR31 to give depth to flakes


Use C-3 for balloon cords


For balloons I used: Y02, G00, BV02, R20 and B000


For light points I use a white gel pen


This is the end result

I hope you enjoyed it, thank you for your attention.

Antonella

Saturday, April 10, 2021

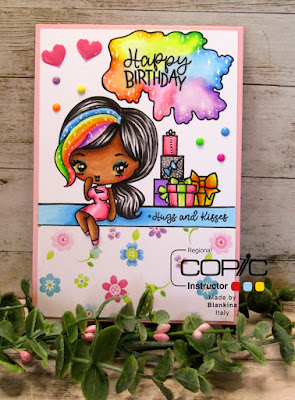
Cheeky Birthday Card in Fun Cheery Colours


Hello ,

Today I have prepared a cheery birthday card for you.

For me April means a month full of birthdays.

I have stamped this beautiful stamp from The Greeting Farm (cheeky birthday) with wicked black hybrid ink onto Perfect Colouring Paper.

And have started to color her skin, this combination caught my eye during a coloring video and wanted to give it a go too.

Yes it starts with a dark purple, V 17...

In the video I show all steps of the colouring of the whole card ..

 VIDEO 

STEP BY STEP COLORING VIDEO

Here it seems she is floating in the air, so I have added something to sit on with my Copic multiliner.

You can see what I did , just two simple lines which were coloured with Copic and I have also added a sentiment from another set from The Greeting Farm called warm wishes.

Here gifts are pilling up, did some masking.

In order to add a piece of design paper on the bottom I have fussy cut the left side, just along the line and her legs. 

Now it is easy to add the design paper  and glue it onto the Perfect Colouring Paper.

This is the final card, hope you have enjoyed your visit here on the blog and that you liked the video too. 

Copic : 

Skin : V 17, E 35, E 33, E 13 

Rainbow colors : 

Pink - RV10, RV 21, RV 25

Orange - YR 20, E 02, YR 07

Yellow - Y000, Y 15, Y 19

Green - YG00, YG 05, G 05

Blue - B00, B 12, B 14

Violet : V 000, V 01, V04 

Hair : T 8, T 4, T 6

Dress : RV 10, RV 21, RV 25

Copic multi liner  0.5 

White gelly roll pen for accents 

Stamps: The Greeting Farm ( cheeky birthday, warm wishes )

Wicked black hybrid ink and enamel dots/hearts Kraftin Kimmiestamps

Design Paper LOTV 

Hugs Blankina 


Saturday, April 3, 2021

Spring is here!

Hello everyone! It's Delphine here today to share a spring card and video tutorial featuring a sweet Polkadoodles image called Honeypie Spring Lambs. Here is the final card:

I printed my image and die cut it with an MFT Pierced Circle Die, which I layered with a Spellbinders Classic Scalloped Circles Large die cut. The DPs and sentiment are by Bo Bunny. And my image, of course, was coloured in Copics - you can see the colouring process below:

Here is a close up on the image and the list of all the Copics I used for it:

Skin: BV00, E11, YR000, 00
Hair: E57, 79, YR21
Blue: B02, 05, 18, 39
Pink: R85, RV23, 29
Flowers: R02, 85, RV10
Sheep: C1, 3, R20, YR000
Butterflies: R05, Y35
Sky: B000, 00
Grass: G99, YG00, 06, 17, 23

Thanks for stopping by, have a Happy Easter everyone! Hugs,
Delphine xx