Followers

Showing posts with label black hair. Show all posts

Saturday, April 10, 2021

Cheeky Birthday Card in Fun Cheery Colours


Hello ,

Today I have prepared a cheery birthday card for you.

For me April means a month full of birthdays.

I have stamped this beautiful stamp from The Greeting Farm (cheeky birthday) with wicked black hybrid ink onto Perfect Colouring Paper.

And have started to color her skin, this combination caught my eye during a coloring video and wanted to give it a go too.

Yes it starts with a dark purple, V 17...

In the video I show all steps of the colouring of the whole card ..

 VIDEO 

STEP BY STEP COLORING VIDEO

Here it seems she is floating in the air, so I have added something to sit on with my Copic multiliner.

You can see what I did , just two simple lines which were coloured with Copic and I have also added a sentiment from another set from The Greeting Farm called warm wishes.

Here gifts are pilling up, did some masking.

In order to add a piece of design paper on the bottom I have fussy cut the left side, just along the line and her legs. 

Now it is easy to add the design paper  and glue it onto the Perfect Colouring Paper.

This is the final card, hope you have enjoyed your visit here on the blog and that you liked the video too. 

Copic : 

Skin : V 17, E 35, E 33, E 13 

Rainbow colors : 

Pink - RV10, RV 21, RV 25

Orange - YR 20, E 02, YR 07

Yellow - Y000, Y 15, Y 19

Green - YG00, YG 05, G 05

Blue - B00, B 12, B 14

Violet : V 000, V 01, V04 

Hair : T 8, T 4, T 6

Dress : RV 10, RV 21, RV 25

Copic multi liner  0.5 

White gelly roll pen for accents 

Stamps: The Greeting Farm ( cheeky birthday, warm wishes )

Wicked black hybrid ink and enamel dots/hearts Kraftin Kimmiestamps

Design Paper LOTV 

Hugs Blankina 


Friday, July 12, 2019

Retro Beach Card with Video

Hi all Copic friends from around the world!

It is hot ..it is Summer and many people think about going to the beach.

Today I have coloured up my fun retro stamp from the Greeting Farm,
she is a " cheeky " stamp from the 10 year celebration rubberstamp set which I have recently bought.

I have stamped her with some black Krafty Kolours hybrid ink onto Perfect Colouring Paper.

And have started to give her some nice suntan with my Copic :)


I have prepared a short video for you,
enjoy watching my colouring step by step.


Half way colouring...


Did you like my little video?
Hope so..

Here is the final result, I have tried several card designs 
but in the end I have chosen a simple
card design to give that retro touch!

Papers from Craft sensations,
stamp The Greeting Farm ( 10 years celebration rubberstamp set )
dies : Marianne Design and Modascrap

And last but not least;

Copic :
Skin : E 11, E 13, E 15
Eyes . YG 91, YG 95
Bikini : R 24, R 29, R 59, white gel pen
Hair : C 4, C 5, C 9, B 24, B 28
Shell : E 50, E 55
Flower : RV 11, RV 14, RV 19
Lips : molotow red pen 

Enjoy your Summer and do not forget to bring your Copics with you on your holidays !

Sunny Hugs 
Blankina

Thursday, March 1, 2018

Black Hair

Hi Everyone, it's Faye here today :)

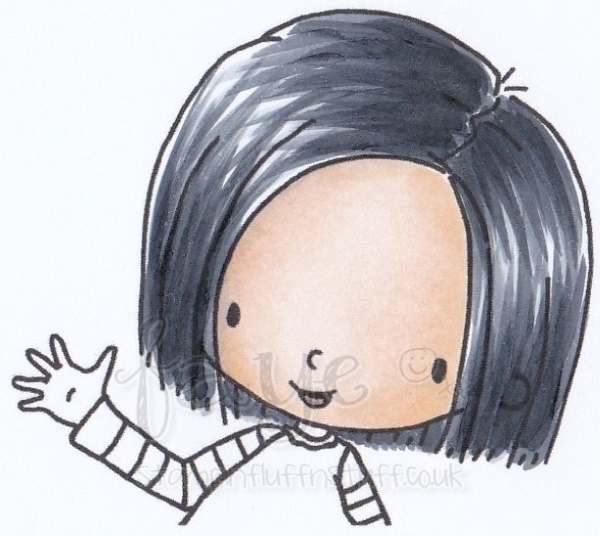
I thought I'd chat to you about colouring black hair and the different effects you can achieve with your Copics. I am using a stamp called Ellie Says Hi, from Tiddly Inks.

When I colour hair with flicks, I prefer to start with the lightest colour and work up to the darkest. This means I do not bleach out anything I have done before, I don't lose the texture and don't have to repeat the steps again.

Although I am looking to achieve black hair, I actually use very little of this colour (100 or 110), preferring to make the greys work for me. Let me show you with a quick step by step. In this example, I am going to use the Cool Grey Family...

I use C3 to get a base layer of colour down. It really doesn't matter that it's messy at this point, because further layers will hide this ;)

I apply a second layer with C5, again not being too precise, although I try and leave some of the C3 showing

Next up, it's C7 and now I try to be a little careful about where I lay the colour and how much of it

This time, I use C9 and you can see I don't use very much at all

Finally, I use 100 in the areas under the chin only. This pops these little bits back and adds depth

As I mentioned, in the samples above I have used the Cool Grey Family. But I thought it would be interesting to show how different each Grey Family looks. It's easy to get caught in a colour rut... if you have them all, it's fun to play with them all!

Top Left - Cool Greys; C3, C5, C7, C9, 100
Top Right - Warm Greys; W3, W5, W7, W9 110
Bottom Left - Neutral Greys; N3, N5, N7, N9, 100
Bottom Right - Toner Greys; T3, T5, T7, T9, 110

Of course, sometimes super shiny black hair will pick up ambient colour from the light around it. You can show this by starting with a colour as the base layer. In the samples below, I have again used the Cool Greys (did someone say something earlier about getting comfortable with certain colours?!), but I started with B21 on the top sample and BV04 on the second one...


Compare how different they look to the samples coloured only with Grey.

Finally, you don't even have to use the Greys for black hair. Look how gorgeous these two samples look. On the first, I have used BG72, BG75, BG78 and N5. On the second, I have used BV20, BV23, BV25, BV29 and C7...


So Copic Lovers, get out your Markers, mix them up and have fun!

Copics Used...
Skin; E000, E00, E21, E70
Hair; C3, C5, C7, C9, W3, W5, W7, W9, N3, N5, N7, N9, T3, T5, T7, T9, 100, B21, BV04, BG72, BG75, BG78, BV20, BV23, BV25, BV29

Thanks so much for stopping by... Have a great day.

Tuesday, July 8, 2014

Soul Summoning


Hello dear Copic lovers!
My name is Yunuyei and today I'll present you my first entry here.

This is my interpretation of the Indian death goddess Kali.

She will be a character in my Manga/Doujinshi/Comic Hell's Kitchen.

At first I started with a digital concept sketch.
It helps a lot  because mistakes are difficult to correct when you're working with Copics.


Here you can see some WIP-pictures (Work in process).


In the end I added some glow effects with Photoshop


Copic used:

Skin: E53,E33, E31, Y11, Y00, BV31, BV20
Black: C9, C7, N9, N7, N5,BV25, BV23
Skulls: W5, W3, BV23, Y00
Red: R46,R43, R37, R35, R32, R27,Bv25, BV23
Background: V99, V095, BV25, BV23, W5, E74, E70. E04
Sky: V95, BV23, RV91, RV11,R32, R12, V12, BG000, B000, YR20, YR01, YR00, E51, E00
Jewelry: Y28, BV25, Y00
Scythe: BV24, BV23, C5, C3. E40, E47, E44
Magic: G43,G21, G20, G00, G000 ,YG11, YG03, YG00, YG0000, Y21, Y04, Y00

Multiliners in different colors and opaque white


I hope you like my first entry.
If you interested in drawing skies you can take a look at my tutorials :
Sky, Rain and Snow Tutorial (German)
Sky Tutorials (English)

Regards,

Wednesday, August 8, 2012

Winner of Challenge 7 (Colouring Black Hair/Schwarzes Haar kolorieren) and new Challenge!

Hello Copic fans,
It's me again, Barbara/Kreativmonster for the Copic Marker Europe Blog Challenge.
I have to apologize that it took me so long to announce the winner and start the new challenge, but we had such a lot of things going on celebrating our first birthday here on Copic Marker Europe Blog and I have been more or less absent for sad private reasons.
Thank you for all the wonderfull entries on our last challenge, there were so many lovely cards!
***
Hallo Copic-Fans!
Ich bin's wieder, Barbara/Kreativmonster, mit der Copic Marker Europe Blog Challenge. 
Ich muss mich dafür entschuldigen, dass es so lange gedauert hat, einen Gewinner auszusuchen und die neue Challenge zu starten, aber es war soviel los hier auf dem Copic Marker Europe Blog wegen der Feier unseres ersten Geburtstags und ich war aus traurigen persönlichen Gründen mehr oder weniger abwesend.
Danke für all die wunderbaren Einträge, es waren so viele schöne Karten dabei! 
 
Finally, here comes the winner of Challenge 7, it  is....
***
 Hier kommt nun endlich die Gewinnerin der Challenge 7, es  ist...

#25 Trine


Trine, please send us an email with your request for 3 Copic Sketch markers.
 *** 
Trine, nimm bitte per E-Mail Kontakt mit uns auf und nenne uns deine 3 gewünschten Copic Sketch Marker.

***************************************************************************
Here is our new challenge for you:
***
Hier ist unsere neue Challenge für euch:
 
  A Summer Card
Eine Sommerkarte

The Design team has shown great summer cards here in the last weeks, so let's  get inspired!
***
Das Designteam hat hier in den letzten Wochen  großartige Sommerkarten gezeigt, also lasst euch inspirieren!

So now, it's your turn! Show us your work, and
you can win 3 sketch markers of your choice.
Of course, we are happy about participants from all over the world, but we can only send Markers to winners who are living in Europe, North Africa and the Middle East.
Enter your link in mr Linky
before the end of September 2nd.
*** 
Also, jetzt seid ihr dran! Zeigt uns Eure Werke,
Ihr könnt 3 Sketch Marker Eurer Wahl gewinnen.
Natürlich freuen wir uns über Teilnehmer aus der ganzen Welt, aber wir können die Marker nur an Gewinner schicken, die in Europa, Nordafrika und dem Mittleren Osten leben.
Tragt Euren Link in Mr. Linky ein
Teilnahmeschluss ist der 2. September.

To enter visit our Challenge page 
Auf unserer Challenge Page könnt ihr euch eintragen
We are looking forward to see your creations!
Wir freuen uns darauf, eure Werke zu sehen!
Hugs
Barbara/Kreativmonster
for
CME team

Saturday, February 25, 2012

In love with these images


Hello,
Hallo,
 as I have mentioned several times on this and on my other blogs, I love the images of Saturated Canary (Krista Smith is the designer). The hair, big eyes and layered clothing, they ask to be coloured with Copics. I made some cards for the show in Frankfurt, this was one of them. I think this is is such a girly girl with her bucket full of kisses (her doggie) 
Wie ich schon mehrmals auf diesem und auf meinen anderen Blogs erwähnt habe, liebe ich die Motive von Saturated Canary (die Designerin ist Krista Smith). Diese Haare, die großen Augen und die vielschichtige Kleidung bitten doch gerade zu darum, mit Copics koloriert zu werden. Ich habe ein paar Karten für die Messe in Frankfurt gemacht, das ist eine davon. Ich finde, das Motiv ist so ein typisches Mädchen mir ihrem "Bucket full of Kisses" (Eimer voller Küsse) - ihrem kleinen Hund.

The colouring is matched with the Pion Papers, they have grey and old purple in them. Of course we have the matching colours in our Copic Range. 
I created an easel card, always a great design for demonstration!  Under the girl I stippled  some soil with a confetti technique, this technique is also used around the image, but in lighter colours.
Die Koloration ist auf die Pion Papiere abgestimmt, sie enthalten Grau und gedecktes Lila. Natürlich bietet die Copic Farbpalette die passenden Farben.
Ich habe eine Easel-Card gemacht, das ist eine großartige Kartenform für Vorführungen. Den Boden unter dem Mädchen habe ich in der Konfetti-Technik getupft. Diese Technik habe ich auch um das Motiv herum angewendet, aber in helleren Farben.


To dress up my card, I used different dies from Memory Box, Marianne Design and Magnolia. Some lace, flowers and text completed the design.
Um meine Karte zu verzieren, habe ich verschiedene Schablonen von Memorybox, Marianne Design und Magnolia verwendet. Ein Stück Spitze, ein paar Blumen und ein Text runden das Design ab. 


To colour this beauty I have used the following Copic Markers:
Um diese Schönheit zu kolorieren habe ich die folgenden Copic Marker verwendet:


Skin/Haut E0000-000-21-11
Clothing/Kleidung RV0000-91-93-95-99 and
N0-3-4-6 and  BG 93-96
Hair/Haar N0-3-4-6-8
C00
I wish you a nice weekend, don't forget our challenge with the subject Doodling
Ich wünsche euch ein schönes Wochenende, denkt an unsere Challenge zum Thema Doodling.
Greetings Diny


Tuesday, February 7, 2012

Tutorial: Coloring Black Hair

Hello Copic fans!

***

Hallo Liebe Copic-Fans!

Today it's my (DeeDee) turn to share a tutorial with you and I want to show you my way of coloring black hair.

***
Heute bin ich (DeeDee) an der Reihe und zeige euch ein Tutorial, wie ich schwarze Haare bei meinen Motiven coloriere. 

On this image I already colored the skin. I always do the skin first, if you do it later it can happen that your dark ink (in this case black) may run into the lighter colors. And this does not only not look pretty, it also means a lot of work and trouble if you have to start all over again.

***
Hier habe ich schon mal die Haut coloriert. Das mache ich immer als aller erstes, weil es sonst passieren kann, dass euch die dunkle (hier schwarze Farbe) in die hellere Farbe beim colorieren verläuft. Und das sieht natürlich nicht schön aus und macht nachher viel mehr Arbeit und Ärger, wenn man noch mal von neuem beginnen muss.

To follow this tutorial you need these Copics:

***

Für dieses Tutorial braucht ihr folgende Copics:

C3 - C5 - C7 - C9

Of course any other grays with the same numbers work as well.

***

Natürlich gehen auch alle anderen Grautöne mit dieses Farbnummern.

The image I used for my tutorial is a digi stamp by Saturated Canary and is called Whispy, a Fairy.

***

Das verwendete Motiv in meinem Tutorial ist ein Digi Stempel von Saturated Canary und heißt Whispy, a Fairy.


♥ ♥ ♥ ♥ ♥ ♥ ♥ ♥ ♥ ♥
Step 1:
When doing hair I always start with the lightest color (C3) and leave those areas without color that I want to be the lightest later.

***

Schritt 1:
Ich beginne bei den Haaren immer mit der hellsten Farbe (C3) und lasse die Stellen frei die später am hellsten sein sollen.


♥ ♥ ♥ ♥ ♥ ♥ ♥ ♥ ♥ ♥
Step 2:
I go on with the darker tone (C5) and color the areas, that I colored with my C3 before, leaving a little of the C3 uncovered. I think the photo shows it.

***
Schritt 2:
Nun nehme ich die nächst dunklere Farbe (C5) und gehe damit über die vorher colorierte Fläche von C3. Male aber NICHT darüber hinaus, sondern lasse einen kleinen Rand zu C3. Ich denke, das Foto zeigt es. ;0)


♥ ♥ ♥ ♥ ♥ ♥ ♥ ♥ ♥ ♥
Step 3:
I repeat what I did in step 2 using C7.

***

Schritt 3:
Nun mache ich das selbe wie in Schritt 2, nur mit der nächst dunkleren Farbe C7.


♥ ♥ ♥ ♥ ♥ ♥ ♥ ♥ ♥ ♥
Step 4:
And than again the same using the darkest tone C9.

***

Schritt 4:
Und das selbe noch mal mit der dunkelsten Farbe C9.


♥ ♥ ♥ ♥ ♥ ♥ ♥ ♥ ♥ ♥
Step 5:
To make the color transitions from C9 to C3 a little bit softer I use the C5 marker and blend the areas from C9 to C3.

***

Schritt 5:
Um die Farbübergänge von C9 zu C3 ein wenig weicher zu machen, blende ich nun noch einmal mit C5 über C9 bis zu C3.


♥ ♥ ♥ ♥ ♥ ♥ ♥ ♥ ♥ ♥
Step 6 - last one:
Now I use C3 to color all the remaining areas and blend it all together - until I like the result. Make sure to not color too far into the dark areas (I didn't go any further than into the C5 areas) or the color might fade and bleed out of your outlines.

***

Schritt 6 (und letzter Schritt) :
Nun blende ich mit C3 so lange über die Fläche, bis mir der Farbverlauf gefällt! Dabei solltet ihr darauf achten, dass ihr nicht zu weit in die dunklen Bereiche geht. In meinem Beispiel bin ich nicht weiter als in den C5 Bereich gegangen. Sonst blenden die Farben unschön aus und ihr bekommt hässliche Ränder.


♥ ♥ ♥ ♥ ♥ ♥ ♥ ♥ ♥ ♥
And this is my completly colored image.

***
Und das ist mein fertig coloriertes Motiv.


♥ ♥ ♥ ♥ ♥ ♥ ♥ ♥ ♥ ♥

Copics:
Haut/Skin: E13 E11 E00 E000 E04 R20
Haare&Schuhe/Hair&Shoes: C9 C7 C5 C3
Kleid/Dress: C5 C3 C0 RV95 RV93 RV91
Flügel/Wings: BG0000 Blender0

 ♥ ♥ ♥ ♥ ♥ ♥ ♥ ♥ ♥ ♥
And this is the finished card I made using this cute image:

***
Und das ist meine Karte die mit dem süßen Motiv entstanden ist.


♥ ♥ ♥ ♥ ♥ ♥ ♥ ♥ ♥ ♥

Hugs,
Diana (DeeDee)

Monday, October 31, 2011

Tutorial : How to colour black hair

Hello Copic friends,
hallo Copic-Freunde.

Today I would like to show you how you can colour black hair.
The most importent thing is .... you don't use your black marker !!!
Because when you colour with black,you can't make shadow, in the picture below you can see a coloured image with only a black marker.
Tilda with black hair ...but not what we want :))
***
Heute möchte ich Euch zeigen, wie Ihr schwarzes Haar colorieren könnt.
Am wichtigsten hierbei ist... Ihr benutzt Euren schwarzen Marker nicht!!!
Denn wenn Ihr mit schwarz coloriert, könnt Ihr keine Schatten einarbeiten. Im Bild unten könnte Ihr sehen wie es aussieht, wenn Ihr nur den schwarzen Marker verwendet.
Tilda mit schwarzem Haar ... aber nicht so, wie wir es wollen. :))

How do you colour black hair ??
With your grey markers, you get the best "black" when you use your "C"grey markers. But I know maybe you don't have Cool grey markers, so use than your W or T greys. You need 3 tones and don't go lighter then a 3.
***
Wie coloriert man schwarzes Haar??
Mit grauen Markern. Ihr erhaltet das beste "schwarz" wenn Ihr die "C"-Grautöne benutzt. Aber ich weiß, vielleicht habe Ihr keine Cool Grey Marker. Ihr könnt genauso gut auch W- oder T-Töne verwenden. Ihr benötigt 3 verschiedene Stifte und verwendet keinen Marker, der heller ist als 3.


First colour the darkest parts, I used 7
***
Coloriert erst die dunkelsten Stellen, ich habe 7 verwendet

Then take your next marker (number 5):
***
Dann nehmt den nächst helleren Eurer Marker (Nummer 5):

Then your lightest colour ,3
***
Dann den hellsten Farbton, 3

And all you have to do know is blend everything with your lightest marker:
***
Alles was Ihr jetzt tun müßt ist, die Farbübergänge mit dem hellsten Ton zu arbeiten:

My two Tilda's with black hair ... ofcourse the left one is the good one :))
***
Meine beiden Tildas mit schwarzem Haar... natürlich ist die linke die "richtige". :))

It's the same when you want to colour curly hair, but you must colour the parts of the waves that go inside darker then the ones that are on top.
It's just the same you start with your darkest colour, go lighter and blend at the end.
I hope the pictures below and my little draw makes everything clear about colouring curly hair.
***
Das selbe gilt übrigens auch, wenn Ihr lockiges Haar colorieren möchtet. Aber hier muss der Teil der Locken, der nach innen gewölbt ist, dunkler sein als der Teil der nach außen geht.
Sonst ist es genau dasselbe, Ihr beginnt mit dem dunkelsten Farbton, macht mit den helleren weiter und gestaltet am Ende die Farbübergänge.
Ich hoffe, die Bilder unten und meine kleine Zeichnung beantworten alle Fragen über das Colorieren von lockigem Haar.


I would love to read your comments,
Lots of greetings,
***
Ich freue mich über Eure Kommentare,
liebe Grüße

Peggy