Followers

Showing posts with label Guest Designer. Show all posts

Monday, February 8, 2016

Guest Designer: Cicci from Sweden

Hello everyone

Today I have the honor to be a guest here at lovely Copic Marker Europa. 

My Name is Cecilia Gunnarsson but everyone calls me Cicci :0)
I live in Sweden with my 3 Boys and a big dog. 
When I don't color something, I work as a guitarteacher.  
The interest for painting  I have received from my dad who himself is an artist, He has always encourage me and that means a lot to me..
I started to color with Copics two years ago after many years break from coloring. 
I really love this Markers! 


Right now I'm a DT-member at Through The Craft Room Door (A Magazine for crafters)
and also a DT-member at Scrappers Delights   :0)  


The Image I have colored today is a beautiful girl from Dilly Bean  that calls Daisy girl
I hope you like it!

 The background Did I with lots of dots, fun way to make a background.


Copic Marker colour combo: 
Skin: E50 51 11 V000 Y000 Y21 
Hair: V01 000 05 06 04 09
Eyes: Y000 00 G20 21 G29 14 YG03 Y08 
Black Copic Multiliner 0,3
Flowers: 
YellowY00 02 08 R02
Lilac: V000 01 06 09 
GreensYG03 G20 G21 YG06 G14 G29

Leaves: Y08 G29 YG00 03 G14
Background: G20 21 YG00 Y00 02 08 V01 
Dots: G29 V01 YG02
And a lots of time to do the dots..Lol


HUGS to you all 
CIcci Vid Pennan :0

Monday, October 19, 2015

Same same but different

Hi there!
It's time for me, Christina, to show some cards I have made. Two small cards, almost the same. Very Clean and simple. Only the images and the papers are different. 

I just love to work with these cuties from HÄnglar and StÄnglar. They are a bit big and I like that, more room to colour. Especially hair and faces. 

First the girl


All the papers are from Maja Design and the sentiment says "Limited Edition" (in Swedish). I have used soft colours for the girl, a Blue Violet combination that I have come to love.


Close up at the creases.


And then the boy


Once again the papers are from Maja Design and I have used the same sentiment for this card. The colours are some of my favourite. Can´t live without E40 pens.


Close up

Now my combinations

The girl
Skin E04-11-02-YR00-000
Hair E51-53-55-57
Dress V28-25-22-20
Shoes BV29-V28-BV23
White N1-0-blender

The boy
Skin E04-11-02-YR00-000
Hair E29-27-25-21
Shirt BG75-72-(71)-70
Pants E44-43-42
Shoes E49-47-43

Thats all from me! Have a wonderful week!

Tuesday, July 8, 2014

Soul Summoning


Hello dear Copic lovers!
My name is Yunuyei and today I'll present you my first entry here.

This is my interpretation of the Indian death goddess Kali.

She will be a character in my Manga/Doujinshi/Comic Hell's Kitchen.

At first I started with a digital concept sketch.
It helps a lot  because mistakes are difficult to correct when you're working with Copics.


Here you can see some WIP-pictures (Work in process).


In the end I added some glow effects with Photoshop


Copic used:

Skin: E53,E33, E31, Y11, Y00, BV31, BV20
Black: C9, C7, N9, N7, N5,BV25, BV23
Skulls: W5, W3, BV23, Y00
Red: R46,R43, R37, R35, R32, R27,Bv25, BV23
Background: V99, V095, BV25, BV23, W5, E74, E70. E04
Sky: V95, BV23, RV91, RV11,R32, R12, V12, BG000, B000, YR20, YR01, YR00, E51, E00
Jewelry: Y28, BV25, Y00
Scythe: BV24, BV23, C5, C3. E40, E47, E44
Magic: G43,G21, G20, G00, G000 ,YG11, YG03, YG00, YG0000, Y21, Y04, Y00

Multiliners in different colors and opaque white


I hope you like my first entry.
If you interested in drawing skies you can take a look at my tutorials :
Sky, Rain and Snow Tutorial (German)
Sky Tutorials (English)

Regards,

Thursday, June 28, 2012

Meet our Guest Ann-Marie

    I am so excited to share my card with you today as a Guest Designer for the Copic Marker Europe Blog!  I am so grateful to have been given the opportunity to share my work with you. I am sending Tracy and everyone over at Copic Marker Europe BIG HUGS for the invite!
***
Ich bin so aufgeregt, dass ich euch heute als Gast-Designerin für den Copic Marker Europe Blog meine Karte zeigen darf! Ich bin sehr dankbar dafür, dass mir die Gelegenheit zur Zusammenarbeit mit euch gegeben wird. Ich schicke Tracy und jedem auf dem Copic Marker Europe Blog eine feste Umarmung für die Einladung!


          Now... onto my card!  For my guest design spot, I selected a digi stamp called "Kissy Fish" by Hannah Lynn for Crafts and Me. Isn't she a beauty?  I wish had had hair like her!
***
Nun...zu meiner Karte! Ich habe für meinen Gastauftrittt einen Digi namens "Kissy Fish" von Hannah Lynn für Crafts and Me verwendet. Ist sie nicht eine Schönheit? Ich wünschte, ich hätte Haare wie sie! 


     When I color my images, I always color skin and hair first, and in that order.  Afterwards, I colored her dress, fish, flowers in her hair and any other details. I make sure to use the Spica Glitter Pens last. Most times I don't select my design paper first, which can be a problem when it comes to putting my card together, but this time I did. Part of the reason was because I just bought this beautiful new digi paper pad from Crafts and Me.  I have been "shy" about digi paper, but once I saw these gorgeous designs and wide range of colors, I had to have them, so I worked my choice of image and colors around this digi paper.  I printed this paper out on a color laser printer but I have also used an inkjet, and I was shocked at the vibrant colors.  (I use HP Bright White brochure paper to print our my digi paper.)  These digi papers are made for those "magical and mystical" images I love to color! I almost always use Pebbles Blue Iridescent Chalk around my image.  It is not as visible in the picture, but it is there!
***
Wenn ich meine Motive koloriere, koloriere ich immer Haut und Haare zuerst, in dieser Reihenfolge. Danach habe ich ihr Kleid koloriert, die Fische, die Blumen in ihrem Haar und die anderen Details. Als Allerletztes verwende ich die Spica Glitter Pens. Meist wähle ich nicht zuerst das Designpapier aus, das kann zum Problem werden, wenn ich dann die Karte "zusammenbauen" möchte, aber dieses Mal habe ich es gemacht. Ein Grund dafür war, dass ich diesen wunderschönen  neuen digitalen Papierblock von Crafts and Me gekauft habe. Ich habe mich bisher nicht so richtig an digitales Designpapier herangetraut, aber als ich diese zauberhauften Muster und die breite Farbpalette gesehen habe, musst ich es haben, und ich habe meine Motiv- und Farbauswahl an dem Papier ausgerichtet. Ich habe das Papier mit einem Farb-Laser-Drucker ausgedruckt, aber ich habe es auch mit einem Tintenstrahldrucker probiert und war von den lebhaften Farben überwältigt (Ich habe HP Bright White broschure Paper verwendet, um die digitalen Papiere auszudrucken.) Diese digitalen Papiere sind für diese "magischen und mystischen" Motive, die ich zu kolorieren liebe, wie geschaffen! Ich verwende fast immer Pebbles Blue Iridescent Chalk um mein Motiv herum. Es ist nicht erkennbar auf dem Foto, aber es ist da!     
 

   I want to thank Copic Marker Europe for allowing me to share my work and, as always, thank you for your kind comments!
***
Ich bedanke mich bei Copic Marker Europe dafür, dass ich mein Werk mit euch teilen darf und bedanke mich, wie immer, für eure lieben Kommentare! 

Card Recipe:
Kartenrezept:
Cryrogen White Iridescent Paper
Design Paper: Crafts and Me Digital Paper Pack
Bazill Cardstock
Hair/Haare: E29, 25, 31 & 50
Skin/Haut: E000, 00, 21, 11, 13/R20, E95 (cheeks)
Dress/Kleid: YG 97,25, 11, & 00
Fish/Fisch: YR24, Y21, Y00 and Fluorescent Orange
Hair Flowers/Blumen im Haar: Copic Spica Pens
Heart/Herz: R 39, 85, 83, 81, R11
Pebbles Iridescent Chalk
Recollections Bling/Gold Netting from Funkie Junkie
Magnolia Doohickey Die
WOC Metal Corners and Flowers, Prima Flowers

Ann-Marie

Sunday, February 19, 2012

Meet Our Guest Jane


 Hi Copic Fans,
***
hallo Copic-Freunde!

We have another fabulous Guest who is sharing with us today.  Jane better known as Jane's Box of Colours is an artist who can turn her hand to colouring in a wide variety of mediums, but in particular Jane has a love for Copics, which is definitely evident in the photo below, gosh she has used alot of copics.
***
Wir haben eine weiter fabelhafte Gast-Designerin, die heute eine Karte mit uns teilt. Jane, besser bekannt als Jane's Box of Colours, ist eine Künstlerin, die mit vielen verschiedenen Colorations-Techniken arbeitet. Aber Copics liebt Jane besonders, was besonders auf dem Foto unten zu Sehen ist. Mein Gott - sie hat so viele Copics verwendet.

Here's a little bit about Jane:-
***
Hier sind ein paar Informationen über Jane:

I am a farmer's wife and Mum to a teenage son.  I have in the past painted watercolour portraits, designed craft dies and for the last 18 months I have been discovering the world of stamping and Copic markers.
***
Ich bin eine Farmer-Frau und Mutter eines Sohnes im Teenager-Alter. In der Vergangenheit habe ich Wasserfarben-Portraits gezeichnet, Schneidschablonen ("dies") designed und in den letzten 18 Monaten habe ich die Welt des Stempelns und der Copics entdeckt.

I prefer figures to still life or landscapes - and I knew as soon as I saw this little chap at a recent craft fair that he had to join my ever growing collection of stamps.
***
Ich ziehe Figuren Stillleben oder Landschaften vor - und als ich diesen kleinen Cowboy hier vor kurzem auf einer Bastelmesse sah, wußte ich, dass er in meine immer größer werdende Familie von Stempeln aufgenommen werden muss.


Stamp/Stempel:
 "Revolver Hero" by Nellie Snellen

Dies/Schneidschablonen:
Spellbinders Nestabilities Ovals
Quickutz Corner and Stars
Go-Kreate alphabet

Paper/Papier:
DCWV - All About Boys Stack

Misc/Sonstiges:
Chalk ink - various shades
Glitter glue
Cowboy ribbon from stash

........and not forgetting the Copics!!
***
......und nicht zu vergessen die Copics!!


Crafty Hugs
liebe Grüße

Saturday, February 11, 2012

3th card form our talented guest designer Brenda

Hi Everyone,
today I'm showing you my last card as a Guestdesigner for this blog. I hope you liked my cards, I did my best to show you my colourwork. I coloured on DCP paper, and as you can see, its a bit hard to blend the darker colours of the bear. The background I airbrushed with a grey colour.
***
Hallo an alle,
heute zeige ich Euch meine letzte Karte als Gastdesigner für diesen Blog. Ich hoffe, Euch haben meine Karten gefallen, ich habe mein Bestes getan um euch meine Colorationen zu zeigen. Ich habe auf DCP Papier gearbeitet und wie Ihr sicher sehen könnt ist es etwas schwer, die dunkleren Farben für den Bär zu vermalen. Den Hintergrund habe ich mit grau ge-airbrushed.


This lovely card I made for a colleague, who has given birth to her first daughter. Congratulations!
It's not the usual colour group pink, I have chosen a orange and brown card. The image is from Mo Manning, the papers I used are from Wild Rose Studio. The background of the card is made with a nestabillities die, and of course I used some gemstones, and 2 flowers. The card is not so filled up with embellishments, I wanted to keep it light.
***
Ich habe diese süße Karte für eine Kollegin gemacht, die vor kurzem ihre erste Tochter geboren hat. Glückwunsch!
Ich habe nicht in den typischen Pink-Tönen gearbeitet sondern mich für Orange und Braun entschieden. Das Motiv ist von Mo Manning, die Papiere sind von Wild Rose Studio.
Der Rahmen hinter dem Motiv ist mit einem Nestabilitie Die gemacht und natürlich habe ich ein paar Glitzersteinchen und 2 Blumen verwendet. 
Ich wollte die Karte leicht halten, darum habe ich sie nicht so mit Embellishments überladen.

Hair colour/Haare: E55, E53, E51
Bear/Bär: E29, E59, E57,
Skin/Haut: E11, E01, E000, R20
shadow/Schatten: N3, N2, N1
Dress/Kleid: YR68, YR18, E97
vest, sweater/Weste und Pulli: E33, E51 


I hope you like this card, thank you for watching, and your reactions.
***
Ich hoffe, Euch gefällt die Karte - danke für's Schauen und Eure Reaktionen.

Creative greetings,
kreative Grüße
Brenda

Monday, January 30, 2012

An lovely card from our Guest Brenda


Hi everyone,
Hallo Ihr,
I'm going to show you my second card I made as a guest designer for this blog.
ich zeige euch meine zweite Karte, die ich als Gastdesigerin für diesen Blog gemacht habe.

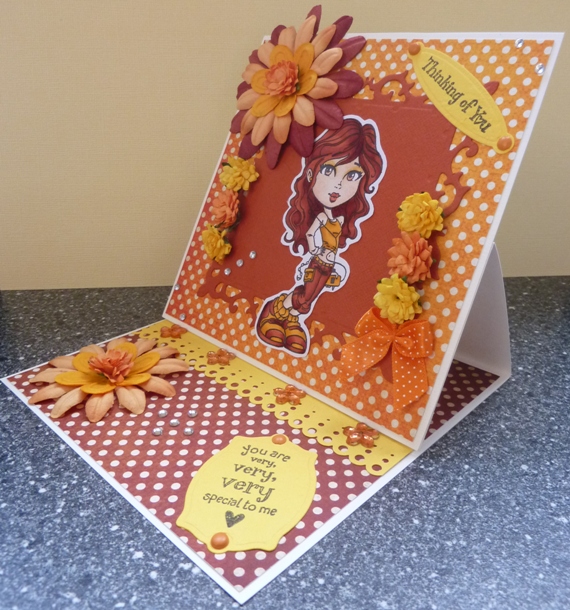
I used a image of KennyK, it’s the first time I worked with this stamps, and I love it. Especially the hair! beautiful long hair to colour. I chose to work with no more than 2 colour groups, orange and red/brown, in total I used 11 Copic sketch markers including the skincolors.
Ich habe ein Motiv von KennyK verwendet, es ist das erste Mal, dass ich mit diesen Stempeln gearbeitet habe und ich liebe es. Besonders  die Haare! Schönes langes Haar zum Colorieren. Ich habe mich entschieden, nur mit 2 Farbgruppen zu arbeiten, Orange und Rot-Braun, insgesamt habe ich 11 Copic Sketch Marker einschließlich der Hauttöne verwendet.

This time I made an easel card, it’s a card that folds out and leans on the little flowers to hold it upright.
The background behind the image is a nestabillitie from Spellbinder.
Dieses Mal habe ich eine Easelcard gemacht, das ist eine Karte, die man aufstellt und die von den kleinen Blumen aufrecht gehalten wird.
Der Hintergrund hinter dem Motiv ist mit einer Nestabilitie-Schablone von Spellbinders gemacht. 


The paper I used is from Bo Bunny, a gift of love
For the text labels I use a die called Xcut from Docrafts the text stamps are from Forever friends
Das Papier, das ich verwendet habe, ist von BoBunny, a gift of love. Für das Textschild habe ich eine Xcut-Schablone von Docrafts verwendet, der Textstempel ist von Forever Friends.

I used a lot of paper flowers, a ribbon, and plastic flowers where the top of the card is leaning on.
Ich habe eine Menge Papierblumen, ein Band und Plastik-Blumen verwendet, an denen sich das Oberteil der Karte abstützt.

 If you open the card completely you will see I put on a swirl to decorate that part of the card
Wenn man die Karte ganz öffnet, sieht man, dass ich einen Schnörkel als Dekoration auf diesen Teil der Karte gesetzt habe.

As you can see in the close-up image I gave the image eyeshadow colour, I have never seen it before on a stamp, I really love it as makes the image more alive.
Wie ihr auf der Nahaufnahme sehen könnt, ich habe dem Motiv farbigen Lidschatten aufgetragen, ich habe das noch nie auf einem Stempel gesehen, ich mag das sehr, weil es das Motiv lebendiger macht.


I used 2 main colours groups, 
Ich habe zwei Hauptgruppen an Farben verwendet
E09, E19, E08 for the red/brown colour/für die rot-braune Farbe
YR24, YR23, Y21 for the orange colours/für die orange Farbe
and the E11, E01, E000 and R20 for the skin colour/für die Hautfarbe


Thank you for watching, I hope you enjoy watching my card.
Danke fürs Anschauem, ich hoffe ihr hattet Spaß dabei.
Loving greetings , Brenda


Saturday, January 21, 2012

Our Guest Designer, Brenda


The winner of our first Challenge is Brenda.
So we asked her if she wants to make some cards 
for our blog this month.
***
Die Gewinnerin unserer ersten Challenge ist Brenda.
Darum haben wir sie gefragt, ob sie diesen Monat ein paar Karten für unseren Blog machen möchte.

Brenda, thank you for your wonderful card and welcome 
for this short time in our comunity.
***
Brenda, danke für deine wunderbare Karte und herzlich willkommen 
für eine kurze Zeit in unserer Gruppe.


 Hi everyone,
Today I'm showing you a card i made for this blog. I'm verry honoured to be asked to become a guest designer for the Copic Marker Europe Blog. I hope you like my cards I'm going to show to you in the upcoming weeks.
***
Hallo Ihr alle,
heute zeige ich Euch eine Karte, die ich für diesen Blog gemacht habe. Ich fühle mich sehr geehrt gefragt worden zu sein, ob ich Gastdesigner für Copic Makrer Europe Blog sein möchte. Ich hoffe, Ihr mögt die Karten, die ich Euch in den nächsten Wochen zeigen werde.

For this card I coloured  a Magnolia Tilda image from the newest love collection.
Tilda is carrying magnolia flowers in her hand. Isn't she lovely?
***
Für diese Karte habe ich eine Tilda aus der neusten Love Collection von Magnolia coloriert. 
Tilda trägt Magnolias in ihrem Arm. Ist sie nicht zauberhaft?


I wanted to use colors in the same colourgroup, so my card is in the purple/pink colours.
The paper I used on the background is from Little Yellow Bicycle, a very nice coloured paper with some glitter on it (it’s not easy to see it on the photograph). I thinks these colors are very suitable for a romantic card.
There is also a little red used on this paper. I made the ribbons in the hair red, but not much more red colour because this card has to have a purple/pink look.
***
Ich wollte Farben aus der gleichen Farbgruppe benutzen, darum ist meine Karte in Lila- und Rosatönen gehalten.
Das Papier, das ich im Hintergrund verwendet habe, ist von Little Yellow Bicycle. Es ist Papier in einer tollen Farbe, das mit etwas Glitter überzogen ist. Leider kann man das auf dem Bild nicht gut erkennen. Ich finde, diese Farben sind sehr passend für eine romantische Karte. 
Auf dem Papier ist auch etwas rot verwendet, darum habe ich die Schleifen im Haar rot coloriert, sonst aber kein weiteres Rot mehr verwendet, denn diese Karte muss lila/rosa sein.

I used some swirls from Joy, beautiful dies to work with, and added some rhinestones. I also put on a big flower and a little rose.
***
Ich habe Schnörkel von Joy verwendet, tolle Dies um damit zu arbeiten, und ein paar Glitzersteinchen. Außerdem habe ich eine große Blume und eine kleine Rose auf der Karte benutzt.


The colors I used are:
***
Die Farben, die ich verwendet habe, sind:
 
Dress/Kleid: RV09, RV17, RV55
socks and flowers/Socken und Blumen: R85, R83, R81 and also some RV17 for the highlights/und etwas RV17 für die Highlights
leaves/Blätter: BG99, BG96, BG93
Hair/Haare: E29, E27, E25, E21,
(the E21 is to make the hair a little colour lighter/blond/E21 habe ich verwendet um das Haar etwas heller/blonder wirken zu lassen)
ribbons in hair/Schleifen: R24, R29

Well, thank you for looking, I hope you enjoyed my entry as a guest designer.
Watch this blog because in a short time from now I'm showing more cards and I hope you enjoy the rest of the DT team with their beautiful cards.
***
Nun, danke für's Vorbeischauen, ich hoffe Euch hat mein Beitrag als Gastdesigner gefallen.
Behaltet den Blog im Auge, denn ich werde in Kürze mehr Karten zeigen und ich hoffe, Ihr genießt den Rest des Designteams mit seinen schönen Karten.

Greetings
Grüße 
Brenda