Followers

Tuesday, July 30, 2019

Lots of zeroes!


Hello everyone! It's Delphine here today! We all love Copics for their unique, gorgeous, vivid colours but there are also some amazing light, pastel colours among the 358 colours. With that in mind, I decided to use only "zero" colours for my post - 00, 000 and 0000. 

I made a bookmark and used Paperbabe Stamps templates and stamps on it. I stamped a face and shoulder from the Profile Face Left Dinky Stamp set and drew around a hair template with a black Copic multiliner to create my image. 


For once, I did not do the background first as I usually do, but for good reasons: I knew the colours would be very light, so no risk of dragging colour into my character; I wanted a very simple smooth background (when it is a full, complicated background, it can be tricky to colour and I may miss and need to start again); and also I wanted to use the same colours as for my hair and really needed to SEE my character coloured to adjust my background.

So, I coloured the skin first, in E000 and E0000. As you can see, I left some parts uncoloured to have a few highlights and still create some depth despite the use of 2 light-coloured markers.


I then coloured the hair in Bs and RVs. I used B00, 000, 0000 from the roots and RV00, 000 for the tips. I also added a touch of C0. After the hair, I finished colouring the skin of the shoulder and coloured the lips and eyelid in RV00.


For the background, I used the same idea as for my hair, with the same 2 colours to have a nice harmony. I started at the top with RV00, then RV000, 0000. Then I started from the bottom of my bookmark going towards the middle, using B00, then B000 and B0000. I left an uncoloured white part in the middle.


As a final touch, I added silver stars in gel pen, drawing them with the help of a stencil, plus a few dots and white highlights in gel pen too.

Thank you very much for your visit, have a great day! Hugs,
Delphine xx

Sunday, July 28, 2019

Christmas in Summer

Hi everyone, it's Virginia here again, with a new tutorial for Copic Marker Europe. 

Summer is scorching in Spain and I try to keep my mind on fresh things: ice-creams, beaches, lemon hail and... Christmas time!!! Lol. So, I've finally decided to prepare my tutorial related with this season. And, to be honest, I've also seen crafters on the Internet doing Christmas projects so,  I'm not the only crazy person!! lol.

I'm spending some days on the beach, with my family, so you can imagine that I'm not really plenty of tools and different supplies to do an impressive project. That reminds me of that days when I started to do scrapbooking and how lost I was with the only few Copic Markers I had. I`ve tried to imitate that stunning backgrounds with antique appearance and it seemed to me extremely difficult. Years later I discovered how easy it is and with my tutorial I want to encourage you, who are starting to colour, to try it.


Here you have an step by step video tutorial with the process. You can find the stamp I've used in El Rincón de Setter .


The Copic Marker colours I've used are:

Background: E44-E43-E42-E41
Skin: R81-E13-E21-E00-E000
Hair: E35-E57-E47
Dress: YR27-YR24-YR21-Y00
Ribbon: RG97-YG95-YG93-YG91
Christmas Balls: R89-R39-R29-R24-R14-YG97-YG95-YG-93-YG91-YG21-B39-B37-B34-B32


And that's all. I hope you like my tutorial. Have a good summer!

Friday, July 26, 2019

Ladybug

Hi lovely copic friends.

The weather is way too hot at the moment and it's very hard not to stick to your paper while colouring, but I've managed to colour this cute colouring page by Color 'n' Chics.

I have coloured her with my Copic markers and added some coloured pencils in the end too. I just love the combination of Copic markers and coloured pencils, they just seem to be a perfect couple. 

In the photo-video you can see how I've coloured this lady and the colours I've used. 


Have a wonderful day
Miranda

Monday, July 22, 2019

Eye, Grey and Mulitliner Cicci

Hi Copic Lovers!!

Cicci here today posting.
I hope you are all having a great time this summer!! 
Here in Sweden we can colour a lot because there has been a few rainy days over here.

Today I'm going to make an eye using Copics from the Grey family and then I'm going to use a multi-liner, so for this you need:

Copic Combo
C10, C7, C5, C3, C2 
Multiliner 0.5 Black

Step 1
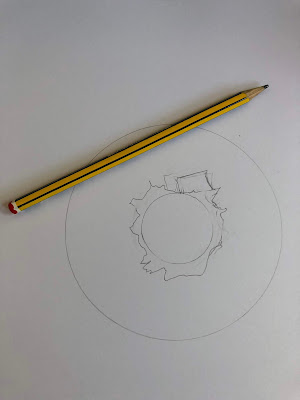
I start to make a circle for the eye

 Step 2
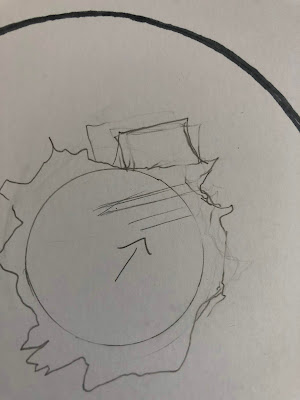
I just follow the circle with C7

Step 3 
I draw some lines to remind myself to leave some space for highlights, so I do not colour this area

Step 4 
I'm using the big side of the marker this time to make a thicker line around the circle using C7 again

Step 5
I add C3 and blend a little at the same time 

Step 6
Here I add C5 and blend a lot between the edge of C7 C5 and C3  I want as little edges as possible

Step 7
I add more and blend with C3 

Step 8
I added B39 around the circle 

Step 9
I add C7 in the middle

 Step 10
I make a few lines with C5

 Step 11
I add lines in the middle circle with C7

Step 12
I make lines the same way at the outer circle with C7 

 Step 13 
Here I start to use the multi-liner SP 0.5 Black. I start to make a lot of little lines 

 Step 14
Now I add some C2 almost over the hole eye

 Step 15
I add more of C5

 Step 16
Add more of C7

 Step 17
This is a fun part!
Blend a lot at the area that needs to be blended with C5 and C3

 Step 18
I add more with C7 in the edges of the circle


Step 19
Time for more colouring with the same multi-liner I used before 

Step 20
I blend and make some more lines with C5 

 Step 21
Here I use C7, C3, and the multi-liner
Add and blend

 Step 22
Blend with C2 over the eye. Remember to leave some area for the highlights

Step 23
Here I add some highlights with a white Posca pen


Step 24
Now the eye is ready and I start with a background. I colour around the eye with C5

 Step 25
I repeat this again and this time I use C7 C5 C3
Add and blend

Step 26
Here I add the darkest of the C-family, C10

Step 27
I colour the edges with C10  

Step 28
Now I add C7 C5 C3 C2 and blend a lot

Step 29
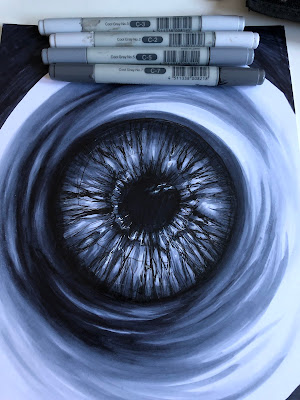
I made some details in the end with the white Posca and the black multi-liner 

DONE!!

Thank you for sticking with me to the end ;0)
It was a long one today!

Have a wonderful day everyone, and see you in August!!

Hugs and Smiles
from us here at Copic Europa blog


Friday, July 12, 2019

Retro Beach Card with Video

Hi all Copic friends from around the world!

It is hot ..it is Summer and many people think about going to the beach.

Today I have coloured up my fun retro stamp from the Greeting Farm,
she is a " cheeky " stamp from the 10 year celebration rubberstamp set which I have recently bought.

I have stamped her with some black Krafty Kolours hybrid ink onto Perfect Colouring Paper.

And have started to give her some nice suntan with my Copic :)


I have prepared a short video for you,
enjoy watching my colouring step by step.


Half way colouring...


Did you like my little video?
Hope so..

Here is the final result, I have tried several card designs 
but in the end I have chosen a simple
card design to give that retro touch!

Papers from Craft sensations,
stamp The Greeting Farm ( 10 years celebration rubberstamp set )
dies : Marianne Design and Modascrap

And last but not least;

Copic :
Skin : E 11, E 13, E 15
Eyes . YG 91, YG 95
Bikini : R 24, R 29, R 59, white gel pen
Hair : C 4, C 5, C 9, B 24, B 28
Shell : E 50, E 55
Flower : RV 11, RV 14, RV 19
Lips : molotow red pen 

Enjoy your Summer and do not forget to bring your Copics with you on your holidays !

Sunny Hugs 
Blankina

Sunday, July 7, 2019

Cork Board Background

Hi everyone. Today I am sharing with you how I coloured a cork board background. 
The stamps and dies I'm using are all from Stamping Bella 


To colour the cork board I used E30, E31, E33, E34, E35, E25 and E27


Stamp the cork board onto copic colouring paper using memento black ink. Taking the E35, and then E33, start making some dots alternating between the colours. 


Keeping adding dots with the E33 and E35 and blend them a little by dabbing E30 on them. 


Keep going with the dots until you have the whole area covered. 


When you are happy with how the darker colurs look, fill in the white spaces with E30. If you need to, reapply the darker colours. 


Apply E27 in a fine line all around the inside edges. 


Blend the E27 inwards with E25 to give a darker shadow on the edges of the cork board. 


To colour the frame, use E35 on the inside then blend out a little with E33 and finally E31 around the outside edges. 


To add elements to the cork board I coloured up some Rosie and Bernie stamps, and also some washi tape stamps, and cut them out with matching dies. 

Colours used:
Skin - E00, E11, EO4
Other colours - BG01 BG53, BG57. 
V000, V04, V06
RV10, RV02, RV04, RV06
C1, C3, 0
Black Gel Pen (Frame)


Create a card base and layer the elements onto the cork board with 3D foam tape to complete the card. 


Thanks for dropping by and I hope you are inspired to take out your markers today. 
Sandie