Followers

Tuesday, December 30, 2014

Happy New Year !!

Good day to you all Copic lovers , ready for the most festive night of the year?
Here is Sandra and with this card I want to wish a very Happy New Year. 
To celebrate the end of this year I chose the digi stamp "She is Charming" from The paper's Shelter. A girl with a beautiful evening dress is preparing for a party. 
What better way to celebrate the new year  that is coming? 
For coloring I chose a combination a bit special but I really like.  I go with colors of  BG family with BV family. 
For the card I used bazzil, pattern October Afternoon and an adhesive sparkling paper I had at home for a long time! 
The banner is a die La La Land Craft and the background is illuminated with Frantage Silver.
With this project, I come back to renew my best wishes for a Happy New Year, which will bring happiness and peace to you and all your loved ones. 

See you soon next year !!!
Copic used :
Skin: E 000-00 01-11 
Hair: N0 -1-3-5-8 
Dress: BG 07-02-01-000 BV 000-01-02-04 
Shoes: BV 01-02-04 
Yellow: Y 0000-11-15
Background: W00-1-3
Spica Lavender

Monday, December 29, 2014

Winner Challenge 34 Anything goes!

Hello ,

first a big thank you to all the participant at our challenges in 2014,
 we wish you all a very Happy New Year 
and hope that you will join us also in 2015.

Finaly we have a winner on Challenge 34 Anything goes!


You really need to take a look at her great entry, 
it is a pleasure to see her work with our Copic products.


Send us  the numbers of the  3 sketch markers you want to recieve.
Copiceurope@gmail.com 
Kind regards Diny

Sunday, December 28, 2014

Four Tags 4 Four Friends


Hello everyone!

It's Vili here today and in the last post for this year I'd like to present you four projects - tags (or bookmarks), which I made for my bigger daughter and for three friends of hers. As to be absolutely personalised, I chose stamps that are connected to a favourite thing of every one of the girls. Here's what I got:


The first bookmark is for Maggie, who lately has a new love in her heart - a little Beagle puppy. I couldn't find a stamp with this breed, so I used Mo's Retriever, which I coloured with the typical colouration of the Beagle:


The second bookmark is for Joanna, who dreams of becoming a doctor. The closest I found was Mo's Nurse:

The next one is for my daughter. I chose Mo's Patty for two reasons - firstly, she herself is called Patricia; and, secondly, most of the time of her 17 years of living she has always been not satisfied with how the things are happening:


The last tag is for Ilina, who is the biggest fan of Pugs. Happily I found Mo's Pug Love:


And that's how the backs of the tags look like:


I wish everybody one more successful 2015; one, that makes dreams come true!

Copics used:
Skin: E11, E50, E51
Hair: E31, E33, E35, E37, Е 40, E41, E43, E44, E49
Retriever: E31, E33, E35, E37, E47, E49
Pug Love: Е 40, E41, E43, E44, E47, E49, R32, R35, R37, R59
Nurse:  W0, W3, W5, RV63, RV66, RV69
Patty: W0, W3, W5, B91, B93, B95, B97, B99, G000, BG72, BG78, G20, G24, G29


Have a lovely day and thanks for stopping by!

Vili  xxxx

Thursday, December 25, 2014

the birds fluttered YES....

Hi everyone,

on this special day it's my turn to publish a new creation and I have another art journalpage for you, because I just love making journalpages.
Making art journalpages is such a lot of fun, everything is allowed, no bounderies what soever. You can write down your feelings and paint/ draw on top of it or you just make a nice page using a lovely image. 


At first I created a background using my Dylusions ink and Dutch Doobadoo stencils.
The stencils I used are flowers, diamonds, stars and screen of stars. After that I did a little stamping using a script stamp.

The image is by the East Wind (check them out if you don't know them yet, they have some wonderful images) printed in a large size on copic paper.

For the hair and eyes I used 
BG01, 09, 57 and FBG2.
For the flowers and dress 
YG00, 17, 23, 
Y19, 
YR07, 15, 16 and 23, 
R05, 17, 37, 39, 46 and 59
RV0000, 02 and 06
For the skin I used
E000, 00, 11, 21 and 04
for shading I used BV00 and 100 (just very very tiny parts and eyebrows)

The copic colours go so well with my favorite Dylusions ink that I really love using them both on my pages, because both have such wonderful bright and cheery colours. 

wish you all a fabulous Xmas day with your dear ones 
and a healthy and very creative 2015
see you next year

hugs


Miranda

Wednesday, December 24, 2014

New challenge: It's a man's world!

Hi everyone!

Deborah here today with the new challenge for the Copic Marker Europe blog.

First, I would like to thank you for the beautiful entries last time, it was a pleasure to take a look at them!
The winner will be announced on friday, December 26.

Our new challenge is called:
"It's a man's world"
So create a card for a boy or a man with your fabulous Copic Markers.

And here is my inspiration for you:


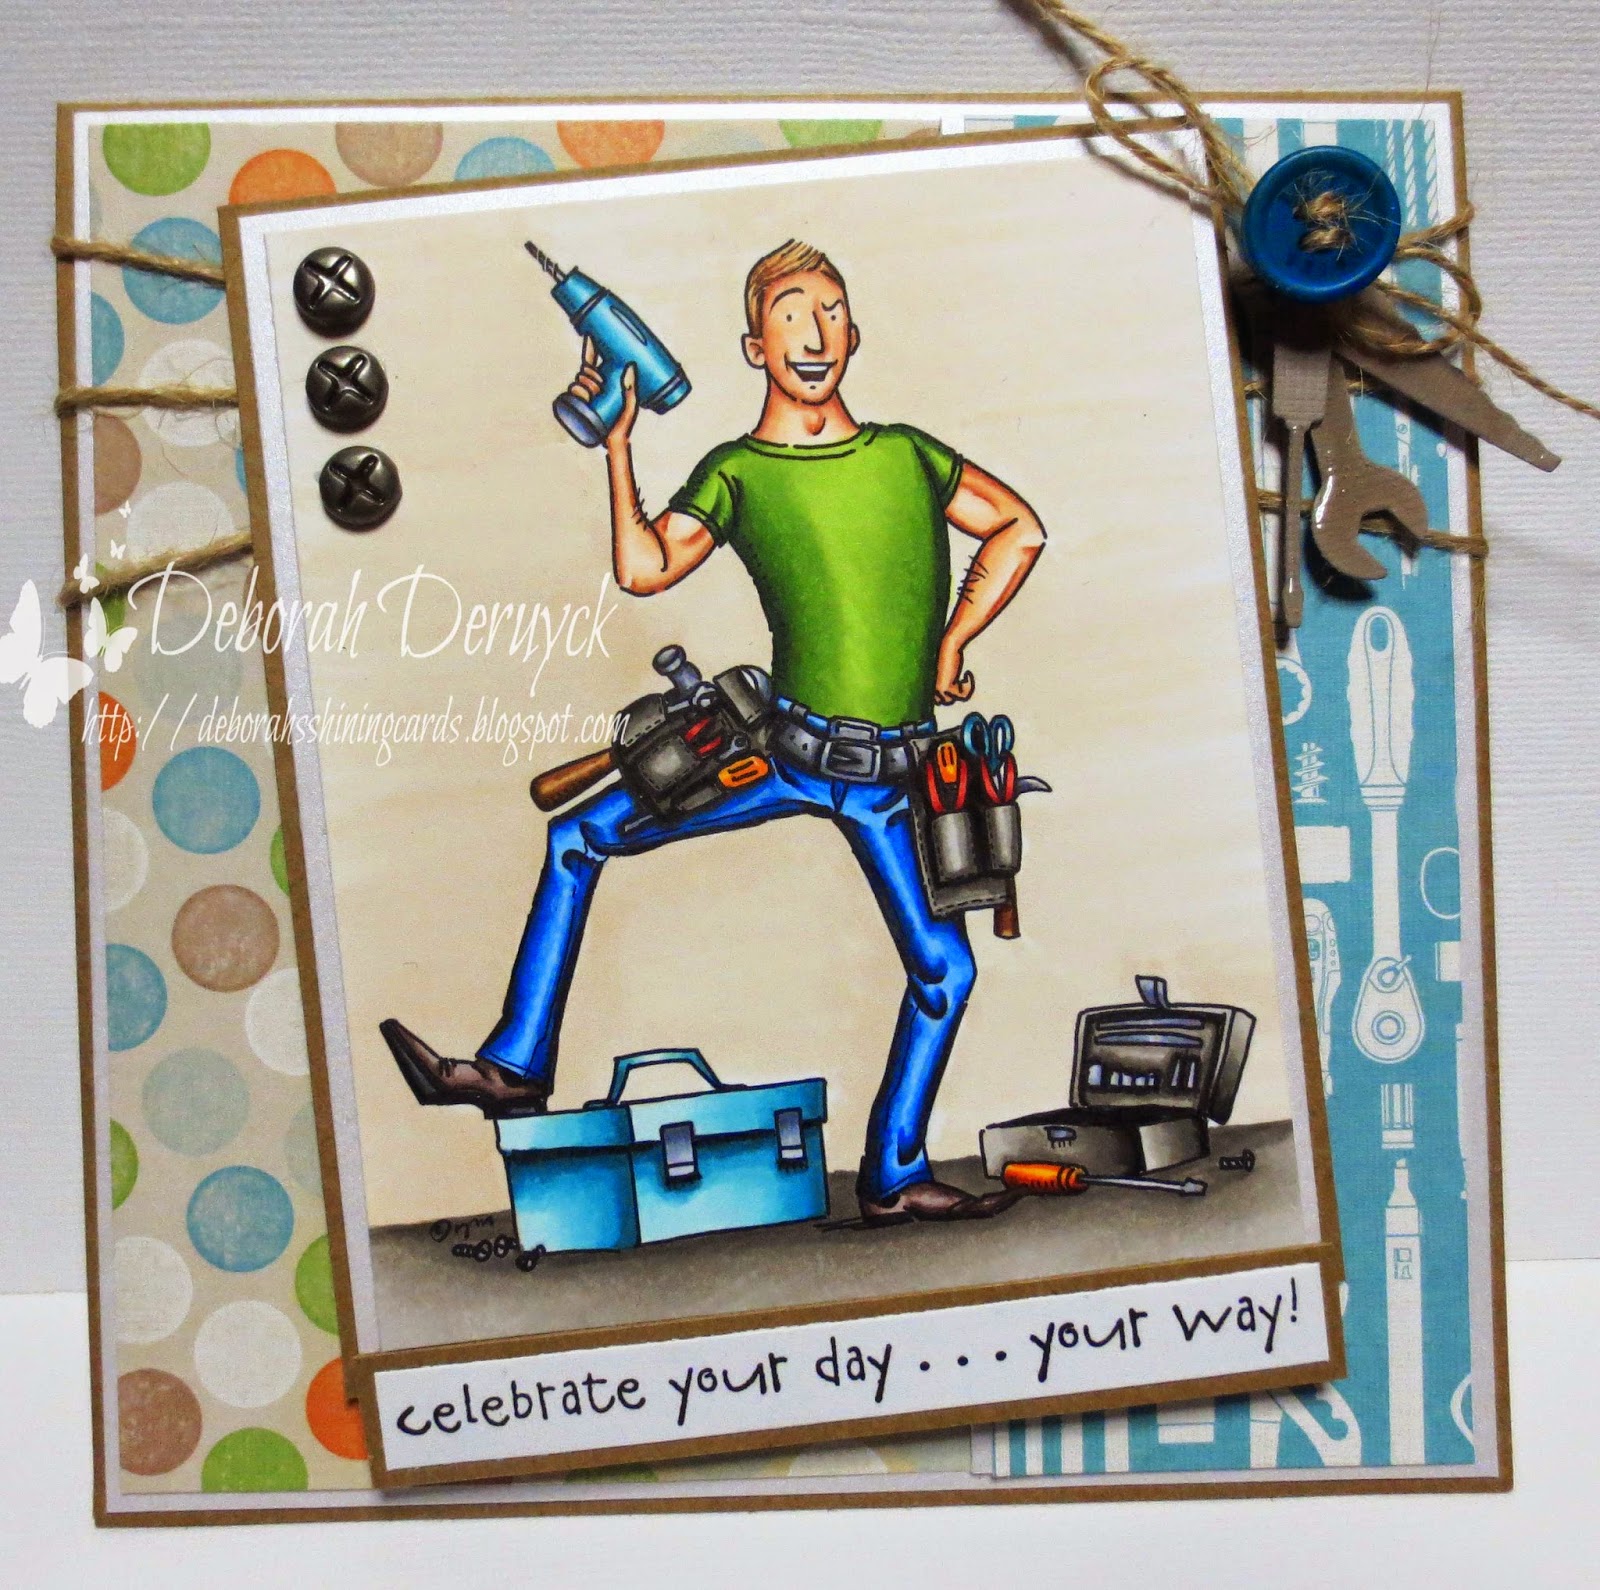
My boyfriend had his birthday this month, so I had to make a special card for him. We bought a new house last year and we had to rebuild it. Every free hour he was busy with working on the house. I'm so proud on him!  


The image is "Mr Fixit" by Mo Manning, her boysstamps are amazing!! The paper is from an old collection of BasicGrey "Bowties".  I've addes some die-cuts from Memorybox and some screw-brads. I've kept it very simple.


Here are the colours that I've used on this one:
Skin: E13, E11, E00, E000, R20
Hair: E35, E33, E50
Green: G28, YG67, YG17, YG13, YG11
Blue trousers: W7, B37, B34, B32
Warm grey: N9, W7, W5, W3, W1
Cold grey: C7, C5, C3, C1
Blue: BG09, BG05, BG01, BG000
Orange: YR07, YR04, Y17
Red: R59, R37, R35, R32
Brow: E37, E35, E33, E31
Background: E43, E41

So now, it's your turn! Show us your work, and you can win
3 sketch markers of your choice.
Please be aware that only entries from those living in Europe, North Africa and the Middle East are possible. 

To enter visit our Challenge page and enter your link in Mr Linky
before the end of 20th Januari 2015.

The winner will be announced 23th of Januari 2015.

We are looking forward to see your creations!
Hugs
Deborah

Tuesday, December 23, 2014

Merry Christmas to all of you

Tomorrow is Christmas Eve
 and I assume you have all the Christmas cards ready and is sent.
Today I show one of my last Christmas cards for this year.


I have tried to color this little cat 
with a slightly different technique from what I usually do.
I am using  small short little thin strokes 
to get some more fur-like appearance.
I have also drawe these thin strokes a little outside the lines
to get an effect of long fur on the cat. 
I paint adds so here two or three times,
 and concludes with the darkest color. 


The digistamp is from Aurora Wings 
and the paper from Maja Designs.


The color I have used:
Cat: E 40, E 41, E 43, E 44, E 47, E 53
Christmas Gift: T 0, T 1, T 4, T 7 and E 07, E 18, R 27
Christmas Santa hat: RV 63, RV 66, RV 69 ( and stickles)

Hugs from Rozzan

http://rozzanscrap.blogspot.se/
https://www.facebook.com/rozzanscrap


Sunday, December 21, 2014

Tutorial, How to colour manga eyes with Copic, by Suki Manga Art

Dear Copic friends,

Today I will show you an easy way to colour manga eyes in 4 simple steps.

I used 2 different range of colours in order to give you ideas, so you will see that you can use different ranges and obtain very nice results  following the instructions of this tutorial ^_____^

Let`s go!


Example nr 1:

I used the following copic numbers: C1 - C3 - C5 - C7 - B000 - B12 - B24 - B29


Here you can see a bigger image with the result using a blue range of colours:


Example nr 2:

I used the following copic numbers: C1 - C3 - C5 - C7 - R20 - RV04 - R29 - R59


Here you can see a bigger image with the result using a pink/red range of colours:


I hope you like this tutorial, I would like to see your version 
with different range of colours like green, violet... etc


Do not hesitate to contact me for any question
See you next month! 
bye..... (^___^)/  Suki Manga


Saturday, December 20, 2014

Bubbles

Hi everybody!
 
Franz from Italy again to share with you all my latest Copic project :)

I used a Saturated Canary image again, one of the latest drawn by Krista; I love her because of her hair and of the bubbles all around the image!


I started colouring skin and hair with one of my favourite brown colour combo and then I coloured up her dresses.
Then I added some accents with Prismacolor Pencils on her cheecks and here and there with a white gel pen; I love adding these accents because I think they give to the image a little more contrast and make it a little more precious too :) 


I generally colour the background at the end.
Here I used my favourite tecnique that is the "Confetti Background" with lots of dots that are bigger and very close one to another near the image and smaller when you colour away from the character.
  
 I used some different markers to achieve this result, two blues, a blue-violet and a warm grey to give the background a "dirtier" look. 


I used Papers form Maja Design and I also added this lovely craft die cut from Dutch Doobadoo, love them, they makes cards special!
 
 
 Here is the complete list of Copics markers I've used:

Skin: E0000, E000, E00, E11, E13 + R20 and Prismacolor Pencil for cheecks
Hair: E000, E13, E15, E18, E29
Outfit Red-Violet: R000, R91, R93, R95
Outfit Blue-Violet: BV0000, BV02, BV04, BV13
Outfit Grey: W1, W2, W3, W5
Bubbles: C1-C3- BV23
Background: B91, B00, B000, BV23, W1, 0

 thanks for stopping by, I hope you all are having a lovely day!
 A big hug everybody :*
Franz.

Thursday, December 18, 2014

Be Merry And Bright!


Hello everyone! It's Delphine here today, sharing another Christmas card, with a cute image and sentiment by Tiddly Inks.


I printed my image called Be Merry And Bright and coloured it with my Copics. I started with the background as always, using a very light blue. I coloured all the lights last, using three Copics each time, first colouring the inside of the light with my medium shade, then outside the light with my lightest to give the idea of lights being on, then added a touch of my darkest shade inside the light. I die cut my image with a Spellbinders Label die and I used DPs by Bo Bunny.


Background: BG000
Dog: W0, 1, 3, 5
Sentiment: E40, Y000
Lights: R32, 35, 37, Y11, 15, 17, YG01, 03, 17
Shadow: BV00

That's all from me today and since I won't see you next week, I wish you all a Merry and Bright Christmas! Hugs,
Delphine xx

Tuesday, December 16, 2014

Hurray!!

Hi everyone, Åsa here today again with some new inspiration.
It´s not going to be a Christmas card this time, alltough it´s almost Christmas.
No it´s going to be a Birthday Card for one of my closests crafting friends, who has her Birthday this close to Christmas. :)


The papers are from Gummiapan, and I have colored all the edghes with distress Frayed Burlap.


The cute image from ScrapBerrys are coloured with the following copics:
Skin: E11-21-00-000-R20
Hair: E79-74-70
Dress: BV29-25-23-20
Wings: V25-22-20
Shadow: N4-2-1-0

I really like to add shadows around and below the image to make it pop a little more.
This time I added the shadows on the right side of the image to strengthen the impression of the lightsource.


I hope you like it!

I like to wish you all a very Merry Christmas!
See you all soon again!


Monday, December 15, 2014

Let's dance

Hello Everyone,
My name is Sarit Sabbag and I'm from Israel.
I feel excited and honored to join these talented ladies.
When I was a kid whenever I was asked "what do you want to do when you're grow up" my answer was "to work at Disney, coloring all those cartoon images" why do I tell you this???
Because for my first entry I decided to combine these two things I love, Cartoon images and Copic.


I used the image "Dancing and flowing" from the talented artist Sabine Rich the image looks a lot like Disney characters
For the skin I wanted to try a new combo. E50, E30, E11 and for the cast shadow I used V93.


I wanted the girl to be with presents, so I decide to color her hair with rich colors. I did the hair with flicks motion going from light to dark, with lots of flicks… (Believe me when I say LOTS of flicks)
For the dress I choose the YG family because they go together with the hair.


I had super fun coloring her.
Here are the copics I used:
Skin: E50, E30, E11, V93
Dress: YG93, YG95, YG97, YG99, G99, Y19, YR12
Hair: YR14, YR27, E15, E18, E39
Eyes: B04
Lips: R37
Bracelet: B41, B45
Hope it inspire you to try coloring other images.

                                                                                 Big Hugs


                                                                                     Sarit

Sunday, December 14, 2014

No lines coloring for Christmas

Good morning Copic friends!

Elizabeth here today to give you some inspiration for your Christmas card- coloring.
I have colored this cute Whimsy Stamps image using the no-lines technique.

I stamped the image using Memento Tofee Crunch ink, wich is light brown. 
When I color the lines wont show, and it gives a soft look on the image.
Kruemel made a great tutorial on no lines coloring here on the Copic Europe blog. You can find it HERE if you want some tips on how to do it! Here's my card:

I used Maja Design papers in traditional Christmas colors, red, white and green. 

 Here's my image, it's named Berry, made by Sylvia Zet for Whimsy Stamps. 
I used the following copic colors: 
Skin: E13-11-21-00-000, R20
Hair: E29-27-21
Red: E18-09-07, R24-22, W7
"White": W7-3-1-00, 
Green: G99-94-82-21-40, W7
Cat: E35-33-31-30, R20


Here's the inside of the card.

Hope you are inspired to play with your markers !  
Enjoy the season! 

Untill next time! 

Crafty hugs, 


Elizabeth xx

Saturday, December 13, 2014

Season's Greetings


Hello everyone! It's Delphine here today with another winter scene - now is really the time to make winter cards!


I have used one of my not so recent Penny Black stamps called Snowy & Hedgy. I stamped and masked my image, added a couple masks to create the hills and airbrushed the background. I then coloured my scene and thought I would add a frame inspired by a number of cards I have seen recently. I cut a rectangle with a die, stamped a CC Designs sentiment on it and put it on foam squares.


Sky: B00, B41, BG000, BV00
Hills: B00, C1
Snowman: 100, BG000, C0, 1, 3, Y17, YR04
Hat: R35, 37, 39, 89, W0, 1, 3
Scarf: B95, 97, 99, R35, 37, 39, 89
Hedgehog's Skin: E000, 00, 21, E70
Fur: T0, 1, 3W1, 3, 5


Thank you very much for your visit, have a great weekend! Hugs,
Delphine xx

Tuesday, December 9, 2014

Hot Cocoa!


This is my Christmas contribution for Copic Europe.
It is a very simple card appearance with stamp of Tiddly Inks.

Card that has gesso, fairy dust, emboss frantage and some other product to give glitter, snow effect, etc.


Used Copic colours:
Skin: E11, E21, E00, E000, R11.
Hair: E47, E44, E43.
Shoes: N3, N5.
Cup: BV29, R37, R35.
Dress: B91, B93, B95.
Bird: R11, V15, V12.
Earmuffs and gloves: R81, R00.
Background: BG01, B01, B00, B000, BG02.


There are still a few days but: Merry Crhistmas!
We'll see you next year!

Sunday, December 7, 2014

Tutorial - Simple Airbrushing for 100% Copic Scene


Hello everyone! It's Delphine here today to share a tutorial on a 100% Copic card with a simple airbrushed background - I absolutely love the look of airbrushed backgrounds! 

For today's example, I chose to do a simple winter scene with a character and just a couple of trees. Please note, I did not stamp and mask the character on my scene because I knew I wanted to add it at the end on 3D foam squares, but it is of course possible to stamp it at the beginning.

Material used for my card:
Airbrush and Copics
Masking Film or Post It notes
Make It Crafty Pine Trees Rubber stamps
Gorjuss Girl


Step 1


Stamp the elements you need on your scene, starting with what you want to be in the foreground first. To mask, I used Post It Label Pads which have 100% adhesive backs, and picked different colours to show you clearly the different parts of the scene.
 Here, I stamped the little tree first where I wanted it, masked it (yellow), then I added orange strips around my "scene" to have an uncoloured frame at the end. I then stamped the tree on the left and masked it (pink). I thought I would have a little snow slope, so I just cut and put pieces of blue Post It Notes to create the slope and protect it from the airbrushing.

Step 2


Airbrush your lightest colour B00 going from left to right and right to left from the bottom of the image and stop midway of your sky. I like using 2 different shades for airbrushed skies (here Bs and BVs) and I always start with my lightest colour, so I can darken the colour afterwards if necessary. 

Step 3


Now start at the top of your image with your second shade - BV02 here - and go down little by little towards the blue area. Airbrush over the beginning of the blue part so that your colours look blended.

Step 4


Darken the sky at the top, using BV04 and stop in the BV02 area. The transition between the 2 BV areas is a bit too visible, but we will work on it in the next step:)

Step 5


Take your BV02 again and go over all the BV04 and BV02 areas starting from the top and being careful to add enough BV02 on the transition to blend it a little and airbrush on the upper part of the blue area too.

Step 6


Now remove your masks and check the result of your airbrushing. And now all you have to do is use your Copics to colour your scene.

Here is my finished card...


Skin: E000, 00, 11
Hair: B41, C5, 7, 100
Purples: V09, 12, 15, 17
Blues: B34, 37, 39
Hearts: R37
Background: B00, BV02, 04
Trees: BG000, C0, 1, 3, E31, 35, 59, G28, YG03, 17, 67
Snow: BG000, C0, 1, 3


That's all from me today! Thank you very much for your visit, have a lovely Sunday! Hugs,
Delphine xx