
Hello to all copic fans!
Kjersti here, and today I have made you an airbrush tutorial.

I often use tags, inspired by Tim Holtz. However there
will be a big difference when copic provides a glossy surface

To avoid spills I use Clearsnap Color Catcher when working.
Always start outside the tag, switch on the compressor and turn
the sketch marker until you get a steady colour spray. Then start
to airbrush by moving the handle sloooow back and forth
- when you think it is slow enough - try a bit slower.
That way you get a smooth and nice colour result.

I start with the lightest color, adding the dark right out at the edge.
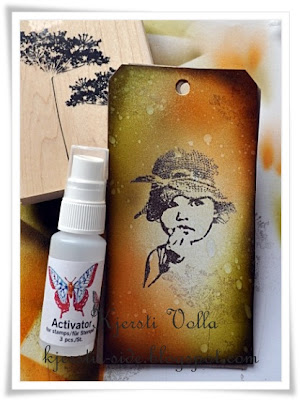
The tag is split in two colours, copics used:
YR12,YR14,E84 og E87
YG97, YG95 og E87
 The image, an old Paperback Studio stamp, is embossed.
It is important to finish the airbrushing before stamping, for
unlike DistressInk the copic ink covers the embossing.
 The flowers, a Penny Black stamp, is colored with copic
marker E44, sprayed with activator and then stamped. Just
wait a second or two before you stamp - to avoid the ink to bleed.
I also used the activator for the "raindrops" on the tag.


And here is the tag I made, finished with flowers, lace and twine.
Hope I managed to inspire you to play
with airbrush and Copic.
Wish you a wonderful week!
Hugs Kjersti:)

It is important to finish the airbrushing before stamping, for
unlike DistressInk the copic ink covers the embossing.

marker E44, sprayed with activator and then stamped. Just
wait a second or two before you stamp - to avoid the ink to bleed.
I also used the activator for the "raindrops" on the tag.

Finally, I sprayed through a doilie using E89 - I really love the effect.
I also use the doilie for decoration - between the Copic paper
and the cardboard.

And here is the tag I made, finished with flowers, lace and twine.
Hope I managed to inspire you to play
with airbrush and Copic.
Wish you a wonderful week!
Hugs Kjersti:)
7 comments:
Beautiful!! Thank you for the tutorial!!
xxx Frouwkje
Super !!!!!!
Such a gorgeous project. love the effects and the colours are so pretty. Hugs! Mojca
Wonderful Tutorial Kiersty!!!!
The way you've worked on this tag is simply brilliant... great the effect of the sprayed doily!!
Thanks for sharing.
Hugs
Cinzia xx
Thank you Kiersty! Fab tutorial and wonderful result! It'll be so useful :)
Hugs, Franz.
Thank you very much for this tutorial Kjersti
Very useful!!l
Beautiful result.
Wish you a nice week
Magda
wow wonderfull
hugs marcelline
Post a Comment