Followers

Showing posts with label Whiff of Joy. Show all posts

Sunday, July 28, 2024

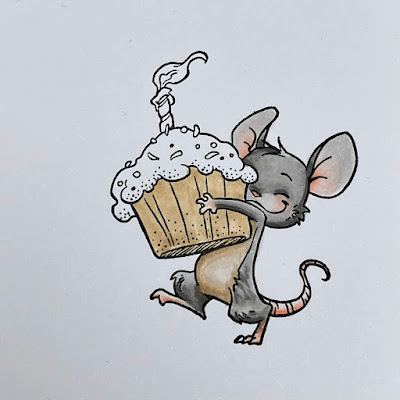
Cupcakes

Hi there.
Helen here today.

A while ago I stumbled over some stamps on Facebook.
It was Whiff of Joy´s Henry Celebrating Mouse Stamp and now I´ve made some cards with the image.


As always, I stamped the image on Perfect Colouring Paper using Memento Ink Pad.


I started with the cheeks and ears, because I wanted to fade the pink and the gray with each other.


Started with the lightest shade for the tummy.


I wanted some shadow from the cupcake on his tummy and
shadow on the lower tummy makes the roundness.


I wanted the light to hit his knees, and darker areas between the legs, under the knees,
under his upper leg/arm, under the jaw and on the underside of the tail.


Started to colour the cupcake by a first layer with the lightest shade.


Wanted the light to hit the front of the cupcake and some shadows from the icing on the cupcake.


Started with the darker shades first for the flame.


Working me trough the flame.


I wanted high contrast in the icing so it feels like the flame light up the icing.
And I added some yellow shades for the highlight areas.


A shadow beneath him will ground him.

Cheeks, ears, tail and nose: R0000 - R00 - R02 - Y000
Tummy: E40 - E41 - E43
Furr: T0 - T1 - T3
Cupcake: E31 - E37 - E35 - E33
Flame: R05 - YR14  - Y15 - B0000
Candle: BG11 - BG15
Icing: RV0000 - RV000 - R81 -R85 - Y000
Sprinkles: BV11 - BV13, Y15 - YR14
Shadow: W0 - W1 - W3

Hope I  inspired you to make some birthday cards today.
Love
Helen

Sunday, December 29, 2013

Love - Peace - Joy

Hi Copic Lovers,

The End of 2013 is near and so I just want to wish you Love - Peace - Joy for the NEW YEAR 2014!!! May you and your loved be blessed.

I've made this sweet winter card using the Penguin Trio Stamp by Whiff Of Joy.
To match the pastell coloured Design Papers, I've coloured the image using
Copic Sketch Markers:
 G0000 / G000 / G00 / YG41 / N0 / N1 / N3 / N5 / N6 / N8 /
R0000 / R21 / R22 / R24 / R30 / Y32 / Y35 / Y38
 Afterwards I've created a mask with the image stamp and covered the image. With my new Airbrush System (Starting Set ABS-1N) I've created the soft blue sky using B00 and B02.
Last but not least, I want to thank you all for having visited the Copic Marker Europe Blog so loyal and for all your appreciated and lovely comments. Hope to see you back in 2014 to surprise you with many more Copic Inspirations by all hyper talented DT Ladies!

Love - Peace - Joy
Angie

Saturday, April 27, 2013

Naschkatze / Sweet Tooth

Hi Ladies,

Today I want to show you this Card Project. I've used a super cute image stamp by Whiff Of Joy. The sentiment "Naschkatze" (sweet tooth) is by WOJ as well. This time I just wanted to show, how I mix up Copics to match paper colours with a used/vintage look.

The papers I've used have this brownish aqua tones that I don't find within the copics palette.
So I coloured first the hat and skirt of the girl using BG10, BG11 and BG13.
To match with the paper tone, I've overcolored these parts (hat & skirt) with E50.


To mix up colours I just love the E50 or the soft Warm Grey tones W1 to W3... give it a chance and try it out :)

Wish you a great next tea time with your friends,
Angie

Thursday, April 4, 2013

Together With You


Hello Copic-Friends!


It's keren here today with a new copic inspiration for you. 

I saw this week two cards which I liked a lot. 
What made them special was that they were "clean", 
meaning no adds-on or any background 
but rather only a colored image, a titlel and nothing more.

I had to try and make one myself.

I used one of my new whiff of joy stamps

♥ ♥ ♥


♥ ♥ ♥

Copics:
 Boy Skin: E0000-E000-E00-E01-E11-E21-R02
Boy Hair: E5-E51-E53-E55
Boy Clothes: YG03-YG23-YG25-YG91-YG93-YG95-Y19
B91-B93-B95-B97
Girl Skin: E0000-E000-E00-E01-E11-E21-R20
Girl Hair: Y21-Y23-Y26-Y28
Girl Clothes: R81-R83-R85-V95, 
BG10-BG23-BG32-BG34-BG45-BG72
Swing: E40-E42-E44

♥ ♥ ♥ ♥


♥ ♥ ♥ ♥


Have a wonderfully creative day!

Saturday, March 9, 2013

Café de Paris

Hi Copic Lovers,

For a couple of days all the white has melt and some true colours appeared :)
So the "ink" of my Copics is running wild in a springlike scenery at Paris (Digi-Stamp by Make it Crafty), where a sweet mouse couple walks along (Digi-Stamp by Whiff Of Joy)...
LOVE is in the air.
 I've added the mouse couple digi to the background digi using Photoshop Elements Software.
Then printed out, cut to 13,5 x 13,5 cm and started colouring.


 To colur this image for my card
I've used my Copic Sketch Markers Nr.:
YG01 / YG17 / Y35 / B91 / B93 / R21 / R22 / R24 / R27 / R29 /
E000 / E41 / E42 / E43 / E44 / E47 / E49 /
W00 / W0 / W1 / W2 / W3 / W5 / W6 / N0 / N2 / N4 / N6 / N8

Wish you a happy weekend,
Angie

Monday, December 24, 2012

Be strong and take heart...


Hi dear Copic Lovers,
Hallo Ihr Copic Liebhaber,

Today is a very special day for me... I am so excited to join the hyper talented Copic Marker Europe Blog Design Team and therefore I want to thank you Ladies a 1000 times... :) Still can't believe I'm colouring around with you now... WOW! So today it's time about showing you my first creation... drumm roll...
Heute ist ein sehr besonderer Tag für mich... Ich freue mich so sehr zum hyper talentierten Copic Marker Europe Blog Design Team zu stossen und dafür möchte ich Euch Ladies 1000 mal danken... :) Kann's immer noch kaum glauben, dass ich nun mit Euch kolorieren darf... WOW! Also ist es heute an der Zeit Euch meine erste Kreation zu zeigen... trommelwirbel...

 I've made a card with this sweet Tilda, cuddling up on a cold winter day.  I thought the paper with the dove fits perfectly with the sentiment. Psalm 31:24 - Be strong and take heart all you who hope in the Lord... That's what I wish you all for the upcomming New Year.
Ich habe eine Karte gewerkelt mit der süssen Tilda, die sich an einem kalten Wintertag einkuschelt. Ich fand das Papier mit den Täubchen passt perfekt zum Text-Stempel. Psalm 31:25 - Seid stark, und euer Herz fasse Mut, alle, die ihr auf den HERRN harrt... Das wünsche ich Euch allen für das bevorstehende Neue Jahr.
 I've coloured Tilda in the design paper colours and the background with a smudgy technique. That makes the sky look a bit more natural, kind as if it's snowing :)
Tilda habe ich in den Farben des Designpapiers koloriert und dazu den Hintergrund in gefleckter Technik. So sieht der Himmel etwas natürlicher aus, als würde es halt eben schneien :)
 Over it all I used a lot of stickles and liquid pearls.
Über alles habe ich eine menge Glitzerleim und Liquid Pearls.
 For Coloration I've used:
Für die Koloration habe ich benutzt:

R22, RV000, RV10, RV13, RV14, W00, W1, W4,
E0000, E000, E21, E42, E43, E44, E50, E51,
YG0000, YG00, YG03, YG25, G0000, G000,
BG0000, BG10, BG11, BG53, BG57

Stamp / Stempel: Magnolia - WINTER TILDA /Sweet Christmas Dreams 2011
Sentiment / Textstempel: by The Verve Stamps
Paper / Papier: Tilda - Winterbird Paperpad 12x12"
Dies / Stanzen: Heart/Herz = Whiff Of Joy
Dies / Stanzen: Plants/Pflanzen = Magnolia Doohickey
 Again, I wish you and your loved ones a blessed and creative Happy New Year!
Nochmals, wünsche ich Euch und euren Lieben ein gesegnetes und kreatives Neues Jahr!


Thursday, November 15, 2012

A Merry Mousy Christmas

Good morning Copic Fans!!
Guten Morgen Copic-Freunde!!!

Today I have a card to show you using Christmas Star Henry Mouse by Whiff of Joy.
***
Heute möchte ich Euch eine Karte mit Christmas Star Henry Mouse von Whiff Of Joy zeigen.
My aim was to give this card a nice vintage look. Distressing with both Frayed Burlap and Walnut Stain help to give the papers and embellishments this look, though the design paper from Wassail by Basic Grey already has this dated look. The sentiment, Holiday Mini Tickets from Whimsy Stamps, the pretty oval shape and the corners (cut from a rectangle shape) cut with Spellbinders dies and the pretty snowflake dies from Whiff of Joy all help to give the vintage look I wanted. But I also wanted Henry to be colored in a vintage style.
***
Mein Plan war es, der Karte einen schönen Vintage Look zu geben. Das Distressen mit Frayed Burlap und Walnut Stain hilft, den Papieren und Embellishments diesen Look zu geben, obwohl die Wassail Papiere von Basic Grey dieses alte  Aussehen bereits hatten. Der Text - Holiday Mini Tickets von Whimsy Stamps -, das wunderschöne Oval und die Ecken (aus einem rechteckigen Stück geschnitten), alle geschnitten mit Spellbinders Stanzen, und die wunderschönen Schneeflocken Stanzen von Whiff Of Joy tragen alle mit dazu bei, diesen Vintage Look zu bekommen, den ich wollte. Aber ich wollte auch Henry im Vintage Look colorieren.
It's been explained on this blog several times already, to get vintage colors the W-Copic Markers are essential. When you check the Copic colors I have used below this post you'll see that almost every thing I have colored received a bit extra with W-colored Copic Markers. You can start with coloring your image with W shades and add your "real" colors after that but I add them at the end. I love to see the brighter colors change into gorgeous vintage colors. As with all Copic colors, the colors blend perfectly. For the star I used E84 and E81. These colors already have a vintage look to them, they already contain a lot of grey, and for me they are the perfect golden when adding Diamond Stickles.
***
Es ist auf diesem Blog bereits öfters erklärt worden, dass W-Copic Marker grundlegend sind, um den Farben einen Vintage Look zu verpassen. Wenn Ihr am Ende dieses Posts nachseht, welche Copics ich verwendet habe, werdet Ihr sehen, dass beinahe alles, was ich hier coloriert habe, ein bisschen W-Farbtöne extra bekommen hat. Ihr könnt Euer Motiv mit W-Tönen colorieren und dann Eure "echten" Farben darüberlegen, aber ich coloriere die W-Töne zum Schluss. Ich liebe es zu sehen, wie die leuchtenden Farben sich in wundervolle Vintage-Farben verwandeln. Wie mit allen Copic-Farben lassen sich die Farben auch hier perfekt vermalen. Für den Stern habe ich E84 und E81 verwendet. Diese Farbtöne haben an sich bereits einen Vintage Look, sie enthalten bereits viel Grau und meiner Meinung nach sind sie das perfekte Gold, wenn man Diamond Stickles darüber verteilt.
As always Henry was completely 3D paper pieced, in the picture above you see the little pieces it took to create this little mouse.
***
Wie immer ist Henry komplett in 3D-Technik aufgebaut, im obigen Bild könnt Ihr all die kleinen Teile sehen, die ich dafür benötigt habe.

I hope you like my card. Have fun creating, bright colors or gorgeous and vintage, with you Copic Markers you can achieve any look you want!
***
Ich hoffe, Euch gefällt meine Karte. Habt Spaß beim Colorieren, egal ob mit leuchtenden oder Vintage, mit Euren Copic Markern könnt Ihr jeden Look erzielen, den Ihr möchtet.

Copic Markers used:
Skin Henry/Henry's Haut: E53, E50, E40, W00, CB
Cheeks/Backen: R20, R00
Red/Rot: R89, R46, R27, R24, W5, W3, W1
Tail, nose and ears/Schwanz, Nase und Ohren: R24, R22, R20, R00, W2, W0, W00, CB
Fur on Santa's hat/Fell an der Nikolausmütze: E41, E40, W00, CB
Fishing pole/Angelrute: E89, E87, E84, E57, E55, E53
Star/STern: E84, E81 and Diamond Stickles
Shading/Schatten: W3, W1, W0, W00, CB

Hugs,


Monday, November 12, 2012

Schneeflocken sind die Schmetterlinge des Winters

Hello dear Copic fans,
Hallo liebe Copic-Fans,
Every year I tell myself, that I do not have to buy any new Christmas or winter stamps, because I have soooo many of them. And then images as cute as this little guy from Whiff of Joy come along and I simply have to have him! He is a cutie, isn't he?
***
jedes Jahr sage ich mir auf's Neue, dass ich keine Weihnachts- oder Winterstempel kaufen muss, weil ich sooo viele habe. Dann sehe ich aber so süße Motive wie diesen kleinen Kerl hier von Whiff of Joy und muss ihn einfach haben! Ist er nicht total süß?

I would not have to buy design paper for Christmas as well, but it is the same story, I am sure you know that phenomenon, too? This one is from Rayher and I really love the colours.
***
Ich bräuchte eigentlich auch kein Hintergrundpapier kaufen, aber das ist die gleiche Geschichte, ich bin sicher, ihr kennt das auch, nicht wahr? Das hier ist von Rahyer und ich liebe diese Farben.
The sentiment stamp is from Rayher, too, it says that snowflakes are winter's butterflies. Nice, don't you think so? The green snowflake, the ribbon and the snowflake charm are from my stash. The tiny snowflakes have been punched out with a border punch from Martha Stewart. There is a tiny drop of Stickles Diamond on every snowflake.
***
Der Textstempel ist auch von Rayher, einer schöner Spruch, nicht wahr? Die grüne Schneeflocke, das Band und der Schneeflocken-Charm sind aus meinem Vorrat. Die kleinen Schneeflocken sind mit einem Bordürenstanzer von Martha Stewart ausgestanzt. Auf jeder Scneeflocke sitzt ein Tröpfchen Stickles "Diamond".

Copics I used:
Verwendete Copics:
Scarf/Schal: R81, R83, YG00, YG03 
Nose/Nase: YR04
Hat/Hut: N9, N7, N5, N3
Snow, snowman/Schnee, Schneemann: N0, N1
Bird, "arms"/Vogel, "Arme": E43, E44
Coloured shadow/Farbiger Schatten: B21

Hopefully you like my card! Have a nice week!
Ich hoffe, meine Karte gefällt euch!Ich wünsche euch eine schöne Woche!
Liebe Grüße/Big Hugs
Kreativmonster/Barbara


Tuesday, August 28, 2012

Hoi means hi in Dutch

Hi Copic fans!!
Hallo Copic-Fans!!

It's Mariska again and this time I have a cute card to show you using Maya watching a ladybug from Whiff of Joy. Now as you may know by now I always work in 3D (I did a tutorial on it HERE) so when I want to work on kraft paper this doesn't mean I have to color on it :). I just colored my image on my usual paper and then paper pieced it onto a base of craft cardstock.
***
Hier ist wieder Mariska und  dieses Mal hzeige ich euch eine niedliche Karte mit "Maya watching a ladybug" von Whiff of Joy. Wie viele von euch wissen, arbeite ich immer in 3D (ich habe darüber HIER ein Tutorial gemacht) und wenn ich auf Packpapier arbeiten möchte, heißt dass nicht, dass ich es kolorierne muss :). Ich habe mein Motiv auf meinem üblichen Papier koloriert und es dann auf einer Basis aus packpapierfarbenem Cardstock aufgebaut.

Isn't that cute? The cardshape is a double scalloped square doily die by Whimsy Stamps and those cute letter stamps are from a stamp set named Spell it out, also by Whimsy Stamps. I wrote hoi, which means hello in Dutch, thought that fitted the little image very well :).
***
Ist das nicht niedlich? Die Kartenform ist ein Double Scalloped Square Stanzer von Whimsy Stamps und diese niedlichen Buchstaben sind aus einem Set namens "Spell it out "von Whimsy Stamps, ich habe Hoi geschrieben, das heißt auf Holländisch hallo, ich dachte, das passt gut zu dem Motiv :).


Here is a close up of the cute little lady.
***
Hier ist eine Nahaufnahme von der niedlichen kleinen Dame.

Now I'd like to show you a little something:
***
 Jetzt möchte ich euch etwas zeigen:
This is the first picture of the little pieces I have colored, not cut out yet but still completely ready for the next step in my 3D paper piecing. The only thing is, I thought the bleu was still to bright. The solution:
***
 Das ist das erste Bild mit den kleinen Teilen, die ich koloriert habe, noch nicht ausgeschnitten, aber komplett fertig für den nächsten Schritt meiner 3D-Technik. Das einzige war, dass mir das Hellblau noch zu hell war.

I had to take my W-Copic markers out anyway to do the bottom layers (if you've seen my tutorial on 3D you know what I mean) so I colored the bleu parts again with a layer of W shades. Just directly over the already colored bleu. I do this pretty often but this time I thought, lets take a picture of the before and after. I know a lot of people first give their coloring a layer of W but as you can see, you can also do it afterwards. Don't you love the blending abbilities of our Copic Markers?
***
Ich musste meine W-Copics ohnehin herausholen um die unteren Schichten (wenn ihr mein Tutorial angesehen habt, wisst ihr, was ich meine) zu kolorieren, daher habe ich eine Schicht der W-Schattierungen auf das Hellblau aufgetragen. Einfach über das, was ich schon hellblau koloriert hatte. Ich mache das ziemlich oft, aber dieses Mal dachte ich, mach mal Vorher-Nachher-Fotos. Ich kenne viele Leute, die ihren Kolorationen   erst eine Schicht Grau verpassen, aber wie ihr sehr geht es auch andersherum. Liebt ihr diese vielfältigen Schattierungsmöglichkeiten der Copic Marker nicht auch?

Copic Markers used:
Verwendete Copic Marker:
Skin/Haut: E11, E00, E000, E0000
Cheeks/Wangen: R22, R20
Shirt and other pink accents/Shirt und andere pinke Akzente: RV69, RV66, RV63
Tulips/Tulpen: RV66, RV55, RV63, RV52
Ladybug/Marienkäfer: R59, R46, R43
Hair/Haar: E44, E42, E41, E40
Jeans: B95, B93, B91, B02, B00, B0000, W5, W3, W0, W00
Leaves/Blätter: G94, YG91, YG23, YG13

See you back in a while!!
Bis bald!!

Hugs,


Saturday, August 18, 2012

adventures and holidays

Hello everyone!
This is Kathrin today sharing a new card with all of you.
***
Hallo an alle!
Hier ist Kathrin mit einer neuen Karte, die ich Euch gerne zeigen möchte.

My girls are off from school for 2 weeks now - and this inspired me to make a vacation themed card. Not only because we are on holidays at the moment - also because august and vacation just belong to each other.
***
Meine Mädels haben nun seit 2 Wochen Sommerferien - und darum habe ich eine Urlaubskarte gemacht. Und das nicht nur, weil wir momentan in Urlaub sind, sondern auch, weil August und Urlaub für mich einfach zusammen gehören.


I used one of the cute Henry the Mouse stamps by Whiff Of Joy here. Its name is Adventures With A Friend.
Since I had colored the Mouse in browns and used a browny green for the backpack I needed some other color to not make the image look lame and so I went with black for the hat and camera. This also brings the image together since I went with greys for the stone the little froggy is sitting on.
***
Ich habe hier einen der süßen Henry-Stempel von Whiff Of Joy verwendet. Der Name ist "Abenteuer mit einem Freund".
Da ich die Maus braun und den Rucksack grün-braun coloriert habe, brauchte ich eine Kontrastfarbe, damit das Motiv nicht langweilig aussieht. Darum habe ich mich beim Hut und der Kamera für schwarz entschieden. Und damit bringe ich auch das ganze Motiv zu einer Einheit, denn für den Fels, auf dem der Frosch sitzt, habe ich mich für grau entschieden.

Matching the photo theme I picked my embellishments: a photo strip, the saying and I also stamped a tiny camera on a tiny metallic plate. The oval brad underneath the bow says "smile".
***
Passend zum Foto-Thema habe ich auch meine Verzierung ausgwählt: etwas Filmstreifen, den Text und auf ein kleines Metallschild habe ich eine winzige Kamera gestempelt. Auf dem ovalen Brad unter der Schleife steht "smile".

And these are the Copics used for the coloring:
Und hiermit habe ich coloriert:


Thanks for stopping by - and enjoy the summer!
***
Danke fürs Vorbeischauen - und genießt den Sommer!


Wednesday, November 30, 2011

Christmas lantern

Hello dear Copicfriends,
Hallo liebe Copicfreunde,


today I show you a lantern
with iamges from Whiff of Joy.
 heute zeige ich Euch eine Laterne,
mit Motiven von Whiff of Joy.
 
On one side, there ist the
"Pscht-Weihnachtsmann" to be seen.
Auf einer Seite ist der
"Pscht - Weihnachtsmann" zu sehen.


On another side there is
"Willow with Cristmascandle".
Und auf der anderen Seite ist 
"Willow mit der Weihnachtskerze".


I coloured both images using three nuances of red
R20 - R22 - R27.
Coloriert habe ich beide Motive in 3 Rottönen
R20 - R22 - R27.

The candle, the wrath in her hair and the belt have
 been coloured using ATyou Spica red,olive, lemon, und gold.
Die Kerze, der Haarkranz und der Gürtel
wurden mit ATyou Spica red,olive, lemon, und gold coloriert.

Willow's hair has been coloured with E29 - E31
and for both faces I used E000 - E00 - E50.
Für "Willow´s" Haare habe E29 - E31 genommen und
beide Gesichter wurden mit E000 - E00 - E50 coloriert.
 

Santa's shoes have been colured with
W1 - W3 and for his sack I used E43 - E47.
Für  die Schuhe des Weihnachtsmann habe ich 
W1 - W3 und für den Geschenksack
habe ich E43 - E47 verwendet.

Illuminated
 Hier beleuchtet


I used Martha Stewart punches "Arctic Snowflakes", XL Himalayan Snowflakes"
Stickles "White", Rhinestones, Atyou Spica  yellow, gold, red and green.
The paper is Graphic 45.
Weiters habe ich 
Martha Stweart Stanzer "Arctic Snowflakes", XL Himalayan Snowflakes"
Stickles Weiss, Schmucksteine,
Atyou Spica in Gelb, Gold, Rot  und Grün verwendet.
Das Designpapier ist von Graphic 45.

I hope, you like my lanterne and thanks for visiting.
Hoffe meine Laterne gefällt Euch und
danke für Euren Besuch.