Followers

Showing posts with label Weihnachten. Show all posts

Monday, December 17, 2012

Merry Christmas!/Fröhliche Weihnachten!

Hello dear Copic fans,
Hallo liebe Copic-Fans,
This is one more image I simply couldn't resist buying this year. It is a digi from Sugar Nellie's Homegrown Collection and it is called "Gingerbread Cookies". Lovely, isn't it?
***
das ist noch ein Motiv, dem ich in diesem Jahr nicht widerstehen konnte es zu kaufen. Es heißt "Gingerbread Cookies" und ist ein Digi aus der Homegrown Collection von Sugar Nellie.
 
 Again I have chosen colours that are not traditional for Christmas. I like that though I am a big fan of red and green für Christmas, too. The pretty paper is from Ursus and it is called "Classic Christmas". The sentiment is from a nice set from Rayher.  I tinted the rims of the image, the sentiment and the snowflakes (Martha Stewart punch) with RV0000, so it matches the designpaper.
***
Wieder habe ich mich für Farben entschieden, die nicht traditionell zu Weihnachten gehören. Ich mag das, auch wenn ich ein großer Fan von Rot und Grün zu Weihnachten bin. Das tolle Papier ist von Ursus, es heißt "Classic Christmas". Der Textstempel ist von Rayher aus einen ganz tollen Set. Den Rand des Motivs, des Textes und die Schneeflocken (Stanzer von Martha Stewart) habe ich mit RV0000 eingefärbt, um sie an das Designpapier anzupassen.
Inside the card, I glued a piece of white cardstock with snowflake borders
 that I made with a Martha Stewart border punch. 
***
Innen habe ich ein Stück weißen Karton eingeklebt,  dem ich mit einem 
Bordürenstanzer von Martha Stewart zwei Schneeflockenkanten gemacht habe.
On the image, I added some golden Stickles to the star and Stickles 
"Frosted Lace" as snow underneath the girl's feet. To make the earflaps look fluffy, I placed the colours there in dots.
***
Auf dem Motiv habe ich paar goldene Stickles auf  dem Stern und Stickles "Fosted Lace" als Schnee unter den Füßen des Mädchens aufgetragen. Damit die Ohrenwärmer flauschig aussehen, habe ich die Farben dort in Punkten aufgetragen.
Copics I used:
Verwendete Copics:
Skin/Haut: E50, E51, E02
Hair/Haare: E08, E19, YR14, E59
Star/Stern: Y35, Y38
Sweater, earwarmer/Pulli,Ohrenwärmer: RV91, RV93, RV95
Skirt, shawl, legwarmers/Rock, Schal, Stulpen: V20, V22, V25, V28
Shadows/Schatten: W0, W1, RV0000
I wish you a very merry Christmas, cozy hours with your loved ones and a Happy New Year!
***
Ich wünsche euch allen ein wunderschönes Weihnachtsfest, gemütliche Stunden mit euren Lieben und ein frohes Neues Jahr!
Big Hugs
Barbara/Kreativmonster

Wednesday, November 28, 2012

Winner of Challenge 11 and new Challenge!

Hello Copic fans,
 Hallo Copic-Fans!

It's me again, Barbara/Kreativmonster
for the Copic Marker Europe Blog Challenge. 
Thank you for all the wonderfull projects you created
 with Copic Markers to join the our challenge last month!
***
Ich bin's wieder, Barbara/Kreativmonster,
mit der Copic Marker Europe Blog Challenge.
Vielen Dank für die großartigen Projekte,
die ihr im letzten Monat mit Copic Markern
für unsere Challenge gemacht habt!
 
 
And now, here comes the winner of Challenge 11, it  is....
***
Jetzt kommt endlich die Gewinnerin der Challenge 11, es  ist...


#6 GroT


Gro,  please send us an email with your request for 3 Copic Sketch markers.
 *** 
Gro, nimm bitte per E-Mail Kontakt mit uns auf und nenne uns deine 3 gewünschten Copic Sketch Marker.

*************************************************************************
Here is our new challenge for you:
***
Hier ist unsere neue Challenge für euch:
 
  A Christmas card
Eine Weihnachtskarte


Here are some inspirational projects from our Designteam
***
Hier sind einige inspirierende Werke des Design-Teams:


So now, it's your turn! Show us your work, and
you can win 3 sketch markers of your choice. As usual, we want you to use your Copics for your project.
Of course, we are happy about participants from all over the world, but we can only send Markers to winners who are living in Europe, North Africa and the Middle East.
Enter your link in Mr Linky
before the end of 23th December.
*** 
Also, jetzt seid ihr dran! Zeigt uns Eure Werke,
Ihr könnt 3 Sketch Marker Eurer Wahl gewinnen. Wie immer möchten wir natürlich, dass ihr eure Copics für euer Projekt verwendet.
Natürlich freuen wir uns über Teilnehmer aus der ganzen Welt, aber wir können die Marker nur an Gewinner schicken, die in Europa, Nordafrika und dem Mittleren Osten leben.
Tragt Euren Link in Mr. Linky ein
Teilnahmeschluss ist der 23. Dezember.


To enter visit our Challenge page 
Auf unserer Challenge Page könnt ihr euch eintragen.
We are looking forward to see your creations!
Wir freuen uns darauf, eure Werke zu sehen!
Hugs
Barbara/Kreativmonster
for
CME team

++++++++++++++++++++++++++++++++++++++++++


Sunday, November 25, 2012

Lichtschein/Light of candles and lanterns


Hallo liebe Copic-Fans,
Hello dear Copic fans,

gerade jetzt zur Weihnachtszeit kommen wir in die Verlegenheit, dass wir Motive kolorieren möchten, in denen eine brennende Kerze oder eine andere Lichtquelle vorkommt. Das hat wahrscheinlich nicht nur bei mir die Frage aufgeworfen, welchen Effekt der Lichtschein auf mein Motiv hat.
***
Right now at Christmas time, the occasion occurs often that we want to colour images that include burning candles or other lightsources. I suppose I am not the only one who has wondered about which effect this will have to my image.

Ich bin sehr glücklich darüber, dass ich einen wunderbaren Ehemann habe, der mich immer unterstützt, also habe ich ihn gefragt, wie sich das seiner Meinung nach mit den Lichtstrahlen verhält. Zunächst rief er mich in das abgedunkelte Badezimmer, wo er mit einer Kerze in der Hand stand, um mir zu zeigen, dass genau unter der Kerze kein Lichtschein hinkommt. Dann habe ich nach seiner Anleitung folgende Zeichnung angefertigt:
***
I am very lucky to have a wonderfull, very supportive husband, so I asked him about the rays of light. At first, he called me to the darkened bathroom where he stood with a candle in his hand to show me, that there is no light right underneath the candle. Later, I made this drawing following his instructions:


Natürlich muss man das nicht soooo wissenschaftlich genau umsetzen, aber es gab mir eine Idee, wie sich das Licht rund um die Kerzenflamme verteilt. Um das in meiner kolorierten Version überprüfen zu können, habe ich den Kreis und den Ausschnitt unter der Flamme auf eine Folie übertragen.
***
 Of course you don't have to apply this scientifically correct, but it gave me an idea, how the light spreads out around the flame. To check on this in my coloured version, I transfered the circle and the gap underneath the flame onto a transperancy.
Ich habe die Folie immer wieder mal zwischendurch aufgelegt, am Ende trifft es nicht absolut, aber ich finde, es sieht natürlich aus:
***
I placed the transperancy several times onto the image during colouring, but at last it does not fit exactly. But it looks natural, doesn't it?


Und das ist mein coloriertes Motiv:
***
And here is the coloured image:
Verwendete Copics:
Copics I used:
Haut/Skin: E50, E51, E02
Haare/hair: E51, E53, E55, T3
Flamme, Licht/flame, light: Y0000, Y00, Y21, Y35, Y38
Kerze/candle: T0, T1
Grünzeug/greenery: YG95, YG99
Schleifen/bows: R22, R27
Schatten/shadows: T0, T1, T3
Sterne/stars:  Y35
B0000

Das selbe Verfahren kann man natürlich auch auf andere Lichtquellen anwenden. Ich mag z.B.  diese viktorianischen Straßenlaternen unheimlich gerne. Diese hier ist von Mo Manning:
***
The same procedure can be applied to other lightsources, too. I really do love those victorian lamp posts. This one is from Mo Manning:
Hier kann man auch genauer erkennen, wie man den Bereich feststellt, in den der Lichtschein fällt. Man zieht jeweils eine Linie von der Flamme zum Dach der Laterne und zum Boden. Da Lichtstrahlen nicht um die Ecke scheinen, ist exakt über und unter der Laterne kein Licht. Die Schleife an dem Kranz steht wiederum so weit vor, dass man davon ausgehen kann, dass sie an den gekennzeichneten Stellen  genauso vom Lichtschein erfasst wird, wie die Enden der Querstange über dem Kranz. Wieder habe ich mit einer Folie kontrolliert.
***
Here you can see more clearly how to fix the area where the rays of light go to. You draw one line from the flame to the top of the lamp and one to the bottom. Because light rays don't shine around corners, there is no light exactly above and under the lamp. The bow is protuding that far, that you can assume, that the marked areas are touched by the light like the ends of the metal bar above the wreath.
Again, I  checked using a transparency.

Und hier ist das fertige Motiv.
***
And here is the coloured image:
Verwendete Copics:
Copics I used:
Licht, Flamme/light, flame: Y21, Y35, Y38, Y0000, Y00
Kranz/wreath: YG95, YG99
Schleife/bow: R22, R27, R29
Laterne/lamp post: T0, T5, T7, T9, 100

Das sind die Karten, die ich mit den Motiven gemacht habe:
***
These are the cards I made using these images:


Ich hoffe, ich konnte euch mit meinem Tutorial eine kleine Hilfestellung geben, und wünsche euch eine schöne Adventszeit.
Hopefully, my tutorial will be helpful to you. I wish you a merry advent.

Liebe Grüße/Big Hugs
Barbara/Kreativmonster

Monday, November 12, 2012

Schneeflocken sind die Schmetterlinge des Winters

Hello dear Copic fans,
Hallo liebe Copic-Fans,
Every year I tell myself, that I do not have to buy any new Christmas or winter stamps, because I have soooo many of them. And then images as cute as this little guy from Whiff of Joy come along and I simply have to have him! He is a cutie, isn't he?
***
jedes Jahr sage ich mir auf's Neue, dass ich keine Weihnachts- oder Winterstempel kaufen muss, weil ich sooo viele habe. Dann sehe ich aber so süße Motive wie diesen kleinen Kerl hier von Whiff of Joy und muss ihn einfach haben! Ist er nicht total süß?

I would not have to buy design paper for Christmas as well, but it is the same story, I am sure you know that phenomenon, too? This one is from Rayher and I really love the colours.
***
Ich bräuchte eigentlich auch kein Hintergrundpapier kaufen, aber das ist die gleiche Geschichte, ich bin sicher, ihr kennt das auch, nicht wahr? Das hier ist von Rahyer und ich liebe diese Farben.
The sentiment stamp is from Rayher, too, it says that snowflakes are winter's butterflies. Nice, don't you think so? The green snowflake, the ribbon and the snowflake charm are from my stash. The tiny snowflakes have been punched out with a border punch from Martha Stewart. There is a tiny drop of Stickles Diamond on every snowflake.
***
Der Textstempel ist auch von Rayher, einer schöner Spruch, nicht wahr? Die grüne Schneeflocke, das Band und der Schneeflocken-Charm sind aus meinem Vorrat. Die kleinen Schneeflocken sind mit einem Bordürenstanzer von Martha Stewart ausgestanzt. Auf jeder Scneeflocke sitzt ein Tröpfchen Stickles "Diamond".

Copics I used:
Verwendete Copics:
Scarf/Schal: R81, R83, YG00, YG03 
Nose/Nase: YR04
Hat/Hut: N9, N7, N5, N3
Snow, snowman/Schnee, Schneemann: N0, N1
Bird, "arms"/Vogel, "Arme": E43, E44
Coloured shadow/Farbiger Schatten: B21

Hopefully you like my card! Have a nice week!
Ich hoffe, meine Karte gefällt euch!Ich wünsche euch eine schöne Woche!
Liebe Grüße/Big Hugs
Kreativmonster/Barbara


Thursday, October 25, 2012

Time for Heidi in the snow again/Es ist wieder Zeit für Heidi im Schnee


Hello dear Copic fans,
Hallo liebe Copic-Fans,
  We are almost at the end of October, so Christmas is just around the corner and will be here surprisingly fast as every year. So I started my production of Winter and Christmas cards with Heidi, one of the sweet images from Sylvia Zet for Wee Stamps. Heidi is a digi, but she is available as rubber stamp, too
***
wir haben fast Ende Oktober, Weihnachten ist nicht mehr weit und wird - wie jedes Jahr - ganz überraschend vor der Tür stehen. Ich habe daher mit der Produktion von Winter- und Weihnachtskarten begonnen, unter anderem mit der süßen Heid von Sylvia Zet für Wee Stamps. Heidi ist ein digi, aber inzwischen gibt es sie auch als Gummistempel.

The lovely paper is from Ursus, it is called "Winterzauber" and I really love that colour-combo! My Craft Robo cut the snowflake and there is a lot of Stickles "Diamond" on this card - I love this, too. The sentiment is from Whiff of Joy. They have sentiments in German and in English, too.
***
Das tolle Papier ist "Winterzauber" von Ursus, ich liebe diese Farbkombination! Die Schneeflocke hat mein Craft Robo geschnitten und es ist eine Menge Stickles "Diamond" auf der Karte, das liebe ich auch! Der Textstempel ist von Whiff of Joy, es gibt dort deutsche und auch englische Texte.
Copics I used:
Die Copics, die ich verwendet habe:
Skin/Haut: E50, E51, E02
Hair and fur/Haare und Pelz: E51, E53, E55, E57, E59
Clothes/Kleidung: B02, B04, B05, B06

Hopefully I could inspire you to mak a start at Chrsitmas cards, too!
Ich hoffe, dass ich euch dazu bewege, euch auch an die Weihnachtskarten zu machen!

Liebe Grüße/Big Hugs
Kreativmonster/Barbara

Sunday, November 20, 2011

Merry Christmas

Hello dear Copic friends,

hallo liebe Copicfreunde,

here I have a card to show you which I used two stamps from the new Magnolia collection "Sweet Christmas Dreams" for. I think this cute Jingle Tilda and the invitingly opened door fit together so wonderfully. Don't you want to enter the festive decorated house?
The snow was made using structure paste and sprinkled with glitter. It's so sad that I am not able to show you more of the wonderful shimmer on the photo.
***
hier bringe ich euch eine Karte mit zwei Stempeln aus der neuen Magnoliakollektion  "Sweet Christmas Dreams". Ich finde, dass die süße Jingle Tilda wunderbar mit der einladend geöffneten Tür  zusammen passt. Bekommt man nicht Lust in das festlich geschmückte Haus einzutreten?
Der Schnee ist mit Strukturpaste gestaltet und mit Glitter bestreut. Es ist schade, dass ich Euch auf dem Foto so wenig von dem schönen Schimmer zeigen kann.

These are the Copics I used:
mit diesen Copics habe ich koloriert:
E000, 00, 11, 71, 77;
R81, 83, 85;
YG01, 91, 93, 95;
Y21, 28
B94, 99;
W1, 3;

I hope it was a pleasure looking at the card and am wishing all of you a wonderful christmas time!
Ich hoffe, dass ich Euch mit dieser Karte eine Freude machen konnte und wünsche allen eine schöne Adventszeit!

Wednesday, November 2, 2011

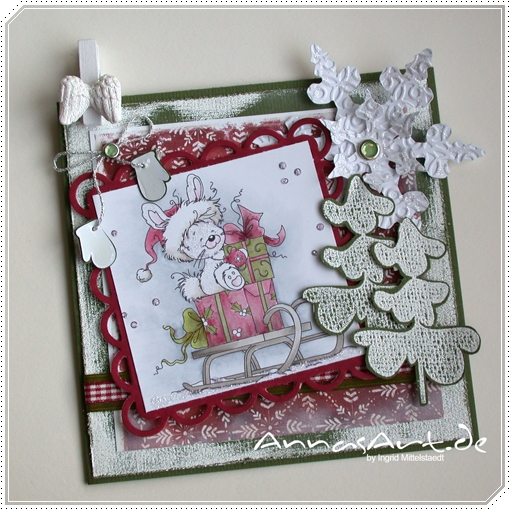
Christmas Bunny


Hello dear Copic fans,
hallo liebe Copic Fans,

here I am back with a new card. I used Christmas Bunny by Sylvia Zet - WeeStamps. This bunny is just too cute so why it shouldn't be him bringing the gifts?
But colorwise I went with the traditional christmas colors of red and green.
***
hier bin ich mit einer neuen Karte. Ich habe mich für den Christmas Bunny von Syliva Zet - WeeStamps entschieden. Der Hase ist doch einfach süß und warum soll er nicht mal die Geschenke bringen?
Farblich habe ich mich dann aber wieder an die klassischen Weihnachtsfarben rot und grün gehalten.


I have used:
Verwendet habe ich:

C00, 1, 3, 5, 7
W1, 3, 5
R83, 89,
YG00, 91, 93, 95,
E11

stamp/Stempel: WeeStamps,
Memento black on Perfect Coloring Paper by Holtz/Memento black auf Perfect Coloring Paper von Holtz
paper, trees/Papier, Tannenbäume: Magnolia
Spellbinder
Stickles, Glossy Accent, embossing powder white diamonds/Embossingpulver weiße Diamanten

I hope you like my card and say thanks for your visit on this blog!
***
Ich hoffe, dass Euch die Karte gefällt und bedanke mich für Euren Besuch auf diesem Blog!