Followers

Saturday, October 31, 2015

Subtle shades of green

Hello everyone, Happy Halloween!!

It's Jane here with a few more colouring suggestions........

Copic colours can be vibrant but they can also be used to create soft, delicate artwork
and here is an example of this using the no-lines technique and some of the paler colours within the range.....

A little tip:
Wrapping paper tends to be patterned and yet when we colour our images we often leave them plain.  As you can see I have added tiny dots, stripes, squiggles and small flowers to mine, hopefully making the whole image a little more interesting.

Tiddly Inks - Wryn Birthday Girl
Various dies

Copic colours:
Dress/Bow - G40, YG11, G12, G21, G46, T1, T2, T3, T4, G20
Ground - W0, W1
Hair - E51, E11, E13, E21, W2, W3
Skin/Eyes - E0000, E000, E00, V20, R20, G43, G46
Gifts - Y0000, Y00, YG0000, YG00, G0000, G00, YG11, G12, R000, R00, R01, RV32, W0, YR30, E50, YR20, W0, W1, G12, YR02, YR0000, YR000, YR00
Shoes - BG10, BG11, BG90, T1, T2

I hope this has inspired you to use some of the paler shades within the Copic colour range and to have a go at adding patterns to your images.

Happy Colouring

Friday, October 30, 2015

Challenge #45: Christmas

Challenge #45

Hi everyone!

Deborah here for you with the super fun NEW challenge #45!
Thank you for all who participated to our latest challenge, it will be a hard time to choose a winner!
There are so many great entries!
The winner will be announced on the first of November. 

Our new challenge is:

Christmas!

Oh yes, it will be there very soon! I think there are only 7 weeks left! Did you already started with your Christmascards? It's time to make them and enter our challenge!


And here's my inspiration card for you. I've used "Frosty Friends!" by Kraftin' Kimmie Stamps.
I used reds and greens and there are little golden accents in the designpaper so I used some frantage on the christmastree diecuts with white and gold.


Here are the Copic colours I've used:
skin: E04, 11, 00, 000, R02
hair: E57, 37, 35, 31
reds: N7, R59, 29, 27, 14
greens: N7, G28, 07, 05
white: C3, 1, 0
black: N9, 7, 5, 3
orange: E09, YR07, 04, Y15
yellow: Y17, 15, 11
blue: B26, 24, 21
sky: B02, 00, 000, 0000
branch: E37, 35
eyes: E35, E33, E31


To enter, enter your link on the Challenge page in Mr Linky
before the end of Thursday December 10.
The winner will be announced on the 13th of December.

 So now, it's your turn! Show us your work, and you can win
3 sketch markers of your choice.
Please be aware that only entries from those living in Europe, North Africa and the Middle East are possible.

Hugs


Deborah

Thursday, October 29, 2015

To a Special Friend


Good Morning!
I'm Cristina Valenzuela and this is my card this month for Copic Europe.
The range of Blue or Violet is my favourite in all it's saturation, one of the latest additions to my collection of Copic, V20.
Wish that I had it before ... I love it!

Here is a sample of the use of these colors in a stamp of  Digistamp Atelier.
I love this little girl!


Copic colours I used:
Skin: E15, E13, E31, E11, R20.
Hair: W1, W5, W7.
Flower: R11, R20, Y13.
Leaf: G21, G24.
Cat: T1, T3, T5.
Dress and Headband: V20, V22, V25.

I hope you like my card.
See you soon. Hugs!


Tuesday, October 27, 2015

Colouring lovely zombies!


Hello everyone!

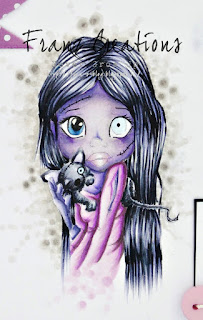
Franz here today with a scary tutorial about colouring zombie characters.

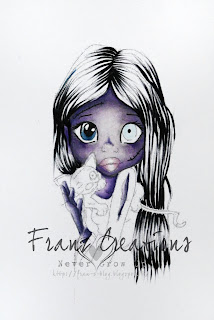
I've chosen a Saturated Canary image, "Zombie and her kitty" in the light version.

First of all, I coloured her skin in Blue Violet, but I started with Warm Greys to make her face a little dirtier.

I used four markers, colouring by dark to light: W7, W5, W3, W1


Then I coloured from dark to light again using Blue Violet Markers: BV23, BV00, BV000, BV0000

  
Then I added some BV08 here and there to give some accents to the image; I coloured the rest of the skin with the same technique.


Then I coloured the eyes in two different colours; the left one is the typical zombie eye :)

Here I used my Copic Multiliner 0.5 to draw some parts of eyes, the scars and the eyebrows

Then I coloured her hair.
I wanted black hair and I started colouring using the black marker: 100


I added some C5 (and BV23 here and there) to narrow the tips of darker lines and to make them longer trying to practice thin lines!


Then I coloured the white gaps within the lines using B01, but I left some highlights here and there


Finally I coloured the cat (from dark to light: C7, C5, C3, C1 + Black Copic Multiliner 0.5), the outfit (from dark to light: V06, V04, V01, V000 + some touches of W5 on the darkest areas)....


...and the background in warm grey: W5, W3, 1, 0

here is the finished card

I hope it could be useful!
Thank you for stopping by,

Monday, October 26, 2015

Spooky Birthday


Hi Everyone, it's Faye here today :)


With Halloween nearly upon us, I thought it would be a good time to colour a Witch. This rather gorgeous one is from Tiddly Inks and she insisted I give her a dark Airbrushed Background to stand on. She had her cauldron with her at the time, so I thought it best not to argue. 

Normally when I Airbrush, I cut a mask out of scrap paper, attach it to my image and then spray happily away, before removing the mask. However, this time, I had a go with Masking Fluid, which I have wanted to try for a while. It was probably easier to use than cutting a mask, but I did find it damaged the fibre of the card when I rubbed it off, and I had to be careful when I coloured after.

And one more thing. If you have a white desk, make sure you fully cover it with paper, before you Airbrush with T5. Just sayin'.


So, after I doodled a border and some cobwebs, I thought I was all done, took my photo's, edited them and then I was looking at the card. Yes, I thought, it really would look much better if I added some white Gel Pen to those cobwebs...


See, told you!

Markers Used...
Background/ Ground; T3, T5, T7
Skin; E000, E00, E01, E11, E71
Hair; YR12, YR14, YR18, E08, E29
Green; YG21, YG03, YG17, YG67
Purple; V12, V15, V17, V09

Thank you so much for stopping by. Have a great day.

Saturday, October 24, 2015

The Wicked Witch of the West.... (allmost)


Hi everyone, It's Sarit here.....

At the weekend we saw the beautiful movie "The wizard of Oz"  with Judy Garland.
When the movie was finished I sat down to color. With the influence of the movie and Halloween just around the corner, I thought it would be lots fun to color a witch.
I wanted something funny to color, looked around for a Digi and I came across a coloring page with such cute witches, it was hard to choose.
Here is the link for the coloring page


I didn't want the witch to have a regular color skin, so this time I have used the YG family for the skin.
For the dress folds, I wanted you to feel as if she is flying really fast......

I wanted the witch to seem with the moon.
The moon and the witch are one piece. Here is how I did it.


1. Mark the round die cut on the paper with pencil, where you want it to be
2. Cut with scissors the part you don't want to cut 
3. Place the die cut underneath the area you don't want to be cut 
4. Cut with your machine

I wanted to color the background, with Copic too.
and I did.....
  
Markers Used...

Face: YG01, YG23, YG25, YG17, G28
Dress: V04, V15, V17, V09, B26
Hat + Shoes: N4, N6, N7, N8 , B24+ B26
Socks: V12, V15, Y17, Y19
Broom: E55, E57, E59, E33
Background: B34, B37, B39

Wishing you a wonderful day


Thursday, October 22, 2015

I'm not so tough

 Hi everybody.
I had a digi lying around of a cool teenaged girl all coloured and ready to use and thought she would look great with this background stamp form the brand Indigo Blue.
Here is a close up of the image. I used the following Copic Markers to colour her:
Skin: E000-00-04-11-C1
Eyes: E25-27
Lips: R29
Hair: R35-37-59 and 110-C4-6-8
Black shades: 110-C4-6-8-10
Grey shades: N1-3-5
Red Shades: Hair: R35-37-59-89 
The background is done with the Airbrush and a stencil from brand Memory Box.
I used the following Copic Markers for the background: B04 - B14 - YG03 - YG09
Thanks for stopping by!
Wishing you a colourful day! 
Crafty hugs, 

Monday, October 19, 2015

Same same but different

Hi there!
It's time for me, Christina, to show some cards I have made. Two small cards, almost the same. Very Clean and simple. Only the images and the papers are different. 

I just love to work with these cuties from HÄnglar and StÄnglar. They are a bit big and I like that, more room to colour. Especially hair and faces. 

First the girl


All the papers are from Maja Design and the sentiment says "Limited Edition" (in Swedish). I have used soft colours for the girl, a Blue Violet combination that I have come to love.


Close up at the creases.


And then the boy


Once again the papers are from Maja Design and I have used the same sentiment for this card. The colours are some of my favourite. Can´t live without E40 pens.


Close up

Now my combinations

The girl
Skin E04-11-02-YR00-000
Hair E51-53-55-57
Dress V28-25-22-20
Shoes BV29-V28-BV23
White N1-0-blender

The boy
Skin E04-11-02-YR00-000
Hair E29-27-25-21
Shirt BG75-72-(71)-70
Pants E44-43-42
Shoes E49-47-43

Thats all from me! Have a wonderful week!

Thursday, October 15, 2015

Christmas Cards

Now is the time to start creating Christmas cards, it is exactly 71 days to go until Christmas Eve !!
I have bought some new stamps with mice that are so cute. I have chosen to colour this image in a little less traditional Christmas way this time.

On this subject, I have only been using different shades of the scales C, W and T
It will be quite effective even though it is not as colourful.

Mouse C1,3,5
Fir twig W5,7
Package W0,2,3,5
Dress T1,4,6

In this image I have coloured the clothes in a pink colour.
The mouse is coloured with shades of scale C. 
As snowflakes I have used Liguid Pearls around the subject.

Mouse C1,4,5 + RV00
Jacket W 1,3,5
Pink RV63,66,99
Fir YG61,63,67
Package BG70,72,75
Snow C2 + Blender

Hope you will be inspired and get started with your Christmas cards if you have not already begun!


Hugs from Rozzan

http://rozzanscrap.blogspot.se/
https://www.facebook.com/rozzanscrap

Tuesday, October 13, 2015

Tutorial: How to color faces

Hi Copic friends.

There are so many ways to colour faces. Depends on what kind of image you colour and how the artist drew the face. It is a matter of taste and technique- everybody has their preference.

I thought I would show you how like to colour faces, using the following Copic Markers: 
E0000-E000- E11-E13- E21- E15, E93 (cheeks), B99-97-93-91 (eyes)
Image is cropped from  "arctic friends" by Saturated Canary.

Start by colouring all the skin with E0000

Draw the shadows using E11. Under the hair line, over and under the eyes, under the chin, under some of the lip. Draw nose lines.

Add deeper shadows using E13.

Blend with E11 and E21.

Blend using E000.
E93 for the cheeks. I add colour from the eyes and towards the middle of the cheeks.

Blend with E000. I only use the E000 on the outer edges of the E93.

Next I darken the shadows using E15. On the hair line and hood line, 
and under the eyes and under the lips. Not on the nose.

Blend with E11 and E21. Adding shadow on the side of the nose and lips.

And finally blending with E000.

I add colour to the eyes. I used B99-97-95-93-91. From dark to light. I leave a small dot of white for highlights.
And for the lips: E93-R20 and E04. Same thing- I leave some white highlights.


Time to colour the rest of the image. Copic colours used: 
Hair: E57-55-53-51
Jacket: BG75-72-71 (homemade)- 70- 57-53-11, W7
Cup and t-shirt: BV25-23-20, W7
Skirt and mittens: E44-43-42-41
Fur: W7-3-00
Background. B60, W000, blender

Here's my finished project: 


Hope you like my tutorial. 
Thanks for stopping by!

Wishing you a colourful day! 
Crafty hugs, 
Elizabeth