Followers

Thursday, August 22, 2019

Cicci Lips in a fun Combo

Hi Copic Lovers!!
Cicci here today posting.
I hope you  are all having a great time this summer!! 

Today I'm going to make some lips in lilac color combo 


Step 1 
I started to color with RV55 but forgot to take a photo on that first step. I think you can see the different colors on the photo below. 

So first I draw some lips and color with RV55 and added V04  around the part I color with RV55


 Step 2
Add BV13


Step 3
Blend it all together with BV02


Step 4
Add BV08


Step 5
Add RV69


Step 6
Add a lot of RV06


Step 7
Now I add V09


Step 8
Blend V09 with V06


Step 9
Add and Blend a lot with V04


 Step 10
Add BV08


 Step 11
Blend again with V04


 Step 12
Add BV13 and blend it together with the other colors


Step 13
Add a little of RV69 


Step 14
Add RV55 in the middle of the lips and blend it together with the other colors


Step 15
Add V06 and V04 and blend it together 


 Step 16
Here I add some highligts with a withe posca pen and  I add some skin colors with E00


 Step 17
Add E21 over E00
I also have add B60 for teeth color

DONE!!


Have a Wonderful Day Everyone and I'll see you in September!!

Hugs and Smiles
from us here at Copic Europa blog

Sunday, August 18, 2019

Playing with ink!


Hello everyone! It's Delphine here today to share an inky post ;) I decided to have a play with my Copic Various Inks, I find it soooooo relaxing to just add drops of colour to paper and watch them mixing - I love it!


I used Transotype Synthetic Paper and put drops of BG09, 15, B04, 69 on it - I just let them act the way they wanted :)


Here is the result - I just keep playing until I like what I see. As you can see, I also usually use a piece of synthetic paper larger than what I really need, so that I can choose the part of the paper I like the most.


I cut my background and glued it to a white card base.


To decorate my background, I picked some Make it Crafty Chipboard - a Wreath Circle Frame, a Christmas Layered Word and a word from the Celebrate Adapt A Word. I coloured them using metallic pens for a bit of sparkle and white acrylic paint. I then covered them all in Star Dust Stickles.


I then glued everything to my background using Glossy Accents - and decided to add "It's" to have a well-balanced sentiment.


Thank you very much for your visit, have a great Sunday! Hugs,
Delphine xx

Monday, August 12, 2019

Ladybug Flower Bella babycard with video

Hi all,

How are you?
Enjoying your summer and perhaps holidays?

Today I have made a short coloring video for you.
I have printed a digital stamp - from Bugaboo which is called 
Ladybug Flower Bella - onto Perfect Colouring Paper.

Isn't this image sweet?
Perfect for baby or toddlers birthday cards.


I have chosen some pink design papers..and have started coloring..

See the short video below, 
it is a step by step coloring video.


Hope it was fun and useful...


hearts and ladybirds..for this cutie


Here is my final card, I have added some clouds,
some hearts,
and a satin bow with a ladybird sticker on top.

Dies : MFT, love2craft (avec)
Punch:  hearts
Design paper : Craft Sensations 

Copic used :
Skin : E 21, E 93, E 00, E 95
Clothes : R 11, R 12, R 14
Hair : E 29, YR 23, E 51
Ladybird : R 17, R 46
Leaves : YG 03, G 07, YG 01
Sky : B 00, FBG2
Flower : YR 12, YR 18, R 11, Y 11, Y 15, Y 19
Details: white gelpen

Thanks for your visit and comments :)

Hugs Blankina

Monday, August 5, 2019

Textured Clothing

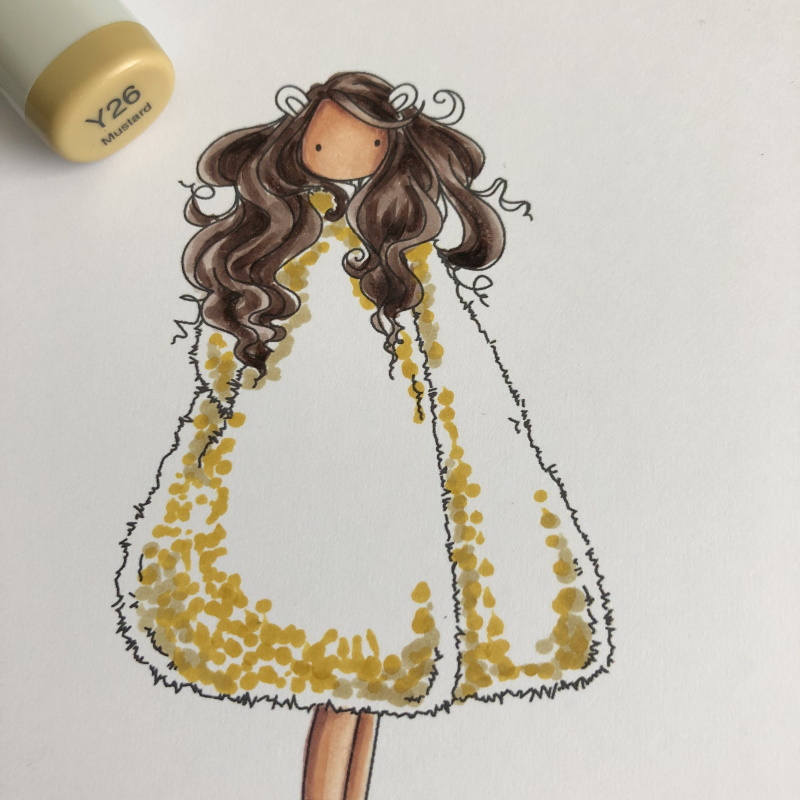
Hi everyone. Today I'm sharing how I add texture on a 'fur' coat. The image I'm using is Zodiac Girl Leo from Stamping Bella. 


First I colour the skin and hair. I use my go-to colours for skin - E00, E11, E04. I didn't add any cheek colour on this image. I also started with the darkest colour and worked to the lightest. I know some people like to do the opposite but this way works better for me. 


For the hair I used E70, E71, E74 and E77. I started with a mid tone, E74, then I dragged that out with some E71. I added the E77 and then went back with the E74/E71. I like to play around a little with it until I'm happy with the colour. I covered all the white space with E70


For the "lion's coat" I am using they Y family - Y21, Y23, Y26 and Y28. 


Again, I use the darkest colour, Y28, to map my shaded areas. I make dots instead of brush strokes. 


Then I add more dots in Y26. 


I completely cover the coat in Y23 dots and then I go back in with Y26 to fill out the colour. 


Lastly, I use the Y28 again and go over the darkest areas. I also use these colours for the lions ears. 


I used the same colour for the boots as I did for the hair, to tie in all the colours. 


Finally, I add some shading on the ground using N1 and N3 and I blend them out with 0. Now she's ready to pop on a card. 


Thanks for dropping by and I hope you're inspired to take out your markers today. 
Sandie
xXx

Sunday, August 4, 2019

It's a beautiful day

Hi everyone.

Hope that you are enjoying the summer.
 This time I have a lovely stamp; Big Sexy Bloom from Power Poppy. 

I have used the Stamping tool from Vaessen to stamp on Perfect Colouring Paper with Fadeout Ink from Inkon3 for a no line effect. 


I forgot to take pictures from colouring the first flower, sorry about that...


The colours I have used are BV13, YR07, YR16 and Y17.

I use the first colour, BV13, to give shade to the petals.

Then I go over this colour with my second colour YG07, to blend these 2 colours together.

My third colour is YR16, this goes a little bit over the YR07 and a little bit further.

And with my fourth colour, Y17,  I colour the rest of the petal.

I repeated this for all the flowers.
When I finished colouring, I put the image on a black,orange and white cardstock mat and added a sentiment with the new Washit ape from Studio light.


I hope you will  have an awesome month of august! 
See you next time!