Followers

Saturday, January 17, 2015

Candy Candy fan art, by Suki Manga Art

Dear Copic friends, first of all... Happy New Year! \(^o^)/

I am glad to be here one more time to show you another recently illustration.
This time I created a fan art of Candy Candy, a character created by Ms. Higarashi & Ms. Mizuki.

She is one of my favourite characters from my childhood, I hope you like this illustration.

I received many times the question about what kind of paper I use for Copic markers, I used a 120 gsm A4 size paper to create this one. Sometimes I use also A5 size.


These are the colours I used:

Skin: E000 - E00 - E21 - RV10
Hair: Y08 - Y38 - E11
Dress: C1 - C3 - C5 - R000 - R00 - R29 - R59 - RV10 - RV04 - R32 - V12 - V91
Raccoon: C1 - C3 - C7 - 100 - R23 - B000 - B05 - B29
Background: R000 - R00 - V12 - RV10 - B000 - B00

I also used a white ink pen for little details ^^

Do not hesitate to contact me if you have any question.

See you next month!

Bye.... ( * 3*)/

Suki Manga Art


Tuesday, January 13, 2015

Winter Wonderland


I'm sharing  with you an envelope card.  I have used the  Dutchdoobadoo Envelope stencil and love how this turned out, it's something different.

I have used the Dutch Doobadoo Ice Stars mask art stencil again with the structure paste on a sheet of Winter Wonderland paper,

I have used accetate for the window panel and kept it clear.


I have diecut the hat and gloves onto white shrink film and heated until it shrank and they made perfect embellishments for this wintery card.

The Winter Text was cut twice, once in white and once in black and I then added shabby blue frantage to the white one and then hooked my little hat over the top of the "T".


The ice skater comes on an A5 sheet of Dutch Silhouette skaters. I have added Dutchdoobadoo glue and Diamond dust for the snowywhite fluffy sparkle.


Here's the image out of the Envelope.  Isn't it cute.


I have added Dutch doobadoo Ice Crystal Snowflakes to the coloured image, which was a great embellishment and flat as the card fits inside the envelope.


Copic Markers used:-
Skin E0000, E000, E00, E11, E04 and Cheeks R20, R22
Blues B23, B26, B60
Snowman C5, C3, C1, B000, B00

Hugs Tracy x


The products used can be ordered in the Noor! Design U.K. webshop:

Follow Me on Pinterest

Sunday, January 11, 2015

Happy birthday!

Good morning copic friends, 

Elizabeth here today with some copic inspiration for you. I have been doing a lot of no-lines coloring lately, I think it gives such a lovely soft effect.

Here is a birthday card I made for my daughters friend. The sentiment means happy birthday in Norwegian.


I used Maja Design papers and flowers by WOC and Kort og Godt. 
The image is a digi-stamp. I lightened the lines in my Word programme and printed it.

 The image is called Amy, by Wee Stamps/Sylvia Zet.
Copic colors used: 
Skin: E13-11-21-00, E95
Hair: E59-577-55-53-51-50
Blues: BV29-25-23-21
Turqoise: BG75-72-70, W7 (YR24-23-21 in the flower center)
Pinks: R89-85-83-81
Pot and stockings: W7-5-3-1-00
Shoes and vest: E37-35-33-31-30
I colored the eyes and mouth using a dark brown prismacolor pencil to keep the soft look.

 Hope you like my card, and you got some inspiration to color!

Wishing you a wonderful week! 
Untill next time, 

Crafty hugs, 
Elizabeth 

Saturday, January 10, 2015

You are the Best!


My contribution today to blog Copic Europe is a simple tag.
Very pink, very shabby, full of sweetness ...

The stamp I used is a digital stamp from Mo's Digital Pencil.
I love the stamps girls dancers are always very nice.


Copic colours I used:
skin: E04, E01, E02, E21, E00, E000.
Dress: R000, R30, RV42, N1.
Stockings: N3, N1, W0.
Hair: E41, E42, E55.
Floor: N1, N3.


See you again in a few days !!
Do not forget to visit the blog of Copic Europe for much inspiration!

Thursday, January 8, 2015

Happy New 2014

Hi there Everone,
Åsa here today with some new inspiration. Hope you all had a fantastic beginning of the new year!


Today Im showing a card with papers from Bildmålarna and Kdesign. I even used my sewing machine on this one. That was a long time ago!


Im a little bored on the Christmas images for the moment, so Im really enjoying colouring this little beaty from ScrapBerry


I have used the following Copic:
Skin: E13-11-00-000-R20
Hair: E49-47-44-43-42
Dress: BV29-25-23-20
Boots/Jacket: RV97-95-93-91
Dog: N4-2-1-0
Ground: E43-42-41-0000
Sky: BG000-0000-Blender

I hope you all like it.
Have a wondefful week - see you all soon again!

Hugs Åsa!

Tuesday, January 6, 2015

Monster Sweets


Hi Everyone. My name is Faye and I'm addicted to Copics. I'm here with my very first post at Copic Marker Europe. I apologise if you can hear a high pitched squeal as you read, that noise happens when I get excited!

So, I wanted to share a card that reflects my style, using a Doodle Dragon Image from C.C.Designs...


You'll mostly find me to be a Clean and Simple kind of girl. Mainly because I can never decide where to stick anything else. But also because I like my image to shout! You'll notice I do a lot of doodling.

For this card, I have stamped my image, called Monster Sweets. I coloured his fur first, it was a big area and I wanted to concentrate on adding texture. I didn't blend at all, I lay down my colour by dotting the Marker down. When I was happy with all the shading, (I like to use grey for deep shade on turquoise colours; N5, or T7, for example.) I went over and randomly added some dots of Colourless Blender. The hat, tongue, nose, teeth, claws, lollipop and ground didn't really take long after that.

On an impulse, I decided to use some Glossy Accents on the lollipop, to add some shine and dimension. My tip to you is this... be patient, (not a strong point with me.) let it dry properly before you take your photo.


Markers Used...
Fur; BG10, BG53, BG57, BG78, T7
Ground; E41, E42, E43, E44
White; C0, C1, C3
Yellow; Y32, Y35, Y38, E33
Orange; YR14, YR18, E07
Pink; RV52, RV55, RV66

Thanks so much for stopping by... have a great day.
Faye x

Saturday, January 3, 2015

A lovely Fairy

Hello everyone and Happy New Year from Italy!
 
Here I'm again with a new card.

The protagonist this time is a super cute Mo Manning's fairy really fun to colour because of her full head of lovely curly hair.


I had lot of fun to colour the background too; I created a night sky with some clouds.
 Do you remember how clouds are during the night? They are not white as during the day, but light blue and a little grey, aren't they?
I used a lovely technique to draw them: first of all I coloured my sky with four different B-BG Copic Markers (B34, B32, B23, BG000) and then I simply removed the colour here and there making some little circles with my Blender Marker (0) to create the clouds.
You have to push the colour out from the circles to rest of the sky and if you are not satisfied, just repeat the same steps after a little bit of time when your paper is dry.
 If you like to give them a touch of grey, just add some Cold (C) or  Warm (W) grey here and there; the colour have not to be too dark, so use C0-W0 or C1-W1.


I created a CAS card with papers from different brands and some lovely Stampendous stamps.


 Here is the complete list of Copic Markers I've used:

Skin: E0000, E000, E00, E11
Hair: E00, E13, E15, E18, E29
Dress: BV000, BV01, BV02, BV13, BV04
Sky: BG000, B23, B32, B34
Grass: YG00, G12, G24, YG67
Water: B00, B02, B05, B06

 thanks for stopping by, I hope you all are having a lovely day!
 A big hug everybody :*
Franz.

Thursday, January 1, 2015

COCKA-DOODLE-DOO HAPPY NEW YEAR

COCKA-DOODLE-DOO   HAPPY NEW YEAR!!!!

I wish you all a happy and healthy year.
This is Sarit happy and excited to start the New Year with copic.


i took the image from kids coloring page "Ben's coloring pages" here is the link. http://www.benscoloringpages.com/coloringpages/pdrooster.php

I found on Wikipedia a gorgeous pic of a rooster that becomes my model and color guide. 

I started with the body with the light color BV20 just to "wet" my coloring area then adding the medium and dark color making the body feathers going back with the light color again to lighten the light areas.


From there I moved to the tail. I started with the BG color in the tail and then I add the BV + C colors with Flick motion from the center of the feather.
 When I finished the tail I made the "white area" with white gel pen.


The last area was the colored feathers. 
I started coloring with blending technique start from red going to yellow when   I finished, I add flicks on every colored area I flicked with darker color to achieve more realistic view.  


I had lots of fun coloring the rooster.
Hope you like it
Here are the color lists:

BV20 , BV23 , BV25, BV29
BG57, BG45, BG53, BG32
C0, C3, C5, C7,
R20, R21, R24, 0 this for the crest
R11, R12 for the legs
R89, R59, R22, R39
YR68, YR24, YR15
Y17, Y06, Y04, Y00
E23, E25

See you next  time

Hugs, Sarit  


Tuesday, December 30, 2014

Happy New Year !!

Good day to you all Copic lovers , ready for the most festive night of the year?
Here is Sandra and with this card I want to wish a very Happy New Year. 
To celebrate the end of this year I chose the digi stamp "She is Charming" from The paper's Shelter. A girl with a beautiful evening dress is preparing for a party. 
What better way to celebrate the new year  that is coming? 
For coloring I chose a combination a bit special but I really like.  I go with colors of  BG family with BV family. 
For the card I used bazzil, pattern October Afternoon and an adhesive sparkling paper I had at home for a long time! 
The banner is a die La La Land Craft and the background is illuminated with Frantage Silver.
With this project, I come back to renew my best wishes for a Happy New Year, which will bring happiness and peace to you and all your loved ones. 

See you soon next year !!!
Copic used :
Skin: E 000-00 01-11 
Hair: N0 -1-3-5-8 
Dress: BG 07-02-01-000 BV 000-01-02-04 
Shoes: BV 01-02-04 
Yellow: Y 0000-11-15
Background: W00-1-3
Spica Lavender

Monday, December 29, 2014

Winner Challenge 34 Anything goes!

Hello ,

first a big thank you to all the participant at our challenges in 2014,
 we wish you all a very Happy New Year 
and hope that you will join us also in 2015.

Finaly we have a winner on Challenge 34 Anything goes!


You really need to take a look at her great entry, 
it is a pleasure to see her work with our Copic products.


Send us  the numbers of the  3 sketch markers you want to recieve.
Copiceurope@gmail.com 
Kind regards Diny

Sunday, December 28, 2014

Four Tags 4 Four Friends


Hello everyone!

It's Vili here today and in the last post for this year I'd like to present you four projects - tags (or bookmarks), which I made for my bigger daughter and for three friends of hers. As to be absolutely personalised, I chose stamps that are connected to a favourite thing of every one of the girls. Here's what I got:


The first bookmark is for Maggie, who lately has a new love in her heart - a little Beagle puppy. I couldn't find a stamp with this breed, so I used Mo's Retriever, which I coloured with the typical colouration of the Beagle:


The second bookmark is for Joanna, who dreams of becoming a doctor. The closest I found was Mo's Nurse:

The next one is for my daughter. I chose Mo's Patty for two reasons - firstly, she herself is called Patricia; and, secondly, most of the time of her 17 years of living she has always been not satisfied with how the things are happening:


The last tag is for Ilina, who is the biggest fan of Pugs. Happily I found Mo's Pug Love:


And that's how the backs of the tags look like:


I wish everybody one more successful 2015; one, that makes dreams come true!

Copics used:
Skin: E11, E50, E51
Hair: E31, E33, E35, E37, Е 40, E41, E43, E44, E49
Retriever: E31, E33, E35, E37, E47, E49
Pug Love: Е 40, E41, E43, E44, E47, E49, R32, R35, R37, R59
Nurse:  W0, W3, W5, RV63, RV66, RV69
Patty: W0, W3, W5, B91, B93, B95, B97, B99, G000, BG72, BG78, G20, G24, G29


Have a lovely day and thanks for stopping by!

Vili  xxxx

Thursday, December 25, 2014

the birds fluttered YES....

Hi everyone,

on this special day it's my turn to publish a new creation and I have another art journalpage for you, because I just love making journalpages.
Making art journalpages is such a lot of fun, everything is allowed, no bounderies what soever. You can write down your feelings and paint/ draw on top of it or you just make a nice page using a lovely image. 


At first I created a background using my Dylusions ink and Dutch Doobadoo stencils.
The stencils I used are flowers, diamonds, stars and screen of stars. After that I did a little stamping using a script stamp.

The image is by the East Wind (check them out if you don't know them yet, they have some wonderful images) printed in a large size on copic paper.

For the hair and eyes I used 
BG01, 09, 57 and FBG2.
For the flowers and dress 
YG00, 17, 23, 
Y19, 
YR07, 15, 16 and 23, 
R05, 17, 37, 39, 46 and 59
RV0000, 02 and 06
For the skin I used
E000, 00, 11, 21 and 04
for shading I used BV00 and 100 (just very very tiny parts and eyebrows)

The copic colours go so well with my favorite Dylusions ink that I really love using them both on my pages, because both have such wonderful bright and cheery colours. 

wish you all a fabulous Xmas day with your dear ones 
and a healthy and very creative 2015
see you next year

hugs


Miranda

Wednesday, December 24, 2014

New challenge: It's a man's world!

Hi everyone!

Deborah here today with the new challenge for the Copic Marker Europe blog.

First, I would like to thank you for the beautiful entries last time, it was a pleasure to take a look at them!
The winner will be announced on friday, December 26.

Our new challenge is called:
"It's a man's world"
So create a card for a boy or a man with your fabulous Copic Markers.

And here is my inspiration for you:


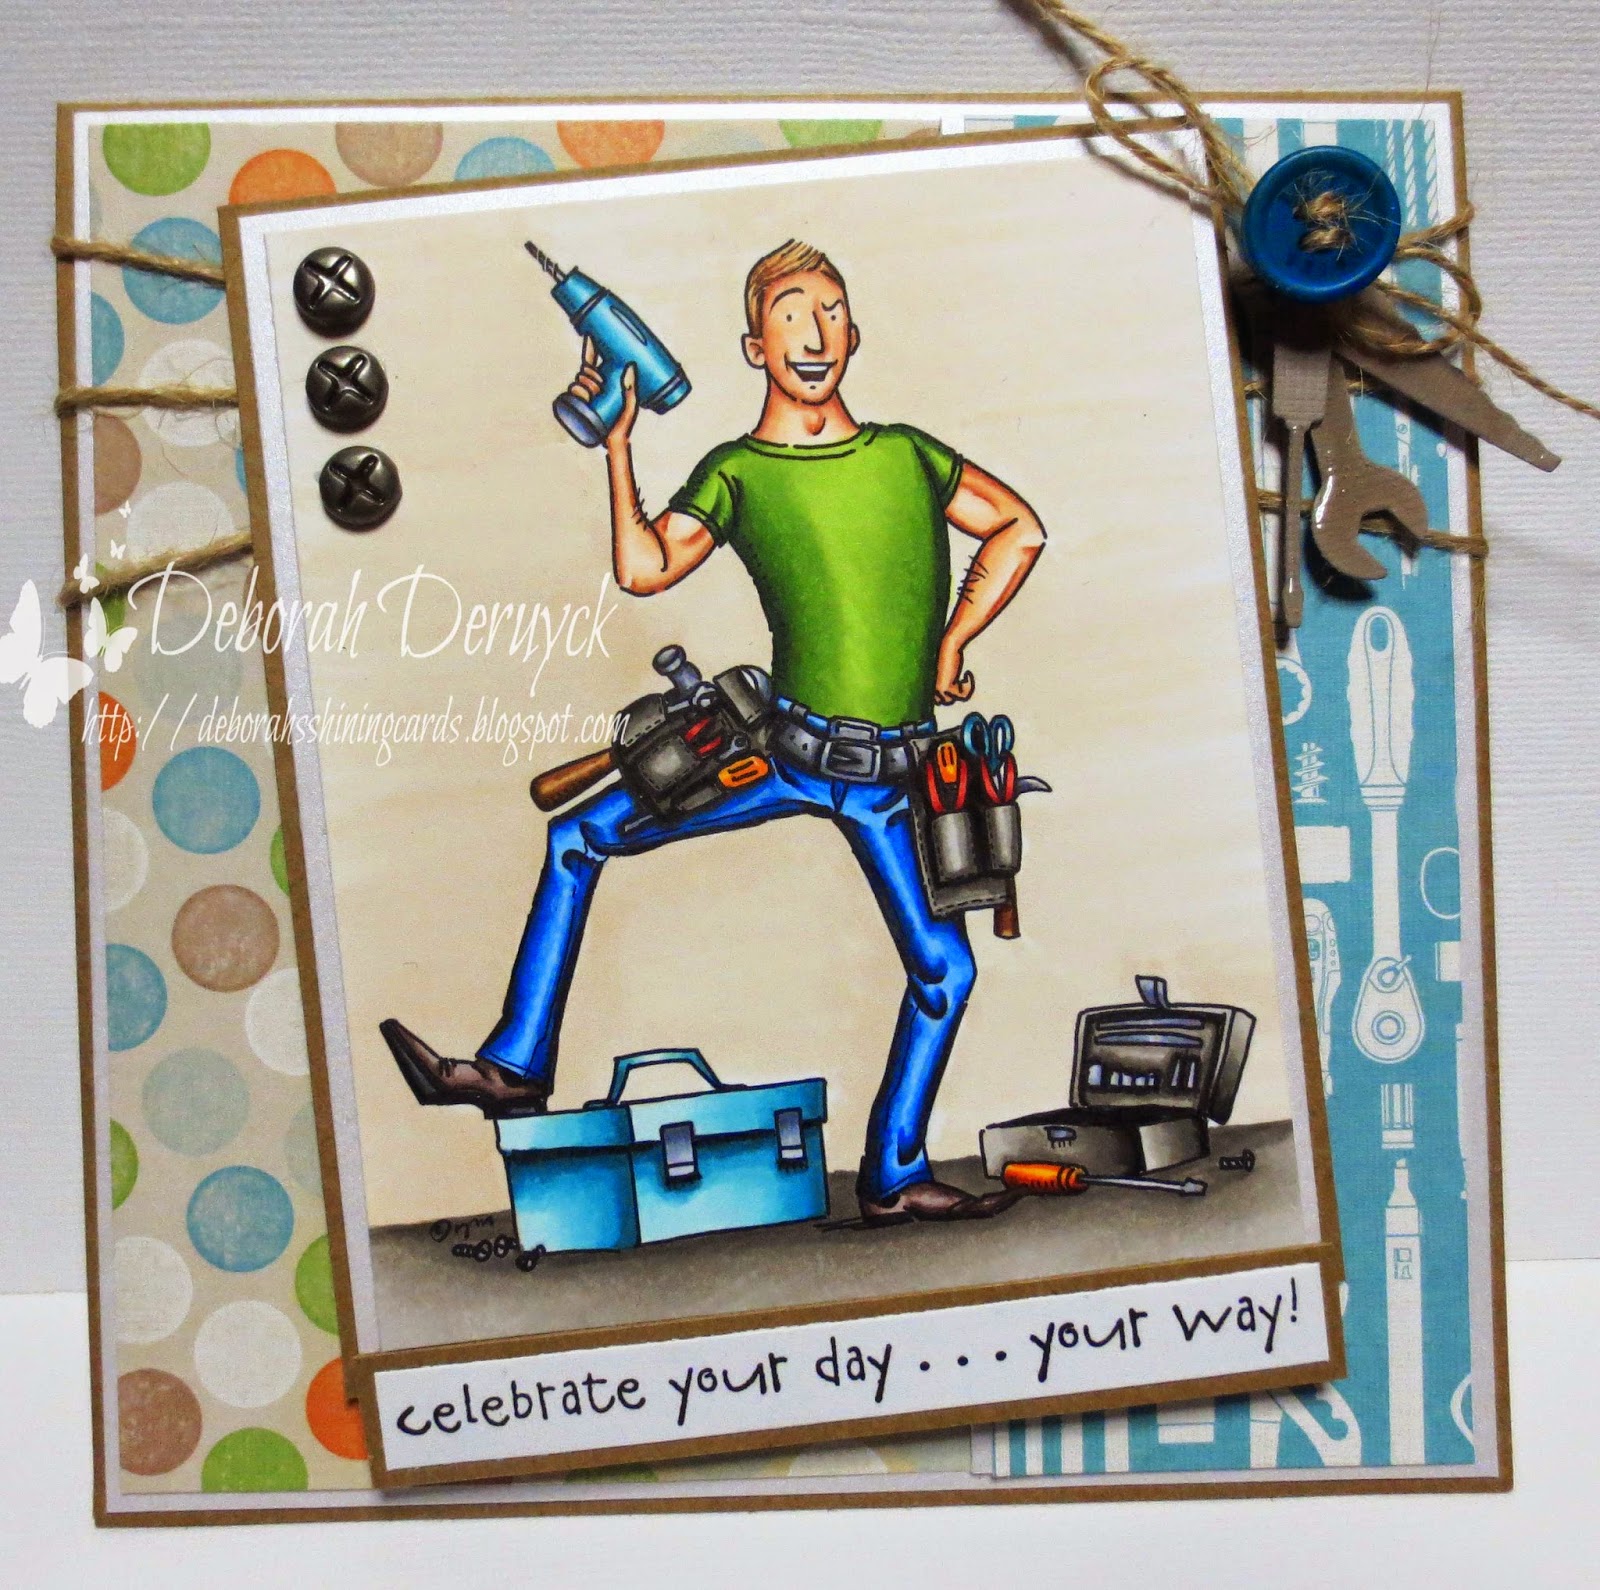
My boyfriend had his birthday this month, so I had to make a special card for him. We bought a new house last year and we had to rebuild it. Every free hour he was busy with working on the house. I'm so proud on him!  


The image is "Mr Fixit" by Mo Manning, her boysstamps are amazing!! The paper is from an old collection of BasicGrey "Bowties".  I've addes some die-cuts from Memorybox and some screw-brads. I've kept it very simple.


Here are the colours that I've used on this one:
Skin: E13, E11, E00, E000, R20
Hair: E35, E33, E50
Green: G28, YG67, YG17, YG13, YG11
Blue trousers: W7, B37, B34, B32
Warm grey: N9, W7, W5, W3, W1
Cold grey: C7, C5, C3, C1
Blue: BG09, BG05, BG01, BG000
Orange: YR07, YR04, Y17
Red: R59, R37, R35, R32
Brow: E37, E35, E33, E31
Background: E43, E41

So now, it's your turn! Show us your work, and you can win
3 sketch markers of your choice.
Please be aware that only entries from those living in Europe, North Africa and the Middle East are possible. 

To enter visit our Challenge page and enter your link in Mr Linky
before the end of 20th Januari 2015.

The winner will be announced 23th of Januari 2015.

We are looking forward to see your creations!
Hugs
Deborah

Tuesday, December 23, 2014

Merry Christmas to all of you

Tomorrow is Christmas Eve
 and I assume you have all the Christmas cards ready and is sent.
Today I show one of my last Christmas cards for this year.


I have tried to color this little cat 
with a slightly different technique from what I usually do.
I am using  small short little thin strokes 
to get some more fur-like appearance.
I have also drawe these thin strokes a little outside the lines
to get an effect of long fur on the cat. 
I paint adds so here two or three times,
 and concludes with the darkest color. 


The digistamp is from Aurora Wings 
and the paper from Maja Designs.


The color I have used:
Cat: E 40, E 41, E 43, E 44, E 47, E 53
Christmas Gift: T 0, T 1, T 4, T 7 and E 07, E 18, R 27
Christmas Santa hat: RV 63, RV 66, RV 69 ( and stickles)

Hugs from Rozzan

http://rozzanscrap.blogspot.se/
https://www.facebook.com/rozzanscrap


Sunday, December 21, 2014

Tutorial, How to colour manga eyes with Copic, by Suki Manga Art

Dear Copic friends,

Today I will show you an easy way to colour manga eyes in 4 simple steps.

I used 2 different range of colours in order to give you ideas, so you will see that you can use different ranges and obtain very nice results  following the instructions of this tutorial ^_____^

Let`s go!


Example nr 1:

I used the following copic numbers: C1 - C3 - C5 - C7 - B000 - B12 - B24 - B29


Here you can see a bigger image with the result using a blue range of colours:


Example nr 2:

I used the following copic numbers: C1 - C3 - C5 - C7 - R20 - RV04 - R29 - R59


Here you can see a bigger image with the result using a pink/red range of colours:


I hope you like this tutorial, I would like to see your version 
with different range of colours like green, violet... etc


Do not hesitate to contact me for any question
See you next month! 
bye..... (^___^)/  Suki Manga