Followers

Tuesday, January 8, 2013

For a mother to be...

Hi there Copic friends!
Hallo, liebe Copic-Freunde!

And welcome to a wonderful and exciting new year!
Und willkommen in einem wundervollen und aufregenden neuen Jahr!


Today I'm showing a card for a mother-to-be,
with one of Saturated Canary's lovely digistamps.
***
Heute zeige ich euch eine Karte für eine werdende Mutter
mit einem von Saturated Canarys zauberhaften Digis.


Papers are from MME and they are all distressed with Walnut Stain.
Flowers from WOC. The pearls are made with Pearlmaker.
***
Die Papiere sind von MME und alle sind mit Walnut Stain gewischt. 
Die Blumen sind von WOC. Die Perlen sind mit einem Pearlmaker gemacht.


I´ve used the following colors:
Ich habe die folgenden Farben verwendet:
Skin/Haut: E13-11-21-00-000
Cheeks, Lips/Wangen, Lippen: R22-11
Hair/Haare: E29-25-21-13
Blanket/Decke: B99-95-93
Dress/Kleid: BG75-72-70-10
Around the image/Um das Motiv herum: B00-BG000

Thank you for dropping by and see you soon again.
Danke fürs Vorbeischauen und bis bald.

Hugs, Åsa

Monday, January 7, 2013

A last project with some ocher yellow

Hi Copic lovers!!
Hallo Copic-Liebhaber!!

I'm very sorry to say this is my last post for Copic Marker Europe. I have been with CME for a year and still to this day can't believe I was asked but loved every single minute of it. Before I show you my last project I would like to thank the lovely ladies from the team, and especially Diny, for their trust in me and the amazing time I had. And I'd like to thank Holtz GmbH for having me on their team, I love your markers and will never stop using them.
***
Es tut mir sehr leid sagen zu müssen, dass dies mein letzter Beitrag für Copic Marker Europe ist. Ich war jetzt ein Jahr lang dabei und bis zu diesem Tage kann ich noch nicht glauben, dass ich gefragt worden bin, aber ich habe jede einzelne Minute geliebt. Bevor ich euch mein letztes Projekt zeige, möchte ich mich bei den zauberhaften Ladies des Teams bedanken, besonders bei Diny für ihr Vertrauen in mich, und die unglaubliche Zeit, die ich hatte. Und ich möchte mich bei der Holtz GmbH dafür bedanken, dass sie mich in das Team genommen habe, ich liebe eure Marker und werde nie aufhören, sie zu verwenden. 

OK, time to show you my final project. I decided to use paper with colors that I normally don't use that often. Especially ocher yellow isn't a shade I pick often. The paper I used as a base for my coloring is Stella and Rose by My Minds Eye.
***
OK, Zeit euch mein letztes Projekt zu zeigen. Ich habe mich entschieden, Papiere mit Farben zu verwenden, die ich normalerweise nicht oft aussuche. Insbesonder Ocker-Gelb ist ein Farbton, den ich selten herausgreife. Das Papier, das ich als Basis für meine Koloration verwendet habe, ist Stella Rose von My Minds Eye.
This is actually the lid of a 10x10 cm's store bought kraft colored box. The image I used is by StampFairy and is one of the Clementine Spring stamps. As always my image was 3D paper pieced and this time I decided to use a layer of design paper on the hat of the bunny. To give the design paper piece the same depth as the rest of the image I did color shading into this part of the hat with W colors.
***
Das ist der Deckes einer 10x10 cm großen packpapierfarbenen Schachtel, die ich gekauft habe. Das Motiv, das ich verwendet habe, ist von StampFairy und es ist einer der  Clementine Spring Stempel. Um dem Designpapier die gleiche Tiefe zu geben, wie dem Rest des Motivs, habe ich mit W-Tönen in diesem Teil des Hutes Schatten eingearbeitet.


I first colored Clementine with E40 colors but decided that with the papers I used she needed a bit more warmth, that's why I colored over the E40 coloring with E50 shades (please see my listed Copic Markers below for the exact colors). I love how Copic Markers blend to get exactly the color you want.
***
Ich habe Clementine zuerst mit E40er Farben koloriert, aber mit den verwendeten Papieren brauchte sie etwas mehr Wärme, daher habe ich E50er über die E40er aufgetragen (genaue Angaben findet ihr unten in der Liste der verwendeten Marker). Ich liebe es, wie die Copic Marker sich genau so verwischen lassen, wie ich es möchte.

That's it for me for Copic Marker Europe. I haven't thanked one group and that's you, the wonderful readers of the Copic Marker Europe blog. Thank all of YOU for your wonderful comments during my year at CME. It's been a wonderful experience!
***
Das war es  für mich für Copic Marker Europe. Ich habe einer Gruppe noch nicht gedankt und das sind die wunderbaren Leser des Copic Marker Europe Blogs. Danke an EUCH alle für eure wunderbaren Kommentare während meines Jahrs bei CME. Es war eine wunderbare Erfahrung!

Hugs,


Copic Markers used:
Bunny fur/Hasenfell: E44, E42, E41, E40 (and over that/und darüber) E53, E51, E50
Cheeks/Wangen: R24, R22, R20
Inner ears and nose bunny/Innenohr und Nase des Hasen: R22, R20, YR00, W2, W0, W00
Top hat/Hutoberteil: YR24, YR23, YR21, YR20
Shadow on paper pieced rim hat/Schatten auf dem Designpapier auf der Hutkrempe: W3, W1, W0, W00
Flowers/Blumen: BG18, BG15, BG13, BG11 and for the hearts/und für das Innere: YR27, YR24
Leaves/Blätter: BG96, G21
Shadow around image/Schatten um das Motiv herum: W3, W1, W0, W00

Sunday, January 6, 2013

Colouring background with "Activator"


Hello copic fans,
Hallo, Copic-Fans,

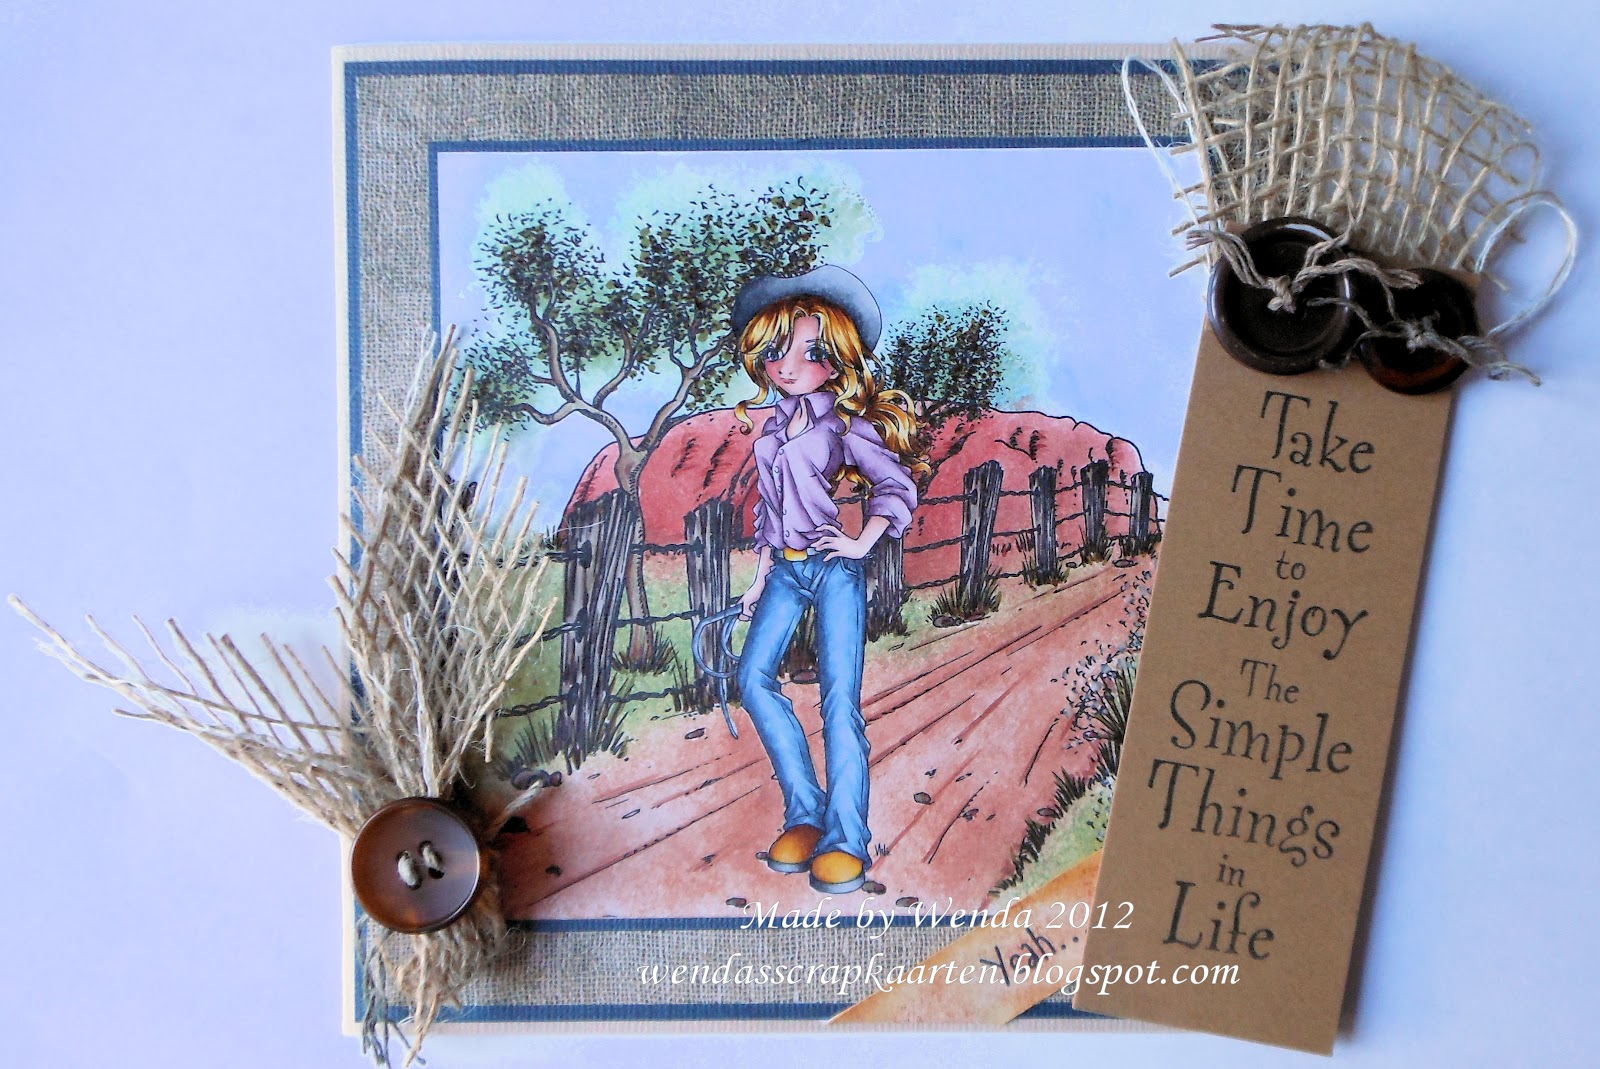
  Today it is my turn to make a tutorial for you and this time I will use the "Activator". For this project I chose digi's from “Make It Crafty” because they have great backgrounds. I have to admit that I have them all, but almost never use these stamps because it is quite a lot of color work. The way in which the background will be colored this time, I did use before to color, for example tickets or tags; so it can be applied in different ways.
***
heute bin ich an der Reihe, ein Tutorial für euch zu machen und dieses Mal werde ich den "Aktivator" verwenden. Für dieses Projekt habe ich Digis von   “Make It Crafty” ausgesucht, weil sie großartige Hintergründe haben. Ich muss zugeben, ich habe sie alle, aber ich verwende diese Motive kaum, weil die Koloration sehr viel Arbeit macht. Die Art, wie ich dieses Mal den Hintergrund kolorieren werde, habe ich vorher schon verwendet, zum Beispiel für Tickets oder Tags, man kann es also auf verschiedene Arten anwenden.


We start with printing the image on Copic paper one time and twice on normally, thin copy paper. From the first copy we cut out the larger masks of the objects we will colorize in the usual way. From the second copy the rock and the horizon are cut out.
***
Wir beginnen damit, dass wir das Motiv einmal auf Copic Papier und zweimal  auf normales, dünnes Kopierpapier ausdrucken. Aus der ersten Kopie werden wir größere Masken der Objekte ausschneiden, die wir ganz normal kolorieren werden. Aus der zweiten Kopie werden der Felsen und der Horizont ausgeschnitten.


Then we will paste the masks on the Copic paper. To paste I always use “2 way glue” myself.
Apply the glue with dots on the ends on the back of the mask and let it dry.
 Once dried the glue is no longer permanently and it can be removed when finished. For the tiny parts and the tree a "masking fluid" is used. This is a kind of liquid rubber which can be applied with a small paintbrush. This is also easy to rub off when we are done.
***
Dann kleben wir die Masken auf das Copic Papier. Ich verwende immer "2 way glue”. Tragt den Kleber mit den Punkten auf der Rückseite der Maske uf, so dass man sie wieder entfernen kann, wenn man fertig ist. Für kleine Teile und den Baum wird eine "Masking Fluid" verwendet. Das ist eine Art flüssiger Gummi, den man mit einem kleinen Pinsel aufträgt. Es ist leicht wegzurubbeln, wenn man fertig ist.


Now we will start with the sky.
For this purpose we lay on the great mask of the rock and everything which is below the horizon.
***
Jetzt beginnen wir mit dem Himmel.
Dafür legen wir die große Maske auf den Felsen und alles, was unterhalb des Horizonts ist. 


We will start with the sky and the green parts of the trees. Normally I colorize from dark to light, but now we will work from light to dark. Further we still need the Activator, the colors we want to use and little sponges. It doesn’t matter what kind of sponge, but the coarser the sponge, the more structure it will give. So we use an ordinary sponge, which first is cut into small pieces.
***
 Wir beginnen mit dem Himmel und den grünen Teilen des Baums. Normalerweise koloriere ich von dunkel nach hell, aber jetzt arbeiten wir von hell nach dunkel. Außerdem brauchen wir den Aktivator, die Farben, die wir verwenden wollen und kleine Schwämme. Es ist egal, welche Art von Schwamm, aber umso gröber die Struktur des Schwamms, umso mehr Struktur können wir erzielen. Wir verwenden einen gewöhnlichen Schwamm, den wir zuerst in kleine Stücke zerschneiden.


We take a piece of sponge between the fingers and apply the color we want to use;  in this case B52. Then we spray the Activator on it and directly start using the sponge.
***
Wir nehmen ein Stück Schwamm zwischen die Finger und tragen die Farbe auf, die wir verwenden wollen; in diesem Fall B52. Dann sprühen wir Aktivator darauf und beginnen direkt, den Schwamm  zu benutzen.


We start with the sky.
Use only the first time the ink, after that spray the Activator on it. We continue until the desired result is reached. Between, you can apply ink on the sponge again. Spray the Activator again when more color is desirable.
***
Wir beginnen mit dem Himmel.
Benutzt die Farbe nur beim ersten Mal, danach wird nur Aktivator aufgesprüht. Wir wiederholen den Vorgang, bis das gewünschte Ergebnis erreicht ist. Zwischendurch kann man wieder Farbe auf dem Schwanmm auftragen, sprüht den Aktivator wieder auf, wenn mehr Farbe gewünscht wird.


On the above picture, some parts of the sky are darkened with B34 in the same way we have done the first time. This can be done also with the same sponge.
***
 Auf dem Bild  oben sind einige Teile des Himmels mit B34 in der gleichen Art behandelt worden, wie wir es beim ersten Mal gemacht haben. Dazu kann man auch dengleichen Schwamm verwenden.


On the above picture I have done the leaves of the trees in the same way as the sky, but with a clean piece of sponge and the colors YG03 YG67 G94
***
Auf dem Bild oben habe ich die Blätter der Bäume so behandelt wie den Himmel, aber mit einem sauberen Stück Schwamm und den Farben  
YG03 YG67 G94


Now we continue with the rock.
We remove the first mask and replace it by the mask of the sky.  (The road with grass or a tree can simply blend into each other a bit, but that is not possible with a rock and the sky.)
***
Jetzt mach wir mit dem Felsen weiter.
Wir entfernen die Maske und ersetzen sie mit der Maske des Himmels. (Die Straße oder ein Baum können miteinander verschwimmen, aber das geht bei einem Felsen und dem Himmel nicht.)


On the above picture, we color the rock in the same way as the sky, but with the colors E08 E07 E09. We continue with the road; and therefore we use the colors E15 E17 E19 and E18, only on the road we don’t dab, but wipe across the paper in the direction of the road.
***
Auf dem Bild oben kolorieren wir den Felsen mit der gleichen Methode wie den Himmel, aber mit dem Farben E08 E07 E09. Wir machen mit der Straße weiter; dafür verwenden wir die Farben E15 E17 E19 und  E18, nur auf der Straße tupfen wir die Farbe nicht auf, sondern wischen in der Richtung des Straßenverlaufs über das Papier.


Finally we will color the grass, for which we use YG93 YG95 YG97 YG99 and we do this again with a small sponge.
***
Schließlich kolorieren wir das Gras, dafür verwenden wir YG93 YG95 YG97 YG99 und wieder tun wir das mit einem kleinen Schwamm.


We start with the lightest color for the entire surface and the darker we go, the less we apply.
At the end this will be the result.
***
 Wir beginnen mit der hellsten Farbe auf der gesamten Fläche und umso dunkler wir werden, umso weniger tragen wir auf.
Das wird am Ende das Ergebnis sein.

  
Then we can remove all masks and rub off the masking fluid. Then we continue with the coloring of the remaining objects.
***
Dann entfernen wir alle Masken und rubbeln die Maskierungsflüssigkeit ab. Dann setzen wir die Koloration mit den verbliebenen Objekten fort.


On the above picture, I finally add a few stripes and dots to the blades of grass, the tree and the road for more depth.
***
Auf dem Bild oben habe ich zum Schluss noch ein paar Streifen und Punkte für Grashalme und mehr Tiefe bei den Bäumen und der Straße hinzugefügt.


Above, the final result.
***
Oben das Endergebnis.
  

Colours used with the sponges:
Farben, die mit Schwämmen verwendet wurden:

Sky/Himmel: B52 –B34
Trees/Bäume: YG03 – G94 – YG676
Rock/Felsen: E08 – E07 – E09
Road/Straße: E15 –E17 – E19 – E18
Grass: YG93 – YG95 – YG97 – YG99

Colours used for the normal color work:
Farben, die für normale Koloration verwendet wurden:

Blades of grasss, tree/Grashalme, Baum: YG97 – E18
Road/Straße: E17 – E19
Rock/Felsen: E07 – E08
Skin/Haut: E11 –E00 – E000
Hair/Haare: E37 E37 - YR24 - Y26 - Y15 - Y21 - E50
Pants/HoseC7 - B99 - B97 - B95 - B93 - B91
Shirt: RV99 - RV95 - RV93 - RV91
Fence/ZaunE49 - E47 - E44 - E43


I hope I have been able to inspire you a little bit with this technique, but should you have any questions despite the above explanation, just let me know.
***
Ich hoffe, ich konnte euch mit dieser Technik ein Wenig inspirieren, aber solltet ihr irgendwelche Fragen zu meinen ERklärungen haben, lasst es mich einfach wissen.

Hugs Wenda

Thursday, January 3, 2013

Hairy Situation

Hello copic-lovers and happy New Year!
***
 Hallo Copic-Freunde und ein frohes Neues Jahr!


It's Franz here with another colourful project.
***
Hier ist Franz für euch mit einem farbenfrohen Projekt.


Today I’ve chosen an image from the talented Krista Smith (Saturated Canary) called “Hairy situation”, not hard to guess why!
***
Heute habe ich ein Motiv der talentierten Krista Smith (Saturated Canary) namens “Hairy situation” (haarige Situation) ausgesucht, es ist nicht schwer zu erraten, warum!


I’ve chosen this image because I love challenges and my challenge to face today is definetely colouring her hair :) I’ve been so lucky to read and experiment a fab tutorial written by Zoe from Make it Crafty and if the result is so far from what she achieved, I’m quite satisfied on how this lovely girl’s hair turns out…
***
Ich habe dieses Motiv ausgesucht, weil ich Herausforderungen liebe und meine Herausforderung für heute ist es definitiv ihre Haare zu kolorieren:) Ich hatte das Glück, ein fabelhaftes Tutorial von Zoe von Make it Crafty zu lesen und auszuprobieren und wenn auch das Ergebnis weit von dem entfernt ist, was sie erreicht, bin ich doch ganz zufrieden damit, wie ich die Haare des süßen Mädchens hinbekommen habe....


I’ve used five markers to give her hair this aspect: E50 for the lightest portions, E21-E25-E29 and E49 for the darkest parts.

First of all, I’ve coloured up the image using one of my favourite brown colour combo: E21-E25-E29 and I left uncolored the lightest strands, only at the end I added the hilights with my E50 and the darkest shadows with E49. I’ve tried to separate the single strands to have the streaks effect; you’ve to be very carefull and light handed if you want to try and I admit that I taken ages to do it :)
***
Ich habe fünf Marker verwendet, um in ihrem Haar diese Effekte zu erreichen: E50 für die hellsten Stellen, E21-E25-E29 und E49 für den dunkelsten Teil.
Zuallererst habe ich das Motiv mit meiner Lieblingskombination für braun koloriert:
E21-E25-E29. Die hellsten Strähnen habe ich unkoloriert gelassen, erst am Ende habe ich mit meinem E50 Lichtreflexe und die dunkelsten Schatten mit E49
hinzugefügt. Ich habe versucht, die einzelnen Stränge zu trennen, um einen strähnigen Effekt zu erreichen; man muss das vorsichtig und mit leichten Hand versuchen und ich gebe zu, es hat Ewigkeiten gedauert :)


This is a close up of the image,
I've used some blender on her trousers to try to give them a "dirty effect" like a real jeans fabric.
***
Das ist eine Nahaufnahme des Motivs, ich habe an der Hose etwas Colourless Blender verwendet, um ihr einen "schmutzigen Effekt" zu geben wie bei echtem Jeansstoff.


I’ve used papers from “Maja Design”, they are my favourite ones, because I think they’re so cute and I love the shabby effect they give to projects.

The sentiment is from Tim Holtz - Stampers Anonymous
***
Ich habe Papier von “Maja Design” verwendet, meine Lieblingsmarke, ich finde sie so hübsch und ich liebe den "Shabby-Effekt", den sie meinen Werken geben.
Der Textstempel ist von Tim Holtz - Stampers Anonymous.


This is my card recipe:
***
Hier ist mein Karten-Rezept:

Image/Motiv:

Saturated Canary - “Hairy Situation”

Papers/Papiere:

Maja Design Patterned Papers

White Canvas Bazzill cardstock

Materials/Materialien:

Cheesecloth/Verbandmull

Ribbons and flowers/Bänder und Blumen

Make it Crafty perfect colouring paper

Versafine Ink Pad “Vintage Sepia”

Tools and Dies/Werkzeuge und Schablonen:

Sizzix Big Shot

Seewing Machine/Nähmaschine

Nestabilities – “Classic Cirle LG” – “Classic Scalloped Circle LG”

Magnolia die “So wrapped lovely”;


Copics:

Skin/Haut: E0000-E000-E00-E11 + R000-R00-R20-R81 for cheecks/für die Wangen

Hair/Haare: E50-E21-E25-E29-E49

Eyes/Augen: B34-B91

T-Shirt: R81-R83-R85-R59;

Trousers (Jeans): B0000-B91-B93-B95-Blender


That’s all from me today!
***
Das ist heute alles von mir!

A big hug everybody,
*** 
Einen dicken Knuddler für alle,

Franz♥

Wednesday, January 2, 2013

Winner of Challenge 12

Hello Copic fans,
 Hallo Copic-Fans!

It's me again, Barbara/Kreativmonster
for the Copic Marker Europe Blog Challenge. 
You gave us a lot of nice work to do, choosing our favourite from all of the fantastic Christmas cards you showed us!
Thank you sooo much!
***
Ich bin's wieder, Barbara/Kreativmonster,
mit der Copic Marker Europe Blog Challenge.
Es war eine Menge schöner Arbeit, unseren Favoriten aus den vielen fantastischen Weihnachtskarten herauszusuchen, die ihr uns hier gezeigt habt.
Gaaaanz herzlichen Dank dafür! 
 
And now, here comes the winner of Challenge 12, it  is....
***
Jetzt kommt endlich die Gewinnerin der Challenge 12, es  ist...


#39 Steph


Steph,  please send us an email with your request for
3 Copic Sketch markers.
 *** 
Steph, nimm bitte per E-Mail Kontakt mit uns auf und nenne uns deine 3 gewünschten Copic Sketch Marker.

Today, there is no new challenge for you here, because we are going to change the schedule for the challenge to the 15th of every month, so watch out!
***
Heute gibt es hier keine neue Challenge für euch, da wir dabei sind, den Turnus auf den jeweils 15. eines jeden Monats zu wechseln, also haltet Ausschau!
   
Hugs
Barbara/Kreativmonster
for
CME team


Tuesday, January 1, 2013

Just for you


Happy New Year !!!
Frohes Neues Jahr!!!

Dear readers, 
Liebe Leser,

I wish you all the best 
with a lot of creativity for 2013
***
ich wünsche euch nur das Beste und eine
Menge an Kreativität für 2013!


Today I have chosen a Bildmalarna image.
And the beautiful paper is from Maja Design,
"It's Christmas time"
***
Heute habe ich ein Motiv von Bildmalarna ausgesucht 
und das schöne Papier ist "It's Christmas time" von Maja Design.


The flowers on this card are from Wild Orchid crafts and
I have bought them in our local scrapbook store.
The tag I have made with a punch from Stampin'Up the
Sentiment is from Popcorn the Bear. 
***
Die Blumen auf dieser Karte sind von Wild Orchids Craft,
 ich habe sie in meinem örtlichen Scrapbook-Laden gekauft.
Das Tag habe ich mit einem Stanzer von Stampin' Up gemacht,
der Textstempel ist von Popcorn, der Bär.


The markers I have used
Die Marker, die ich verwendet habe:
Skin/Haut: E000 E00 E02 R20
Hair/Haare
Clothes/Kleidung: R59 R56 R43 YG97 YG95 YG93
W0 W2 W4, C0 C2 C4
Bear/Bär: E44 E43 E42 E41


Inside the card
Innenseite der Karte


Thank you for leaving your comment, 
I hope we can read your comments
also in 2013.
***
Danke, dass ihr eure Kommentare hinterlasst
ich hoffe, wir können eure Kommentare auch 2013 wieder lesen.