Followers

Thursday, June 28, 2018

Building a background

Hi there Copic loversElena F here from Scrap-lanak Ganbaran.

For my latest DT project I have built a background matching the theme of the stamp I used.

I stamped my rubber Gorjuss Girl stamp (how much do I love rubber stamps?!) in Memento Desert Sand Ink to colour her using the No Lines Colouring Technique. I love to colour this way.

Here you've got the picture of my project:


...and here's a closer look at the colouring:


I'm going to show you in pictures how I built this scene.

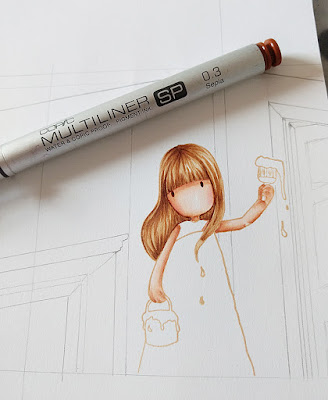
I take my ruler and draw a central line, which is going to be the center of the perspective.


At an 80 degree angle I draw the angle for the two walls.


Then using the same angle I draw an open door to make my scene more interesting and I draw by hand the decoration for the door.


I draw a chimney, also respecting the 80 degrees angle.


Then I start colouring my stamp, as you can see in the next step pictures:

I love to colour skin in E0000, 00, 21, 11 and 13.This is my super favourite skin combo.


Then I colour in dark blonde her hair using  E57,35 and 31.


Then I took my sepia Multiliner to add details to the eyes, a very few tiny lines in the hair and in the contour of her face. See how different she looks? There is much more depth.


Then I colour her dress using  BG10, 11, 13 and a few tiny touches of BG49.


Now I start coloring my background in a light pink using RV10, R81, 83.


To colour the incoming wall (darkest for the shadow) I draw across the line with the marker and the ruler and then I add straight lines to blend all over.


As it appears she is decorating the room...a little BV11 colouring.


Then I took My R43 to make a patterned wallpaper look.


I colour the door in E43, 42, 41, 40 and the dark shadow of the other room in N5 and 7 (not shown in the picture).


Finaly I coloured the chimney C1, 00 and blender and the inside of it with C7 and C5.


I hope you found this post inspiring.
Thanks for sticking with me to the end!

Tuesday, June 26, 2018

If the shoe fits..

Good morning Copic Friends.

There are 2 ways to start colouring. Sometimes I just start and choose the colours I love to use. I let the images inspire me. 
But I demo at craft shows and shops a lot too and on those days I make lots and lots of backgrounds. So on other days I choose a background I have previously made and become inspired by this background to choose the colours. 

For today's creation I have chosen a background I made some time ago. It has a limited palette of colours, pink, blue and  violet, so I decided to use the same colours for my images. 
The images are by Dylusions. 


I always start with the face first. I used E50 as a base colour. 
Add BV00 for shading. 
Add E00 to get a warmer skin tone and blend all the layers together with E0000.


For the pink part of the images, I start with RV21. 
To create more depth use RV29 first than RV25 and RV23 and blend the layers toegther with RV21. 


I use the BV series next. I start with BV00. Use BV02 and BV04 to create more depth and blend all layers together wih BV00. 


The toadstools will be blue. Again I start with the lightest colour first; B23.
Use B29 next and then B28, B26 and B24. Blend all the layers together with B23. 

 Use the same blues for the border; B23, 24, 26, 28 and 29. 


Cut out all the images and glue them on your background. 
I found this funny quote on the internet. 

Have a fabulous day,

Miranda.

Saturday, June 23, 2018

Blowing bubbles...

Hello everyone!

It's Sue here today with a technique that uses Copic refills and washing up liquid to create a really fun bubbly background!

The items I have used for this background technique are - 
A piece of Glossy Photo Paper, Copic refills BG15, BG13, FBG2, plastic disposable cups, plastic straws and household washing up liquid.
I put a little bit of Copic refill BG13, a little Copic Colourless Blender and some washing up liquid in a plastic cup.  You need enough washing up liquid to make the refills quite thick and sticky.
Then, I put the straw in the liquid and blew through it to create bubbles!
There are a few things to be careful of at this stage!  Firstly, do not blow too hard or all the liquid will fly up and out of the cup and splash your face - I know this to be true!!! Secondly, please remember to blow through the straw - do not forget and suck the liquid up!
So - blow quite gently and slowly and steadily until you have a cup full of bubbles!
Then I placed a piece of glossy photo paper glossy side down onto the bubbles and pressed down so the bubbles burst on the paper.
Repeat this several times until you are happy with how it looks!
Next is the exciting part when you see the pattern the bubbles have made on the card!
Then I changed colour, and repeated the technique with FBG2
I had far too much fun playing with these bubbles - I think this has become one of my favourite techniques!
                             
I made quite few bubbly backgrounds - I did n't want to waste the Copic Ink so I made some for another time!
The background will dry after a few hours and all the bubbles left on the card will disappear!
There was really only one image I could put with such a fabulous bubbly background - hands up if you are also thinking of mermaids!!!
I had such fun doing this!  It would be great if you could try this too and show us your cards at
Copic Marker Europe on Facebook.
To find us just follow the link
HERE.


Thank you for popping by.
Happy Copic colouring

from Sue...xxx


Friday, June 22, 2018

Cicci colouring a fruit

Hi there Copic Lovers!
Cicci here today posting!! I was thinking to show you how I made this fruit.
I hope you like it and colour and eat one today.
Lol. 
It's very Healthy ;0)


Step 1
First I draw the fruits and some leaves
 Then add Y13 on the top. I used a Copic Mulltiliner  0.1 for the brown details

Step 2 
 Below the Y13, add Y15

Step 3
 Add YR15 over the Y15

Step 4
Add YR12 over the two other markers and add
 little lines on top of the fruit

Step 5
Add a little darker marker, I have used YR24

Step 6
Now its time for the fun!!
Blending.
Use Y15 and go over the whole fruit

Step 7
 Add some dots with YR07

Step 8 
More blending and more dots with YR04

Step  9
Blending again with Y08

Step 10
 Add some YR02 on the top on the fruit 

 Step 11
I like to use strong yellow so I added Y04 
for more light in the fruit

Step 12
Time for the babies!
Add in strokes with Y04

Step 13
Fill with Y17

Step 14
Add some YR04

 Step 15
 Add and Blend with Y15

 Step 16
Blend more with Y08
on the both the babies and the fruit

Step 17
Now I'm going to do the trick for this colouring...
Just add little white strokes on the babies and now its little like I think :0))
I have used a Posca Pen:

For the leaves, use YG23 03 13 G28 29

Have a wonderful day everyone and please feel free to visit anytime!!

HUGS and Smiles from the Copic Europa Girls,