Followers

Friday, June 30, 2017

Lucky duck!

Hi Copic marker Europe fans!

Sadly today it's my latest post for Copic Marker Europe.  I needed to stop because I hardly have some free time left and it's going to be so busy for me. Thank you so much for all your visits to my blogposts!!


I've used the stampset Quackers by SugarPea Designs, they are really cute!
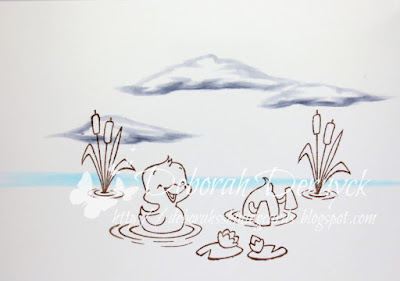
First I stamped the ducks and the plants in brown Memento ink on some colouring cardstock.
Then I mapped out the water with a light blue sky colour B000. I drew some clouds with C1 and added some texture to it using C3.


Then I added some more depth in the clouds using C3 marker again.


Then it's time to fill in the blue between and around the clouds using B00 and B000. I always keep it a little bit lighter around the clouds.


I blended the  blue sky colours together using B000 en B0000

The sky is ready so it's time for colouring the water. I used B60 to map that out and I used B37 to go over the lines in the water.


I blended the harsh line out using B34.


And blended again using B32 and added some marks to look like moving water.


I went over it using B37.

Blended again using B34.


And blended again using B32


Blended everything together using B21 and that is the lightest colour.

Then it was time to colour all the other things, like these plants.

The ducks were awesome to colour.

So here you can see the finished project using Copic markers.


I've added some more light using a white Derwent coloursoft pencil. You can do it with any white colourpencil. I also added some white highlights using the Copic Opaque White paint, that finished the colouring.


And here you can see the finished card:

All the colours I've used:
sky: B00, B000, B0000
clouds: C3, C1
water: B60, B37, B34, B32, B21 (+ white colourpencil and Copic opaque white)
ducks: Y17, Y15, Y11/ YR07, YR04, YR02,  YR00
green: G28, YG17, YG13, YG11
pink: RV17, RV55, RV52
brown: YR21, YR23, E37, E35

Thanks for your visit!

Deborah

Sunday, June 25, 2017

Copic and Chipboard


Hello everyone! Delphine here today to share a Copic project, with a Gorjuss stamp and chipboard in Copics - because you can colour chipboard with them and add a very "matching" touch to your card. The stamp I used is called Heartfelt.


Since I knew I wanted to use an oval frame chipboard, I started by colouring the background making it oval, using YG05, 03, 01, 00. I then coloured my Gorjuss skin in E04, 11, 00, 000.


For the dress, I wanted colour to pop as for my background and went for red, using a little bit of T5, then R39, 37, 35. I also coloured the heart in RV66, 55, 02 and made the underskirt black.


Next I did the hair with my favourite black combo - 100, then C9, C7 and BV04 for highlights. 


The frame I picked is a Make it Crafty Chipboard frame called Delicate Love Oval Frame. What I really like about those frames is the colour of the chipboard - a cream colour on which you can use and blend Copics.


I coloured the hearts first with the same reds I used for my image, then coloured the black with my 100 Copic and added tiny touches of gold with a paint pen. 
I die cut my image with an MFT oval die, added glue on the back of my frame to frame my image. I put my framed image on foam for a bit of dimension and that was it. 


Skin: E000, 00, 04, 11
Hair: 100, BV04, C7, 9
Red: R35, 37, 39 (+T5)
Pink: RV02, 55, 66
Background: YG00, 01, 03, 05


Thank you very much for your visit, have a great day! Hugs,
Delphine xx

Thursday, June 22, 2017

Toadstools

It has been a while since I last journalled....but finally I found some time to play. 
For this spread I used the lovely toadstools by Mischief Circus. And of course I coloured my toadstools with my Copic Markers.
    

I normally start with the light colours. 
Add a thin layer of YG03 and YG05.

Blend the 2 layers together with the YG03. 

For some more depth add some YG07 and YG09. 

Now I start colouring the rest of this cute toadstool. I used orange for the stem. Start with YR04, add YR07 and YR09 and blend the colours together with YR04. 


For the finishing touch I decided to use some blue as well. Start with BG01 and add more depth with BG05 and BG09.
I have coloured all the toadstools in the same way. 


I used quite a lot of colours, but I wanted a cheery and bright page, so I picked out a large set of happy colours.
All the colours I used are:
Y02:13:15:17:18:19
YG03:05:07:09
YR02:04:07:09
RV02:04:06:09
V01:04:05:06
BV00
BG01:05:07:09

Make a background with Dylusions inks and stencils.
At this point I decided to add some more depth using coloured pencils. I really love the combination of Copic Markers and coloured pencils. They really blend well together.
One half of the toadstools....


And the other half....


And this the finished spread...
In the end I added some doodles too, using Copic Multiliners.
Have a lovely day

Miranda 

Tuesday, June 20, 2017

Party like a pirate!...

Hello everyone...

It's Sue here today with a card made with some Copic coloured die cuts.
This card was really good fun to make, I enjoyed colouring it and adding texture to the background with Colourless Blender.

Here's a tutorial to show you how I made the sky, sea and sand background - it was very straightforward so I hope you'll try it too!
Here are the ingredients I used for the first part of the background - the sunset.
The Copics I used here are Y35, Y38, YR04, YR09 and Colourless Blender refill.
Take a piece of card measuring approximately 15cm x 12cm and colour across the top of the card with YR09. This doesn't need to be too precise and you can use the broad tip of the marker (I love using that - after all we don't get to do so very often)!
It doesn't matter if it looks a bit streaky as sunsets often look like that.
Repeat this with YR04...
then Y38...
and finally Y35.
Fix the Rays stencil on top of the Copic coloured sunset and stick it down with masking tape.  Pour a small amount of Colourless Blender into a spray bottle.
Spray the card and stencil with Colourless Blender - about four times should be fine.
Carefully remove the stencil and you will see that the Colourless Blender has lightened the colours leaving behind the stencil shape.
Set this aside.
These are the ingredients for the next part of the background - the sea.
The Copics used here are B18, B16, B02, B01 and Colourless Blender refill.
On another 15cm x 12cm piece of card colour horizontal bands of colour darkest to lightest, as shown. 
Pour a small amount of Colourless Blender into a small pot.
Dab the Colourless Blender over the Copic coloured card with a sponge, you will see the texture of the coloured background starting to change straightaway - I love this - it's like doing a magic trick!  The sponge gives the Copics a bubbly texture which is perfect for water!
With the Ocean Waves dies cut the card and set aside.
Here are the ingredients for the final part of the beach background - the sand.
The Copics I have used here are E33, E31 and E30.
Colour a piece of 15cm x 12cm card in exactly the same way as you did previously with the sunset and the sea...
Using a small piece of towelling or flannel dab Colourless Blender over the Copic background, tiny little dots will appear which are perfect for the texture of sand.
Using the Scenic Safari Dies cut the coloured card and start to assemble the beach scene.
Once the pieces are glued together and cut down to measure 14cm x 11cm the beach scene should look a something like this!
You can see the texture and patterns that the Colourless Blender has made in the Copic Colours, I think it looks really effective - I hope you do too!
It would be great if you could try this technique and show your cards to us at 
Copic Marker Europe on Facebook.
To find us just follow the link
To finish the scene I have added some images from the 
My Favourite Things stamp set - Party Like A Pirate along with an MFT die cut frame and a star charm.
Copic Markers Used -
Hair E19
Skin E04, R11, R00, E000, E0000
Clothes, Blues, B99, B97, B93, B91, 
Reds, R39, R37, R35, R32
Greys W9, W7, W5, W4, W2
Browns E27, E25, E23
Thank you for popping by, 
happy Copic colouring
from Sue...xxx