Followers

Showing posts with label Different Skin Tones. Show all posts

Monday, October 12, 2020

Halloween Card with Kraftin' Kimmie Stamps


Hello,
How are you ? Hope all safe..

Today I have a little inspiration for you. I have created a Halloween scene with a mix of super fun clear stamps from Kraftin Kimmie.

During the colouring I have made photos of the combination of Copic used.
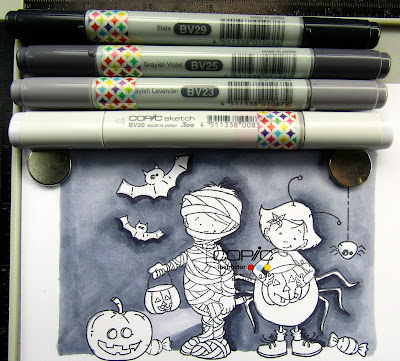

I have started to colour the background with the BV 20, BV 23, BV 25, BV 29 .
I love this combo..it creates a nice dark background with a violet hint.


The skin combo a bit different than usual
E 99, E 97, E 02, E 00..
and for the cheeks R 39


The spider costume of the girl was coloured in a purple combo
V 12, V 15, V 17, V 09


The pumpkins were coloured with my favorite combo
YR 14, YR 18, YR 07, E 15, E 18


The green combinations has almost a fluor look
YG 01, YG 23, G 14, G 29
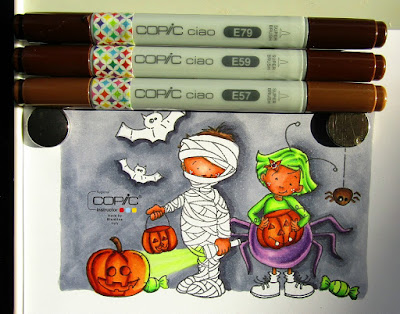

The spider and hair of the boy were coloured in a brown combination
E 57, E 59, E 79


The bats were coloured in a "black" combination
using N 4, N 6, N 8 and a hint of 110 and a black multiliner 0.3


The bandage of the boy was coloured with
E 40, E 41, E 43 


...and last but not least the floor was coloured with
N 4, N 6, N 8


Here is my finished card,

The shape die is from Studiolight Essentials STENCILSL116
The circle label die is from Sizzix , 660060 Tim Holtz 
The spider web die is from Marianne Design LR 0430
Various ribbons from my collection

The stamps are from Kraftin Kimmie 
(You're a scream ( boy and girl , sentiments boo, dressed to spook ) , 
I want candy ( pumpkin, bats, spider , candies )

The circle stamp is from Prickley Pear CLR013E
trick or treat sentiment is from Papertreyink Tag-its #7 


The part with the coloured images can actually be opened
to find the hidden message inside


Hope my card will inspire you to create your own Halloween card,
thanks for your visit here on the Copic Europe blog..

Hugs Blankina

Saturday, September 1, 2018

Different Skin Tones

Hi Everyone, it's Faye here today :)

Last month I wanted to do something different with a fairy I had already coloured a few times and I chose to use a different skin tone to the ones I would 'normally' reach for.

Whilst I was scribbling colours together to see how they looked, it occurred to me that I don't tend to play around with skin tones and really I ought to. It can be all too easy to get caught using your comfort colours every time you colour something, so I decided this month I would experiment with some alternative combinations.

I've used a Tiddly Inks image called Ellie says Hi. I love this stamp anyway, but she is particularly good for what I want to do here, as there's a nice big area for me to play with.

I'm only interested in her face at this time. I'm not worrying about eye or nose details, I just want to lay the colours down and see how they look together.

First of all, I am going to show you the order I lay markers when I colour a face. My light source is coming from the top left, so I'll have more shading on the right of the face than the left (because the right of the face is further from the light source)...


I start with E11, which is my lightest colour.
I am using this colour to 'mark' where my shading will be when I have finished.
I use a lighter colour first, for two reasons:
One.
If I change my mind about where I want the shading, this will be disguised when I go over the top with a darker colour.
Two.
By putting a layer of ink down first, the darker colour will sit on top, rather than sinking straight into the fibres of the paper, which makes it easier to blend.


I go over the top of the first colour with my darkest colour, E33


I use E13 to pull the shading out a little further.


When I am happy with the shading I have already added, (repeat previous steps if necessary) I use E11 to close the white space.


I add a cast shadow (BV23) under the left section of hair. As the light source is coming from the top left, the light cannot get here. I have also added BV23 inside her mouth and under her chin. By using a separate, darker, colour for the cast shadow, it makes these areas look different to the shading and really pops them back.


Here she is again, with all the colours:
E11, E13, E33, BV23

Here are some other skin combinations I played around with...


E23, E57, E27, BV25


Y28, E43, E44, BV23


E30, E53, E55, BV23


E70, E43, E71, BV25


E74, E47, E59, BV25

So peeps, be brave and reach for some of those 'other' colours sitting in your Copic Bag ;)

Thanks for stopping by... Have a great day.