Followers

Saturday, December 31, 2016

Introduction New DT members

Hello,
as promissed before, I love to introduce the new DT Members.

Sandra Catarino 
Copic Instructor Portugal

Hi, I am Sandra from Lisbon, Portugal. 
I am a mother of three lovely and joyful boys and a foster mom for two cats. I have a business and economics background, and I discovered Copics a few years ago when I opened a scrapbooking store, which I closed already. 
I am a perfectionist and love to learn, so in 2013 I attended the Copic Standard and Intermediate Designer Courses, in the US. 
In Germany I attended all the European Copic Colouring courses from 2012 to 2014, and finally became an European Regional Copic Instructor for Portugal in 2014. 

want to continue learning Copic and share it with fellow crafters and Copic fans. That’s why, last November, I attended a Copic boot camp in Arizona, USA, and I am already planning to attend the next ones.

And one of my favourites (and hubby’s) work. I put this on a tag and gifted it so I don’t have a better picture 
Happy new year!
Sandra
*********************************************************
Annemieke 
Copic Instructor Italy

Hi all Copic Europe lovers, my name in art is Blankina. 
I was born and raised in the Netherlands, but after having worked in several countries Italy has become my new home in 1996.  
Now I dedicate most of my time to my family , blog and my Copics, 
I am proud to be a Copic Instructor for Italy.

As a child I used to draw a lot but after having discovered stamps things slightly changed , 
now I mostly colour my stamped images , with Copic offcourse.
On this blog I hope to show my "doodle" side too, 
love to use my Copic Multiliners and get "lost", 
I normaly just start on a sheet without knowing what it will become, very relaxing.
Hope you will enjoy reading my posts on this blog and I love to see you on my personal blog too.


Groetjes Annemieke

We wish you both a very good time at CopicMarker Europe

A New Year and changes in our DT

Hello Copic lovers and followers,


on this last day of 2016,
 I want to thank my DT members for all the beautiful creations they have showed us on this blog. 
So much inspiration and ideas, from the bottom of my heart: THANK YOU Girls.

Also a big thabk you for the people who visited our blog, I know that in these days other social media forms are more popular, but to explane the techniques  we need the blog. I
t would be great when you find time to make a comment, my girls would love it.

At the end of this DT period we say good bye to Christina(Sweden) and Esther (Spain), both a big hug to thank you for you work for the CME blog. We will stay in touch. 

When two people are leaving, we needed two new DT members. Our Copic Instructors from Italy and Portugal are joining us . Blankina en Sandra welcome to the crew. In a separate post I wil introduce the new girls on the block. 

May I wish you all the best for 2017 and we hope to see and hear you here all a lot of times in 2017

Kind regards Diny Sprakel
administrator CME

Wednesday, December 28, 2016

Welcome to the world!

Hi Copic lovers,


Deborah here with some new and fresh inspiration for you.  Because Christmas is over, I decided to make a new start. And I'm going to start with the begining of life, so I made a babycard for a babyboy. 


I didn't wanted to made a blue card for a boy, so I made it in fresh Lemongreen. 
The stamp is one by Neat & Tangled and is called "Itty Bitty Welcoming Committee Stamp Set". How cute are those little critters? I didn't coloured the animals with many details but kept it simple, that matches the drawing much better. Even the design is simple.


Here are the colours I've used:
sheep: E25, E55, E53, E51
E44, E43, E41
bunny: W7, W5, W3, W1
chicks: Y28, Y26, Y21
Y17, Y15, Y11
banner: N5, YG09, YG06, YG03, YG00
gras: YG67, YG17, YG13, YG11
sky: B0000, B000, B00

Thank you for stopping by, 
Deborah

Tuesday, December 27, 2016

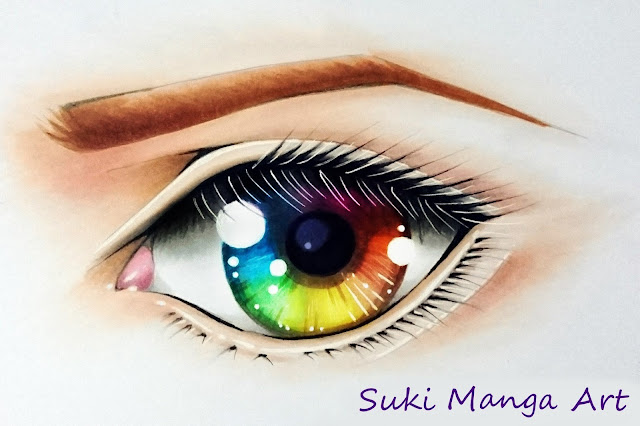
Tutorial: Rainbow eye by Suki Manga Art


Dear Copic friends, 
today I would like to show you how you can mix a total of 22 Copic markers 
to create a colourful rainblow eye.

Please try to do it yourself, I am sure that you will enjoy it.

I hope you like it ^__^


1) First of all I used Copic multiliner 0.1 warm gray colour
 and Copic multiliner 0.05 black to crate the line art


2) Then I started to apply shadows below the eyelid.

Colours used are: W1 - C3 - C5


3) Now we can add colour for the skin around the eye

Colours used: E000 - E00 - E21 - E35


4) On this step I proceed to apply the colours following this sequence: 


G14 - YG11 - Y08 - Y00 - E11 - Y38 -  RV04 -  RV10 - V12 - BV00 - B05 - BG01 - B00 


For the lacrimal caruncle I used: R81 - R20 - RV95


5) Then I used W3 - W1 to add profundity and shadows.

For the pupil I used V09 - BV13


6) I used W3 - W5 to apply more shadow under the upper eyelid


7) To colour the eyebrow I only used E11 - E35 - E99


8) Last step is to apply bright reflections with white ink and thin lines with FB2 - E71


and.... this is the final result and all the colours used during all the process!

FB2 - B05 - BG01 - B00 - G14 - YG11 - Y00 - Y08
 - E00 - E21 - Y38 - E35 - E71 - V09 - V12 - RV95
 - RV10 - W1- W3 - C3 - C5 - B66


Have a very nice 2017! \(^O^)/ BYE!

Suki Manga Art


Friday, December 23, 2016

Gorjuss Christmas


Hello everyone! It's Delphine here today to share a Christmas card - of course, featuring a Gorjuss Girl - I just love these stamps :)


This Gorjuss Girl is called Ladybird. I stamped her in Memento Tuxedo Black Ink and die cut my image with a Lawn Fawn Stitched Rectangle. I first coloured the background, then my image using Copics. I then added a bit of shading to her skin using my Polychromos. I stamped little snowflakes in Versamark using a Bo Bunny snowflake and embossed them in white. I did the same for my sentiment, by CC Designs. Finally I applied some Distress Inks around my die cut image to make it pop a bit more.


Skin: E000, 00, 01, 11, 13 + pencil
Hair: 100, BV04, T7, 9
Pink: RV55, 66, 69
Purple: BV00, 02, 04, 08
Background: BV02, C2, 3


Thank you very much for your visit, have a great day and a Merry Christmas everyone! Hugs,
Delphine xx

Monday, December 12, 2016

Meribelle the Mermaid


Hi Everyone, it's Faye here today :) 

So, Christmas is coming and Christmas is coming FAST! When we get to this point in the proceedings, I like to take a break. Ok, so I have a rebellious streak. But, it's nice to step away from the red and green, the cute elves and do something completely different..


 This sweet image is called Meribelle Pretty, (from Polkadoodles) the perfect name for her, don't you think? 

I coloured the background with Copics. The trick to colouring a large area smoothly is to use the chisel nib and have a lovely juicy marker. It can get messy, so make sure you have something underneath!


Copics Used... 
Background; BG10, BG11, BG53
Skin; E000, E00, E21, E70
Hair; N3, N5, N7
Mermaid Tail; BV0000, BV01, BV02, BV13, BG10, BG11, BG53, RV10, RV11
Starfish; Y35, Y38, YR14
Shell; E41, E42, E43

Thanks so much for stopping by... Have a great day. 

Saturday, December 10, 2016

Poinsetta

Hello everyone!

Franz here with a new little Copic project again...

Today I've a card with a lovely Tilda from Magnolia; Magnolia stamps are always so sweet and lovely, especially the Christmas ones!


I used a classic Christmas colour combo: red and warm grey to give a vintage touch to the white areas of the image.


 For my character, I created a romantic card with lots of lovely embellishments.


 Here is the complete list of Copic Markers I've used:

Skin: E0000, E000, E00, E11 + R20 for cheeks
Hair: E00, E13, E15, E18, E25
Outfit - White: W1, W3, W5
Outfit - Red: 0, R22, R29, R35, R37, R59

Thank you all for reading,
 a BIG hug,
Franz.

Wednesday, December 7, 2016

Christmas Shaker card


Hi Everyone!!!

Christmas is almost here.... and one of the best things about the holiday is making Christmas cards!
I love to make interactive cards and shaker cards are one of them.

This time I didn't use the traditional Christmas colours for the base of the card. The lovely bear image is Lili of the Valley.


Here are the Copics I used:

Bear: E31, E33, E34, E35, E37, E99
Hat: R17, R29, R59, N0, N1, N3. Blender
Scarf: YG09, G17, G29
Ground: W0, W1, W3, W6.

Wishing you all a beautiful day and Merry Christmas.


Sunday, December 4, 2016

Singing Elves


Hi Everyone, it's Saskia here.

Every year with Christmas I give my brother, my sister and some friends a special made Christmas creation. This one is for my brother and his family.
 

Actually there is very little colour work in this small project.
I coloured two little elves from the brand Mo Manning, which I have included in this wooden Christmas project. But but it would be boring project without this colourwork.


 Copics Used...
 Skin: E000 - E00 - E11 - E21 -R20
Hair: E13 - E19
Red Shades: R14 - R46 - R59
Gray Shades: W1 - W3 - W5 -W7
Book: E42 - E43 - E44 - E47 and sepia multiliner 0.05

I hope you have read this post with pleasure.
Until next time.

Friday, December 2, 2016

kindness is like snow

KINDNESS IS LIKE SNOW. IT BEAUTIFIES EVERYTHING IT COVERS...

I found this quote on the internet and I think it is absolutely true, don't you think so too?

Allthough it is cold outside I just love the wintertime, because it also means warm sweaters, hot cocoa, candles , hot soup, gloves and scarfs, fireplaces, roasted chestnuts, iceskating (if we are lucky)...yeah the wintertime is a great time.

For my background I've used just cool colours, like blue, purple and phthalogreen. 


The image I've used is by Hannah Lynn for Crafts and Me.


The image is coloured with Copic markers. The colours I've used are:
Antlers and paws E70, 74, 77,79, C3, 100
Bloue BG02, 05, 07, 09
Skirt B63, 66, 69 
Hair V04, 05, 06, 09 
Skin E50, 51, 00, 0000, BV01, W1 


and this is my finished art journalpage

wish you all a wonderful Christmas and a happy and creative 2017

Miranda

Monday, November 28, 2016

Sweet Holiday Wishes

Hi everyone!

Thank you to all who participated in the last challenge in our Facebook Group, the winner will be chosen by random.org and will be announced on November 30.

Unfortunately we are taking a break on the challenges right now, but it comes back!


For this card I've used an adorable stampset by SugarPea Designs called "Ginger Snaps" and the papers are called "Happy Holidays" and is by SugarPea Designs too.

I also used Wink of Stella on the roof of the house and the blue parts but it doesn't show up on the picture.


Copic marker colours I've used:
brown: E59, E37, E35, E33, E31
red: R59, R29, R27, R24, R22
blue: BG09, BG05, BG01, BG000
pink: RV19, RV17, RV55, RV52
green: G28, YG17, YG13, YG11
dark brown: E49, E47, E44, E43

Thank you for stopping by,
Deborah

Sunday, November 27, 2016

Superman, by Suki Manga Art

Dear Copic friends, I am not good drawing DC or Marvel characters
because my style is pure shoujo manga
 but this time I tried to draw my favourite Superhero, he is "Superman"

 I hope you like it :)


I used these Copic colours:

Skin: E000 - E00 - E21 - E35
Hair: C7 - 100
Eyes: B05 - B29 - B95 
Clothes: B05 - R29 - Y08 - E21 - B29 - B66 - B24 - R59 - BV25
Background: C7 - 100 - B29 - B05 - W9

See you soon! (^_^)/ bye!


Suki Manga Art


Saturday, November 12, 2016

Snowman Present


Hi Everyone, it's Faye here :)


Today, I would like to share a card I made for a recent class I taught. We were discussing snow. It can be really easy to reach for the same Copics when we want to colour something. For example, my go to colour blend for snow is C0, C1 and C3. That's the three markers I reach for, without really thinking about it. Until I thought about it! In our class we played with other combinations for snow, but ironically, the sample I am sharing today is with my old time favourite.

I coloured the image with these colours to match a design paper, but when I came to make the card, it was just too fussy for the image, so I went for a very clean and simple card.

Anyway, I promise the next time I colour snow, I won't automatically reach for my favourite. Maybe I'll get a new favourite. You'll have to keep an eye on me, won't you?!


Copics Used...
Snow; C0, C1, C3
Carrot; Y38, YR14
Sky; BG10, BG11, BG23
Trees; YG03, YG63, YG67
Broom; E31, E33, E99
Light Aqua; BG10, BG11, BG23
Turquoise; BG11, BG23, BG57

Thanks so much for stopping by... Have a great day.
 

Monday, November 7, 2016

Enjoy the little things in life


Good morning Everyone.

A few days ago we had the first rain. Everything around us received a good wash (including my car - lol)The rain was such a nice change from the heat. I love the smell after the rain.
On my way to my washed car I saw this little one... It just decided to go for a walk after the rain.


Isn't it cute? When I came home and looked for an image to colour, this digi caught my eyes.


The image is called Boo & Snookie from The Emerald Faerie Garden.

Here are the Copics I used:

Fairy Body: E50, E51, E53, E55
Hair: C3, C5
Wings: R0000, R000, Y0000, Y000, Y11
Hat & Pants: B00, B02, B04, B06 Snail - YG0000, YG91, YG93, YG95, YG99
Snail: E81, E84, E87, E89
RV91, RV93, RV95

Background: Distress ink

Wishing you a blessed day.
Hugs,