Followers

Showing posts with label LOTV. Show all posts

Monday, December 18, 2023

Walking on a winter wonderland

 Hello Copic fans, Rosi here! I'm here today with a sweet image from LOTV stamps. 

I didn't used many colours this time.

For the bear i used W2 and W3


For the penguin I used W2,W3,W5,W7,W9


The penguin hat is coloured wit BV 00,01,04


The scarf is coloured with BG10 and BG 13,the pattern is made with BV01 and BV 04.


Snow shades are with BG000


That's all from me for today.
Have a very Merry Christmas .
See you next year!
Rosi

Tuesday, May 12, 2020

A special mixed media gift midori & card


Hi all Copic friends,

How are you?
Here in Italy we still have to stay at home so I have done a lot of colouring lately :) 
and have tried new things too. Today I show you one of these "new"  things.

I have a fun die from Studiolight to make booklets/album or midori, instead of leather for the cover  I wanted to try something different .
So I have used the Transotype Synthetic Paper !!


With the die I have cut the shape

+

On the TSP I have used a pretty butterfly stencil from Kraftin Kimmie and with a spatula I have added some glitterpaste. ( Ferrario -  malta glitter iridescent ).

After drying I have played around with some Various inks ( refills ), just let drops of ink and blender fall on the TSP  and with a little tool I have blow the ink. You could also use a hairdryer ( cool air ).


this was the result

When everything was dry I have added some paper on the outside and inside, ribbons and an elastic cord to keep everthing together.


It almost looks like a little purse , doesn't it? 

Please watch the video to see the rest....


Copic used :
Refills ( Various Ink ) : V 12, E 70, RV 10, R 81, blender "0"

Card : 
Animal : E 70, E 71, E 74, E 79, W 7
Cheeks /inside  ears : E 04, E 70, E 71
Accents : gelly roll white
Background : B 000, B 02, B 05, RV 10, RV 13, V 12
Edges : E 70, E 74, E 79
Grass : YG 91, YG 94
Flower : RV 10, RV 13, YG 91, YG 94

A sweet gift idea..hope this post will inspire you to try something like this too!

Thanks for your visit here on the blog, in case you would like to see more videos from my cards and creations. I suggest you to follow me on you tube: blankinacreations on video

Hugs Blankina

Tuesday, November 12, 2019

Ice Christmas Penguin Scene Card & Video


Hello all,

Today I have a Christmas card for you..with lot of ice.
I hope it might be useful for all Copic card makers among us. 

First of all I have printed the sweet and oh so cute digital stamp
called  "Ice Christmas" from LOTV  onto transotype Perfect Colouring Paper .


Here it is ,
now let's start to colour...
I have started with the lightest colour B0000.


After having coloured the ice blocks I thought it was fun to draw an icy background too.

I am not an expert but it is great to try new techniques right? 
And practice is always the key.. It was such fun to do too ! 


Of course the cute penguin needed some colour too.

Below you can find the colouring video,
step by step to give an idea how I have created this card.


Was it clear?
It takes quite a lot of time to create videos but if they are helpful for you it is all worth it.
 It would be nice to receive some feedback in the comments .


Buon Natale means Merry Christmas in Italian...

Copics used :

Ice : B0000, B000, B00, B01, C 2, C 4
Background : B0000, B 01, B 02, C 2, C 4 , 
SP multiliner cool grey
 BG 11, BG 15, B 01, BV0000
Penguin : C 0, C 2, C 5, C 7, C 10
RV 0000 , RV 11, "0" , YR 21, YR 23
Scarf : RV 02, RV 04, BV 0000, BV 000
Envelope / ribbon : YG 00, YG 03, YG 23
Presents : RV 0000, RV 11, RV 02, RV 04
Accents: white gelly rol pen
Glossy accents
Sentiment stamp from craftemotions


Hope this hand coloured Christmas card will be appreciated, it was sure made with love.

Thanks for your visit and your kind comments,
Hugs Blankina

Thursday, July 26, 2012

The enchanted love garden


Hello dear Copic friends,
hallo liebe Copic-Freunde.

It’s Cinzia here  again, to share with you all the second leg of my journey in the Copic Marker world.
For my card I choose another “green” subject, perhaps because here in Rome the summer is very hot, up to 40°C, and milder weather seems hard to come, so sometimes I find myself  to daydream about warm and enchanting places. 
***
Hier ist wieder Cinzia um mit Euch mein zweites Werk auf der Reise durch die Welt der Copic Marker zu teilen. Ich habe ein weiteres "grünes" Thema gewählt, denn hier in Rom ist der Sommer sehr heiß, bis zu 40° C, und milderes Wetter ist nicht in Sicht. Darum tagträume ich manchmal von warmen, verzauberten Orten.

This time I decided to use a gorgeous LOTV image “Time to treasure” , I really love  these images, they are a sort of thumbnail sketch that with a thin drawing can express the feelings of the moment.  So I try to colour them in the same way, with the tip of a Copic marker.
The papers  are Magnolia, the dies are Magnolia, Tim Holtz and Memory Box (the gate).
***
Diesmal habe ich entschlossen, eines der tollen Motive von Lili of the Valley zu benutzen: "Times to treasure". Ich liebe diese Motive absolut, sie sind wie eine schnelle Skizze, die mit feinen Linien die Gefühle eines Moments zeigen. Darum versuche ich, sie ebenso zu colorieren - mit der Spitze eines Copic Markers.
Die Papiere sind von Magnolia, die Stanzen sind von Magnolia, Tim Holtz und Memory Box (das Tor). 


Here is a close up of the colored image:
***
Hier ist eine Nahaufnahme des colorierten Motives:


 And  a close up of some details:
***
Und Nahaufnahmen einiger Details:


Copic  Markers:

Skin/Haut: E0000, R000, E21, E13, R20
Hair/Haare: E 25, E50, Y21, Y23
Dress and Shoes (Girl)/Kleid und Schuhe (Mädchen):  RV0000, RV000, V04, V12
Dress and Shoes (Boy)/Kleidung und Schuhe (Junge): W00, W1, E71 (vest/Weste);  YG11, G21 (shirt/Hemd); C00, C1, C3, C7 (shoes/Schuhe)
Book/Buch: C00, C1, C2,C3, C7
Bench/Bank: E50, E13, E35
Ground and Grass/Boden und Gras: YG91, YG93, YG95, YG12, W00, W1, E71

Thanks for stopping by on our blog today!
Enjoy the rest of the week
***
Danke, dass Ihr heute auf unserem Blog vorbeigeschaut habt.
Habt eine tolle Rest-Woche 

Hugs,

Thursday, January 26, 2012

A Birthday Wish with Lili of the Valley

Hello Copic fans!
Hallo Copic-Fans!

This is going to be my first post for the Copic Marker Europe blog and I couldn't be more excited (and slightly nervous). I really hope you like what I made for you today with the pretty Little Dot "Birthday Wish" by Lili of the Valley stamps:
Das ist mein erster Beitrag für den Copic Marker Europe Blog und ich könnte nicht aufgeregter sein (und leicht nervös). Ich hoffe wirklich, dass ihr mögt, was ich heute mit dem süßen Motiv Little Dot 'Birthday Wish' von Lili of the Valley  für euch gemacht habe:
Isn't she absolutely adorable in her gorgeous blue dress and her pretty stickled up golden wings. Because of the card design (a Double Dutch Fold) I had a little difficulty taking a picture of the total card. Here is a close up of the top of the card so you can see the Copic colored image better:
Ist sie nicht absolut bezaubernd in ihrem niedlichen blauen Kleid und ihren hübschen goldenen Flügeln, auf denen Stickles aufgetragen wurden. Aufgrund der Kartenform (eine  Double Dutch Fold) hatte ich Probleme, ein Foto von der ganzen Karte zu machen. Hier ist eine Nahaufnahme des oberen Teils der Karte, damit ihr das mit Copics colorierte Motiv besser sehen könnt. 
Copic Markers:
Face/Gesicht: E11, E00, E000, E0000
Cheeks/Wangen: R22, R20, R00
Hair/Haar: YR24, YR23, YR21, YR20 (and then I decided I wanted it to be a bit more brown so/und dann habe ich beschlossen, dass ich es etwas brauner wollte): E35, E33, E31, E00
Dress/Kleid: B97, B95, B93, B91
Flowers Hair/Bumen im Haar: B93, B91
Shoes/Schuhe: E49, E47, E44, E42, E40
Wings/Flügel: E87, E81
Butterfly/Schmetterling: B95, B93, B91, B0000, CB
Giftwrap/Geschenkpapier: B91, CB and for the flowers/und für die Blumen R27, R24, R22, R20
Flowers/Blumen: YR09, Y19, Y15
Label: E44, E42, E40, CB
Shading/Schatten: W5, W3, W1, W00

Hope you didn't fall of your chair :). My favorite thing about the Copic Markers is that they blend so beautifully and I love to blend until I have exactly the shade I had in mind. I first color the wings with E81 and then go over the tip of my E87 marker with my E81 marker to get a shade between those two, then I blend again. Since the new release will bring us more E8. colors this will not be necessary in the future. The giftwrap was colored with just a small amount of B91 very well blended with my Colorless Blender. I love this heavenly blue shade.
Ich hoffe, ihr seid nicht vom Stuhl gefallen :). Ich liebe an den Copic Markern ganz besonders, dass man so schöne Farbschattierungen damit erstellen kann und ich liebe es, solange daran zu arbeiten, bis ich genau die Schattierung erreicht habe, die ich mir vorgestellt habe. Ich habe die Flügel zuerst mit E81 coloriert und habe dann mit die Spitze meines E81 Farbe von E87 aufgenommen um einen Farbton zwischen diesen beiden zu erreichen, dann habe ich die Übergänge verwischt. Das wird zukünftig wohl nicht mehr nötig sein, da bei den neuen Farben weitere E8er dabei sein werden. Das Geschenkpapier habe ich mit ganz wenig B91 und ganz viel Colorless Blender coloriert. Ich liebe dieses Himmelblau.

Since I used a lot of color in the image I decided to keep the papers very basic so just one sheet of Magnolia Design Paper and white cardstock. Some embossing, some pretty white flowers and a gorgeous golden ribbon and that's it. The sentiment comes with the stamp and the only things that I added there were some Papermania Shimmer Dots.
Da ich beim Motiv viele Farben verwendet habe, habe ich beschlossen, die Papiere sehr einfach zu halten, nur ein Blatt Magnolia Design Paper und weißer Cardstock. Ein bisschen Embossing, ein paar hübsche weiße Blumen und ein niedliches goldenes Band, das war's. Der Spruchstempel gehört zu diesem Motiv und das einzige, das ich noch hinzugefügt habe, waren einige Papermania Shimmer Dots.
When you don't know my blog you may not know that I usually paper piece my images in 3D. Here is a side view of my card so you can see the depth and also the model of the card better:
Wenn ihr meinen Blog noch nicht kennt, dann wisst ihr auch noch nicht, dass ich meine Motive meist in 3D aufbaue. Hier ist eine  seitlichere Ansicht meiner Karte auf der ihr sowohl die Tiefe als auch die Kartenform besser sehen könnt.
On my personal blog I always share the little pieces that the image was made of. Since this is my first post here I thought I'd show them as well.
Auf meinem persönlichen Blog zeige ich auch immer die kleinen Teile, aus denen das Motiv zusammengesetzt ist. Da das hier mein erster Beitrag ist, möchte ich das hier auch zeigen.
I do hope you like my card! Can't wait to read what you think.
Ich hoffe, ihr mögt meine Karte! Ich kann es nicht erwarten zu lesen, was ihr denkt.

Hugs,

Saturday, September 3, 2011

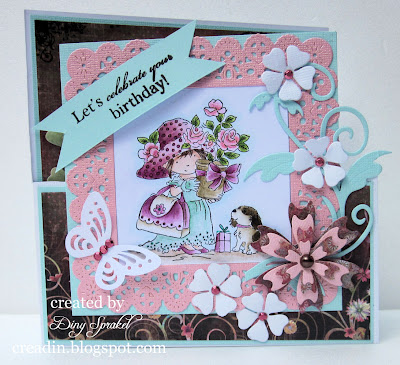
Celebrate your Birthday

Hello,
Hallo,

one has never enough cards for birthdays, therefore I made an other one with a lovely stamp from LOTV. This time for some one who is a little bit older, read the quote at the inside. I love these quotes for cards. To get a space for a quote and a personal message, I created this card pattern.
-----------------------
Man hat nie genug Karten für Geburtstage, daher habe ich eine mit diesem zauberhaften Stempel von LOTV gemacht. Dieses Mal ist die Karte für jemanden, der schon etwas älter ist, lest den Spruch auf der Innenseite. Ich mag diese Sprüche für Karten. Um Platz für den Spruch und einen persönlichen Text zu schaffen, habe ich diese Kartenform entwickelt. 


At the front I used the new dies I bought the last couple of weeks, it is a real addiction these dies. The square and the vine are from Cheery Lynn, the small flowers are from Magnolia and the big flower made with a Crealies die.
------------------------------------------
Auf der Vorderseite habe ich die neuen Schneideschablonen verwendet, die ich vor einigen Wochen gekauft habe; ich bin regelrecht süchtig nach diesen Schablonen. Das Quadrat und die Ranke sind von Cheery Lynn, die kleinen Blumen sind von Magnolia und die große Blume habe ich mit einer Crealies Schablone gemacht. 


The front of the card is cut in half, the rest of the design paper is placed at the upper part of the inside.
--------------------------
Die Vorderseite der Karte habe ich halbiert, den Rest des Designpapiers habe ich auf dem oberen Teil der Innenseite aufgeklebt. 


I used the rest of the diecut from the front to create a small card for a personal message. For the inside decoration I also used dies from the companies I already mentioned.
I think this quote is great for some one who is from my age (60 plus)
-------------------------
Ich habe den Auschnitt, den die Schablone von der Vorderseite hinterlassen hat, genutzt, um darauf eine persönliche Nachricht zu platzieren. Auch für die Dekoration der Innenseiten habe ich Schneideschablonen der bereits erwähnten Hersteller verwendet.
Ich finde den Spruch großartig für jemanden in meinem Alter (60plus).


The coloring of the image is done with my favorite Copic Markers. For the darker pink I used a very light marker RV10 and a dark one RV66. I scribbled some ink of the RV66 on a palette and took it on the brush tip of the RV10, colored with a flicking motion. Every time starting at the darkerst area, at last I took the RV66 and applied a little bit of the ink, blended it with the RV10. With this technique you can get a lot of contrast in your images only with two markers. Give it a try yourself.
------------------------------------------
Die Coloration des Motivs habe ich mit meinen bevorzugten Copic Markers gemacht. Für das dunkle Pink habe ich den sehr hellen Marker RV10 und den dunklen RV66 verwendet. Ich habe ein bisschen Farbe von dem RV66 auf eine Palette aufgetragen, habe sie dann mit  der Pinselspitze des RV10 aufgenommen und mit einzelnen, schwungvollen Bewegungen aus dem Handgelenk coloriert. Ich habe jedes Mal mit dem dunkelsten Bereich angefangen, zum Schluss habe ich RV66 aufgetragen und die Übergänge mit RV10 verwischt. Mit diese Technik kann man mit nur zwei Markern starke Kontraste in einer Coloration erreichen. Versucht es selbst!


This Copic Markers are used:
Diese Copic Markers habe ich verwendet:

E000-00-11, RV10-66, G000-00, RV11-13, YG25-67, E40-41-43, E81-87, E43-W3

Thanks for your visit, please leave a message.
Danke für euren Besuch, bitte hinterlasst eine Nachricht.

greetings Diny