Followers

Wednesday, May 31, 2017

A Mermaid Hello

Hi everyone!

Today it's my turn to show you a card that I made. This time I choosed to make a little underwater scéne with some mermaids and fishes. I have the Little Mermaids stamp by The Greeting Farm almost 1 year and I finally had some time to play with it!

First I stamped the images with my Memento Desert Sand ink pad on some Neenah cardstock so I can use the no lines technique to colour in. I overdrew the eyes with a black Copic multiliner 0.1 and let it dry for a few minutes. 

I started to add a layer on E51 on the bottom of the cardstock to make it like sand.
Then I coloured the rest of the sand a little bit wavy because it's in water with my E55 en E53 markers.


Now the sand needs a bit more texture and I did it with adding some dots of the same colours on top of sand.


Then I coloured the sandcastle and I used E57, E55, E53 and E51 for that. I also darkend the shadow around the castle with my E57 marker to let the castle pop out more.


After that I did the water but I forgot to take pictures in between, so stupid. I decided to have my lightsource at the right upper corner and let it fall down like hairstrokes. You have to do flicky moves.
Here you can see that I coloured a bit over the other images that are still blank, but that isn't a disaster. You won't see that if you colour the rest.


After that I did the skin of both images. I always start with skin right behind I did the background.


Then I coloured the mermaids with some fun colours. I really like it to give them crazy haircolours.


Here's how it looks like when it was done but I added some details on the bubbles with the Copic Opaque White paint. You can see that on the last picture.


And tadaaaa... Here she is, my mermaidcard!


Here are all the colours I've used (there are a lot!!!)
skin: E04, E11, E00, E000
orange: E09, E07, E04, E02, E00
purple: V09, V06, V04, V000
green: G28, YG17, YG13, YG11
pink: RV69, RV19, RV55, RV52
yellow: E37, E35, Y28, YR23, Y17, Y15
blue: B29, B26, B24, B21
sand: E51, E57, E55, E53
water: BG000, BG11, BG72, BG23, BG01


Thank you for stopping by, 
Deborah

Saturday, May 27, 2017

A pre-historic card!


Hello everyone, it’s Sandra from Portugal!


It’s funny how, in a boy filled house, I often end up coloring girly themes. To counter it, this month I decided to create a boyish card. I had this "dinomite" digistamp  from Tiddly Inks for a long time already, and finally got to colour it.

I relied on Sandy Allnock’s Hex Chart to pick nice and smooth colour combos. It is so much easier when colours blend well together and this chart is a good tool to achieve it, with colour combinations you wouldn’t think about at first instance.

I first coloured the stegosaurus (that’s the dinosaur on the back), using G21, YG63, G94, and G46. For its plates I used R30, R32 and R35. I liked the contrasting colours very much!


It was then time to colour the other dinosaur, (can it be a brontosaurus?) and I used B21, B34, B37 and B39.

For the boys' “clothes” I used YR12, YR15 and YR04. 


And then E81, E84 and E87 for his shoes (and E44 for the strings/laces). For the club I chose E42, E43 and E44. 

I then coloured the hair with E50, YR31, YR24,  and E35.


And finally the skin, using markers E000, E00, E11 and E21.


I added some (shy) cast shadows on the floor, and this is the finished card:


I hope you like it!

Here is a list of all the markers I used:


Stegosaurus: G21 / YG63 / G94/ G46, and R30 / 32 / 35

Brontosaurus: B21 / 34 / 37 / 39

Clothes: YR12 / 15/ 04 

Shoes: E81 /84 / 87 (and E44 for the strings/laces).

Club: E 42 / 43 / 44 

Hair: E50 / YR31/ YR24 / E35.

Skin: E000 / 00 / 11/ 21.


Hugs,


Sandra

Wednesday, May 24, 2017

Full of Love!


Hello everyone! It's Delphine here today to share a card full of love! I used one of the Sweet Valentine Girls digis by Make it Crafty called Marcy Full Of Love - of course ;)!


As always, I coloured skin first using E000, 00, 04, 11 and a bit of R20 for the cheeks and mouth.


Next I coloured part of her dress white - using C Copics. I left a lot of white to give the impression of white with shading and coloured using C4 in the places meant to be the darkest, then C2 and C0.


I continued with the reds. To give a bit more depth, I used T5 in the darkest spots, then R39, R37 and R35.


For her black hair, I chose my favourite combo of 100, C9, then C7 and BV04 in the highlights. So all the colours I used for my image are as follows:

Skin: E000, 00, 04, 11
Hair: 100, BV04, C7, 9
Eyes: BG000
White: C0, 2, 4
Red: R35, 37, 39, T5

And there she is on a card:


I matched her with love DPs by MFT and added 4 little Make it Crafty Heart Chipboards coloured in R35 and R39.

That's all from me today, thank you very much for your visit, have a great day! Hugs,
Delphine xx

Monday, May 22, 2017

making backgrounds with various ink

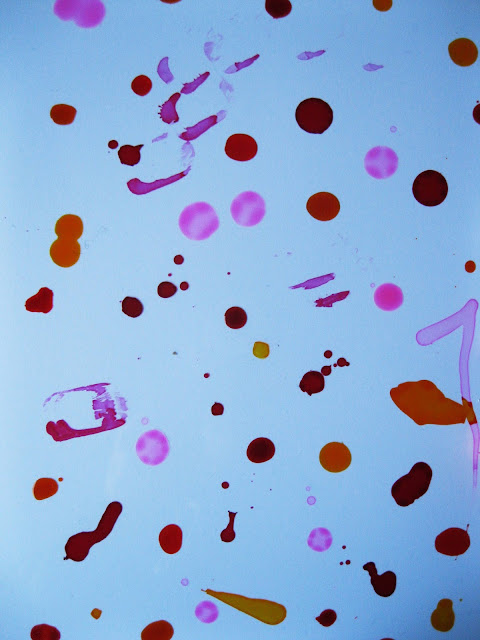
Do you know that you can make some wonderful backgrounds with the Copic Marker refills (Various Ink)? Let me show you how!


Pick out some nice colours. I've used the same colours as for my image.


Drip some ink on an acetate sheet.


Use a blending tool and a piece of felt. Drip some activator on the felt and press the blending tool lightly into the ink. Move the blending tool over the acetate. Drip some more ink to get a more brighter result. 


Spritz some activator on the acetate sheet and watch what happens. The ink reacts really nicely with the activator. Just play a little with the blending tool, the ink and the activator until you are happy.


To give my creation some more definition I decided to add a border with a thick gloss gel and some sea elements. 
I coloured the gloss gel with mica powders and some black ink. 

The image I used for my creation is by Aurora Wings.
I have used the following colours for this image:

hair: RV17, 19, 55, 66, YR15, 16, Y35, R7, 14
skin: E50, 0000, 000, 00, W1,3, BV0000, 00
eyes; E44, 47, 49
shells: Y21, RV00, R11, 12,  Y0000, BG0000, YR31

have a colourful day

Miranda


Tuesday, May 16, 2017

Sweet Birthday Wishes

Hi everyone! It's Sandie here today with a card I made featuring the super sweet C.C. Designs stamp, Swiss Pixie Rose with Balloon


I stamped the image onto Perfect Colouring Paper with Memento Tuxedo Black ink. 


To colour Rose I started with the skin, using E000, E00, E11, R20. 


For the hair I used E50, E51, E53, and applied some E33 as my darkest colour. 


For the colouring on the clothing I used my favourite pink colours R81, R83, R85 and R39. 


On the balloon I used Y13, Y15, Y17, Y19. 


and for the shoes, E42, E43, E44. C1, C3, 0


I added some shadows to the white areas using cool greys, C1 and C3. The cool greys have always been my go-to greys, but recently I bought the Neutrals (N) and I am just loving them. I will definitely be using them more. 

I like to melt the C1 and C3 together with the colourless blender. 


I applied white gel pen to make the little dots on her dress, and for the highlight on the balloon and shoes. 


I also added some 'ground' underneath her feet, using the C1, C3 and colourless blender, but the sentiment covers most of it up. 


Thanks for dropping in today. I hope it inspires :)
Sandie

Saturday, May 13, 2017

Sparkle and Shine with Copic Glitter Pens

Hello everyone!

Sue here today, to tell you something about Copic Glitter Pens and show you an image that they help to colour beautifully!

If you love sparkly, shiny things, then these gorgeous pens are just for you!


Copic Glitter Pens are available in 24 colours which are sold in two sets of 12 pens. 

The pigment-based archival ink is transparent and can be used over other pens and the beautiful subtle glittery effect is produced by micro glass flakes which really reflect the light. 

The important thing to remember about Copic Glitter Pens is that they must be stored lying down otherwise the teeny tiny glass flakes will sink to one end of the pen and clog the nib. This is different of course to Copic Markers which can be stored anyway up.

I absolutely love Copic Glitter Pens. The nib is really fine which makes them perfect for colouring the tiny details some images have.

I have put together a tutorial where I have used Copic Glitter Pens to colour a lovely image by Stamping Bella - Giftabella.


I stamped the image on Make it Colour Blending Card with black Memento Ink and selected my Copic colours.  You can see that Giftabella has an armful of presents with some fine details which are perfect for colouring with Copic Glitter Pens.


I coloured the image with Copics and left the tiny details until the end to colour with Copic Glitter Pens. I chose five Glitter Pens to go with the Copics I have used - Lipstick, Turquoise, Orange, Pink and Clear.  (The clear pen is my favourite because you can use it over the top of any colour).


I carefully coloured the fine details of the image with a Copic Glitter Pen.


...and I coloured over some of the Copic colours with the clear Glitter Pen.


This is the image when I had finished colouring it and adding the lovely glittery details with the Glitter Pens.

I had great fun making this card and here is the finished design.


This picture shows how sparkly the Copic Glitter Pens are and just how they can make an image shimmer and shine!


I hope you have enjoyed my tutorial.  It would be great if you could try this technique and show your cards to us at Copic Marker Europe on Facebook.
To find us just follow the link

Copic Markers 
Skin V20, E00, E000, E0000
Skirt & Shoes BV08, B69, B66, BV13, B63, B60
Gifts BG09, BG49, BG45, BG15, R59, R56, R45, R14, RV66, RV17, RV55, YR09, YR07, YR04, YR14, Y38, Y35, Y32
Ground W5, W3, W1
Copic Glitter Pens -
Lipstick, Turquoise, Pink, Orange, Clear

Other Ingredients
Giftabella by Stamping Bella
Make it Colour Blending Card by Elaine Hughes (Marker Geek)
Memento Ink Pad in Black
MFT 6x6 Paper Pad Dots and Stripes Brights 
Lawn Fawn Stitched Oval Stackables
Whimsy Hand Stitched Rectangle
MFT Stitched Labels
(all from Dies To Die For)


Thank you for popping by.
Happy Copic colouring!
love from
Sue...xxx

Monday, May 8, 2017

How I create mountains using Copics

Hello Copic lovers.

Here is Juanita again, and I would like to show you how I create mountains using Copics.


 After I drew the lines with a pencil, I started with the chisel nib of B32 and made strokes from the top to the base of the mountain.


Then I took C2 and did the shadow side of the mountains in the same way.


 With C6, I made darker parts for shadow. I used the brush nib for this.


 The darkest parts I did with C8. I always start at the top of the mountains.


 For the lighter side of the mountains I used C1, C2, B45 and B0000. With C4 I made some fine lines to show the shadow on the lighter side. On the dark side, I used C4.


 I made some more depth on the bright side with C4 and C6. On the dark side I made the whole mountain darker with C6, C4 and C2. I wanted a rough structure that's why I did not blend all the colours. This style makes it simple to do mountains like this.

I also put some B45 on the dark side and some more shadow on the lighter side to finish the image.


 The eagle digi is from animalstown.com and I coloured it with;
E71, E74, E77, E79, E27, E29, E47 E57 
White parts E81, B000, W3
Beak YR15, YR27


 Here one more time the colours of the mountains:
C1, C2, C4, C6, C8, B32, B45, B0000

This is the card i made with it.


 The blue cardstock is from Papicolor. The bright one is called Celeste and the dark one is Aquablue.

I hope you like it and wish you all a nice day!

Hugs Juanita