Followers

Tuesday, February 28, 2023

Snowman with Bird

Hi there.
Hope you all are fine today!

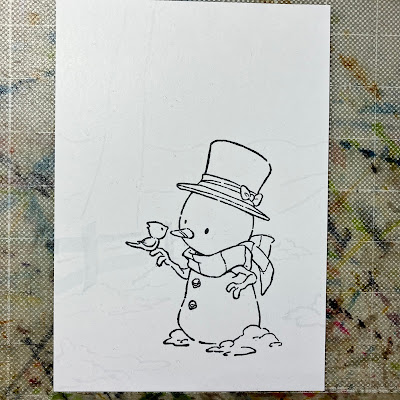
Helen here, and today I will show an image from CC Design, Snowman and Bird.
I got it as a rubberstamp, but you can get it as a digital stamp from Whimsy Stamps today.

As always I stamped the image on to Perfect Coloring Paper with ink from Memento.


Started off by sketching in the background using C0.


The snow got B70 - B0000 - B000 - B45


The sky got Y000 - Y11 - Y00


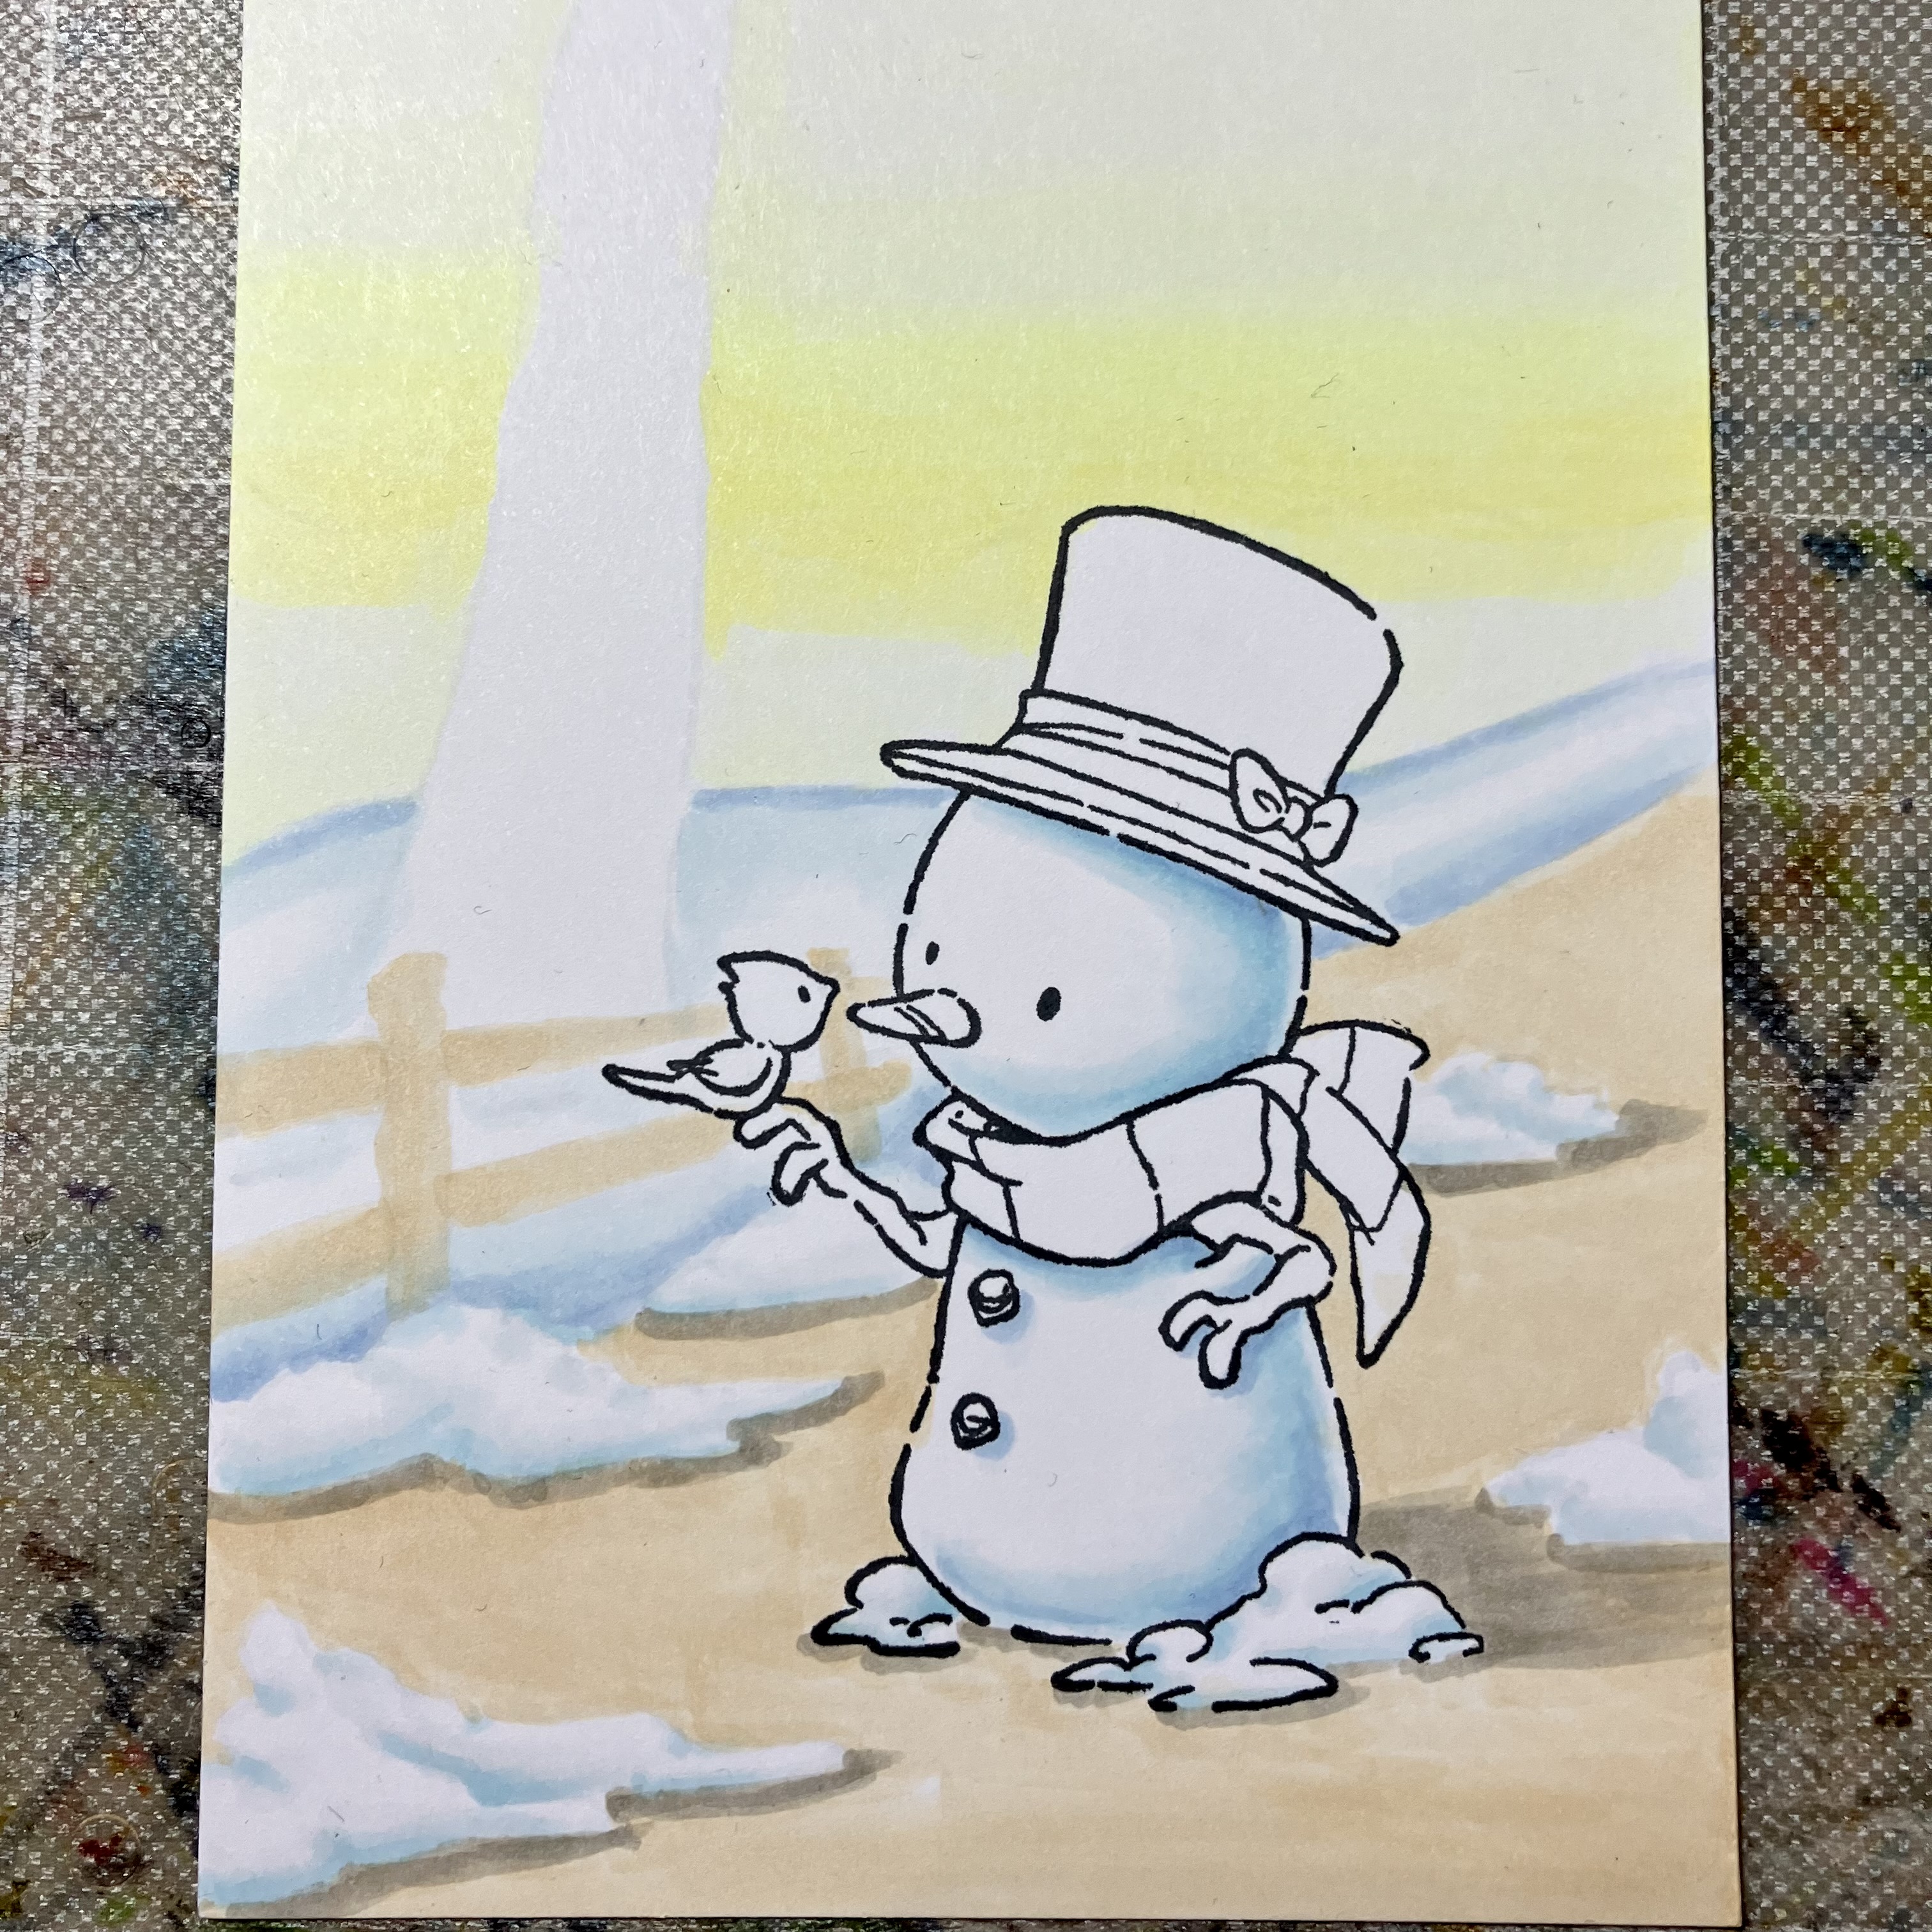
The first layer off the ground got E30, and shadows W3.


I outlined the piles of snow with a multi liner.
The ground got E31 - E33 - E35 - E37


The first layer of the tree was E42.
The first layer of the fence was E30.
Sketched a line of trees in the background with C1.


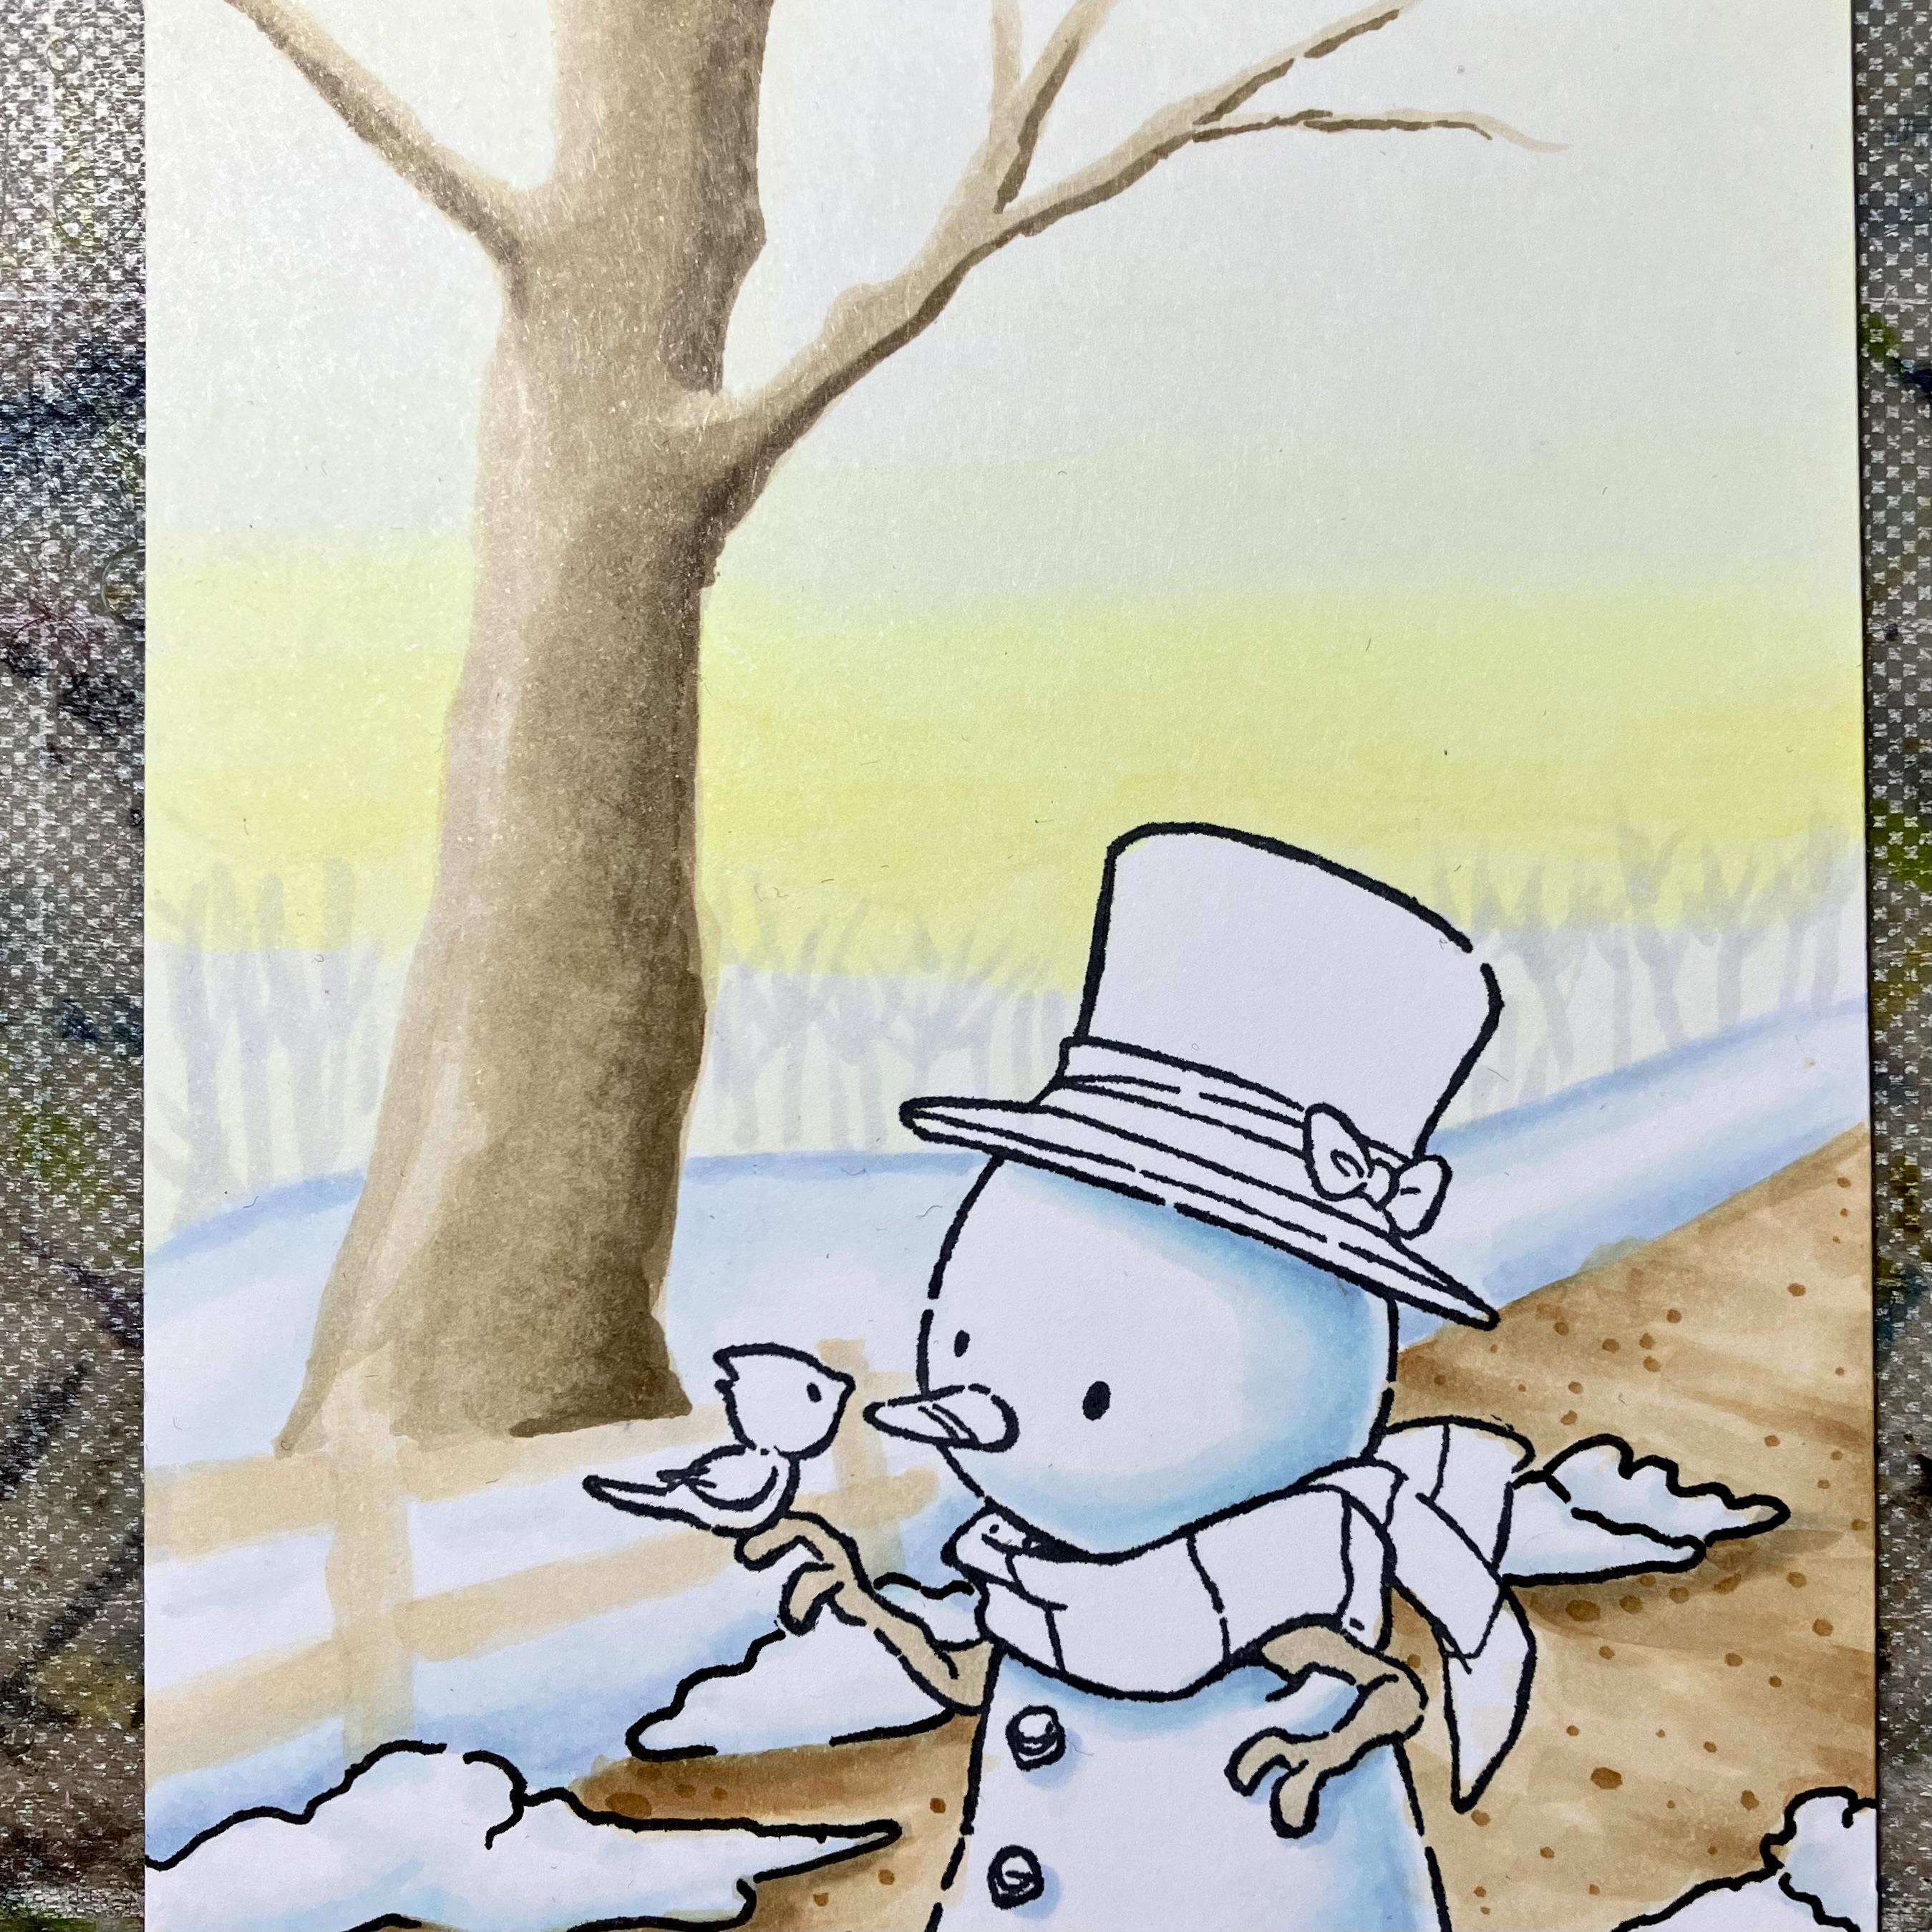
The darkest area of the tree is E47 and the mid-tone is E44.


Scribbled in the bark of the stem with E47 and W3.
I used the very tip of the nip with light pressure, and randomly I got heavier pressure to get the pattern for the bark. The fence got layers of E33 - E35 - E37 - W5


Smoothed the bark pattern out by going over it with E44 - E42.
The shadow on the tree is E47.


The hat and buttons got C3 - C5 - C7
The carrot got YR14 - YR07
The snowman's arms has the same color as the tree.


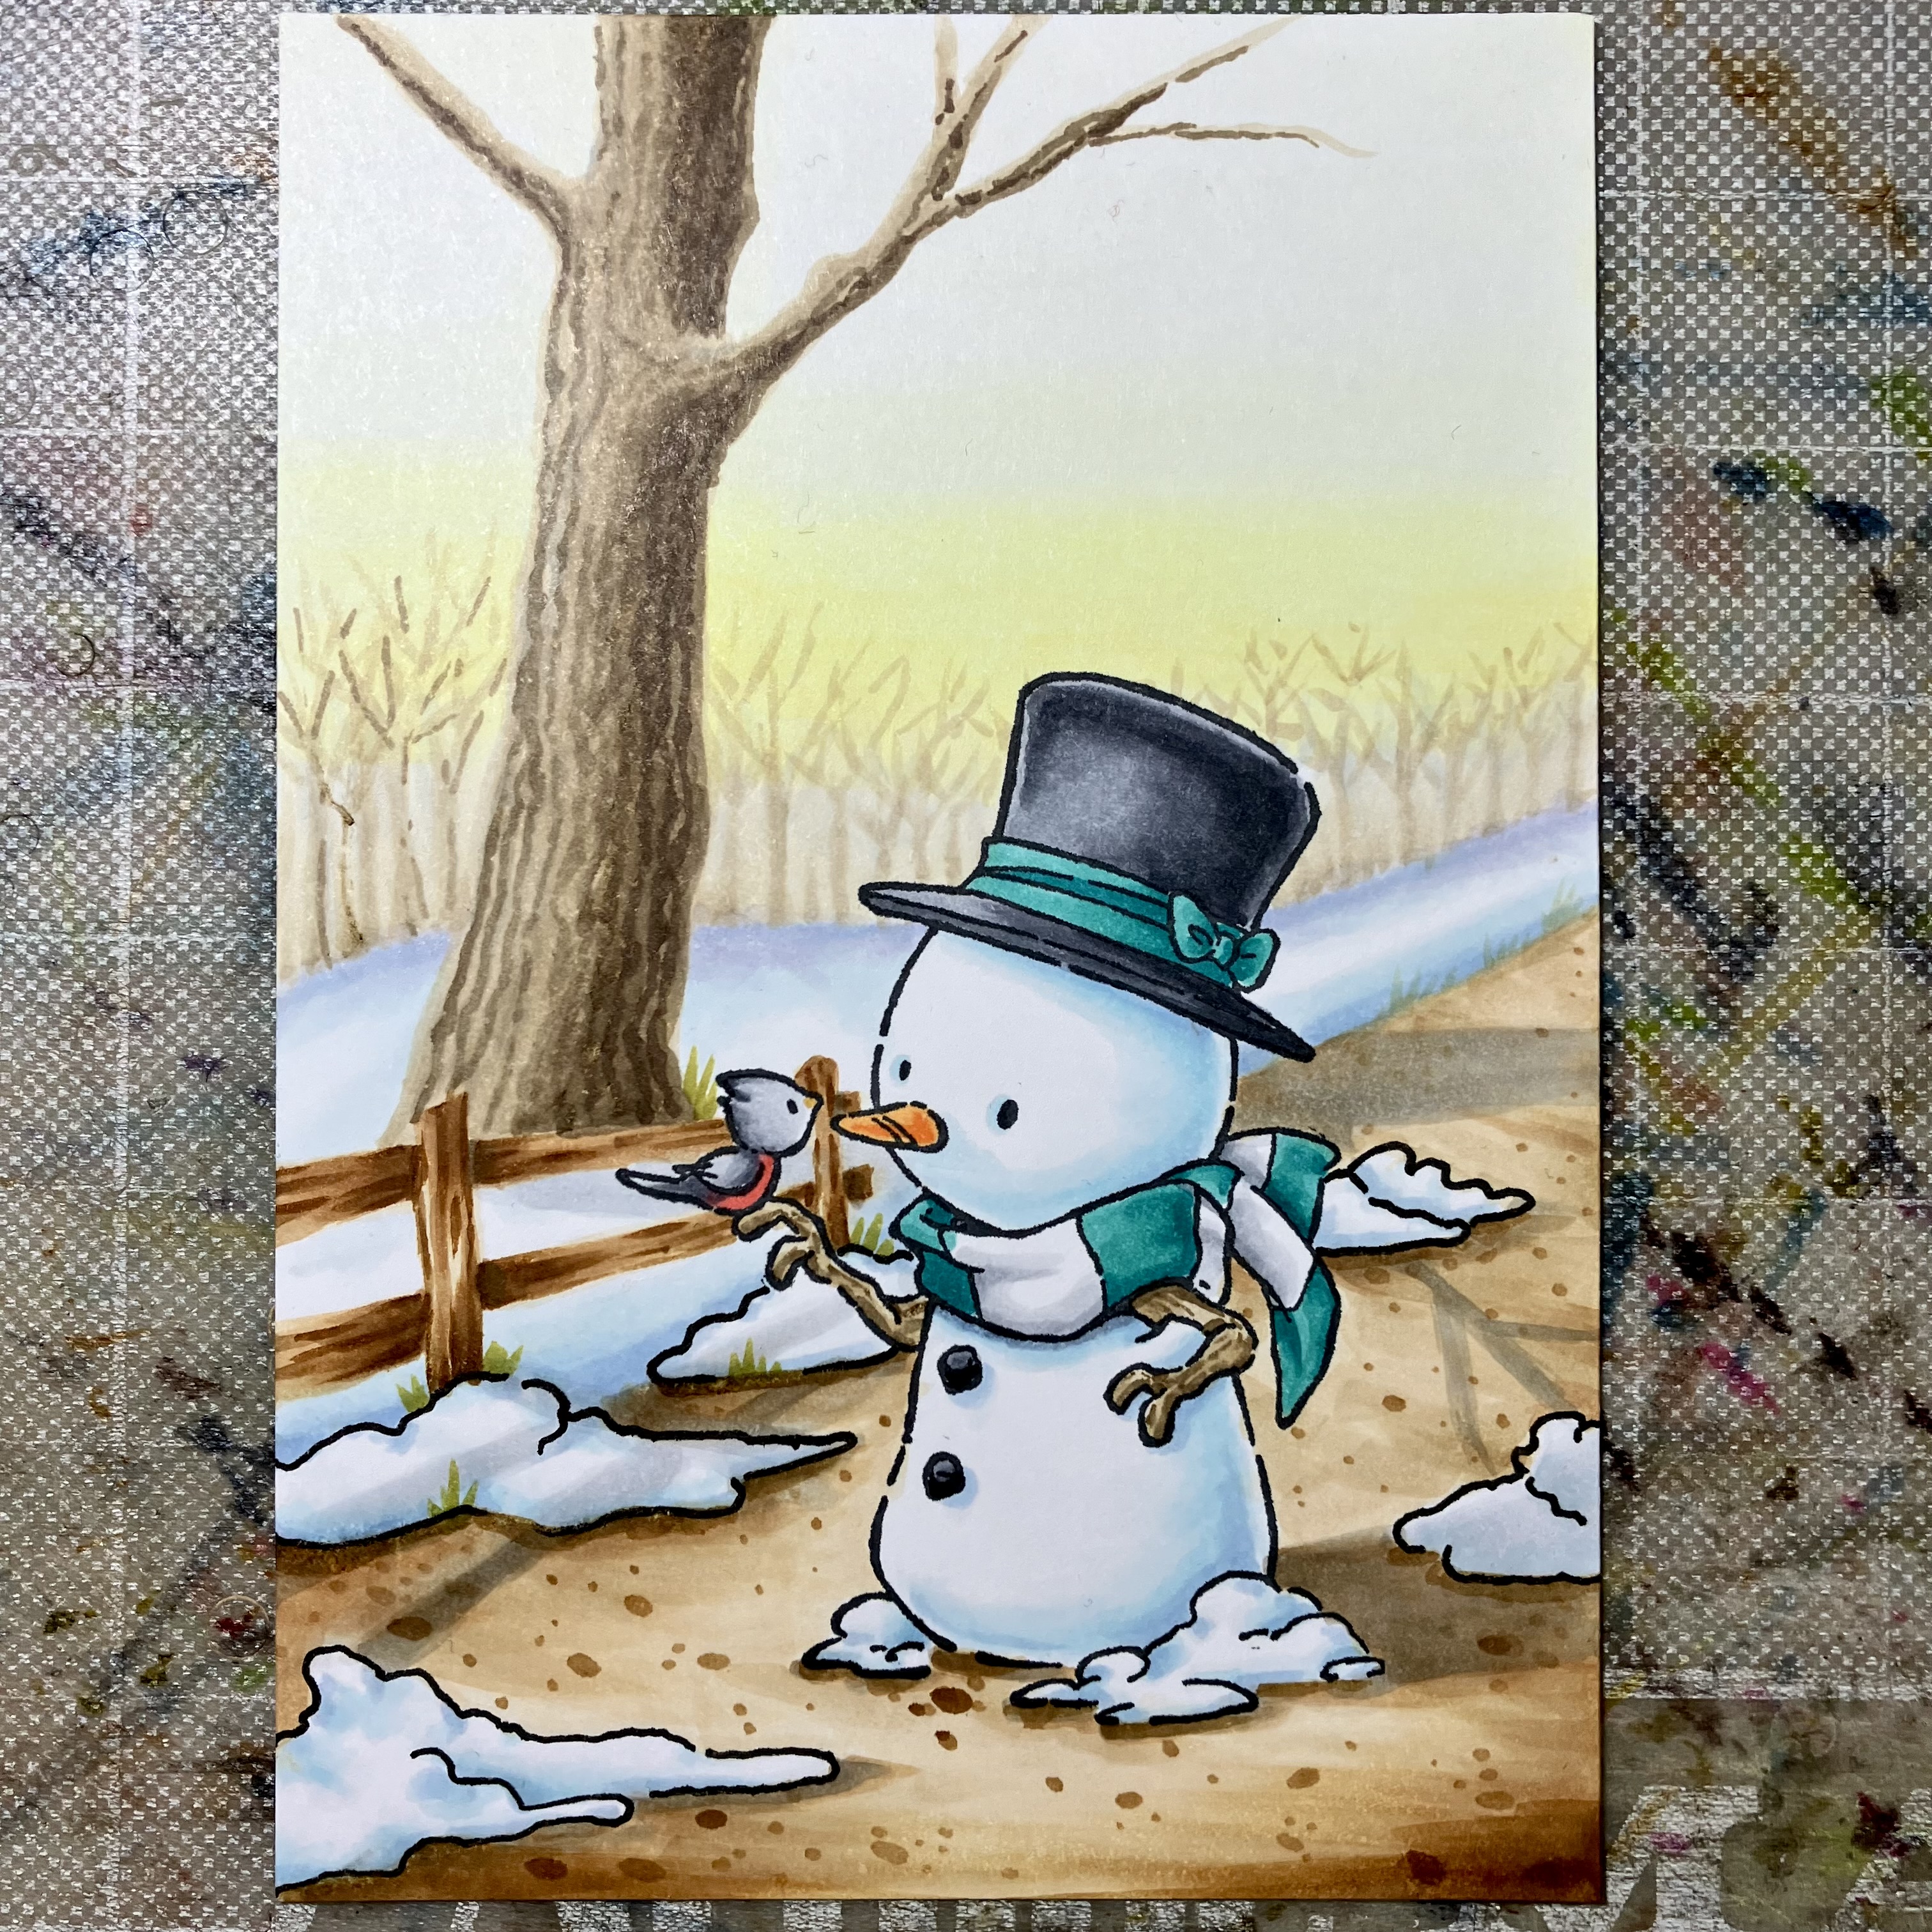
 The bird got C1 - C3 - C5 - R24
The scarf and the ribbon got BG13 - BG49 -  C1 - C3
And the ground and snow got some shadows from the tree and fence with W3 - C1.

I made an inventory among my stamps and I got a lot of different snowmen and I just want to color them all. Maybe there will be a snowman next time as well...

Have a nice, copic coloring day!

Saturday, February 25, 2023

A sweet Ladybug scene and video


Hello everyone! It's Delphine here today :) For today's post, decided to create a spring scene featuring a sweet ladybug character, the opportunity to show how to colour grass with highlights, use reds, and colour simple folds. 

For my card I used a digi by Vera Lane Studio called Ladybug, here is the final card:

I coloured all my elements in Copics, except for a bit of glitter pen for a few details, and you can see the whole colouring process below:

Here is the coloured image and a recap of all the Copics I used:

Skin: E000, 00, 11, 25, RV02
Hair: 100, W5, 7
Outfit: R35, 37, 59, W7
Wings: BV00, RV00, Y00
Sky: B000, 00, BV00
Sun: Y000, 11
Grass: G28, YG01, 03, 17
Blades of grass: G28, YG41, 45, 67
Bird: B93, 95, 99, YR23

After the video, I stamped a sentiment and that's it :)

Thanks for stopping by today, have a great day! Hugs,
Delphine xx

Wednesday, February 22, 2023

Cicci makes patterns

Hi COPIC lovers
Cicci here posting from Sweden. Today I color some patterns and not so much blending. 
COPIC I have used 
Blue: BG0000 B00 BG02 B04 BG09 BG13 
Red: R24 blend with R22 and Y04
Yellow: Y04 Y02 Y08 FYR1
Green YG03 FYG2 
Pink:RV55 add with Yellow
Stamp from Penny Black 
Copic BS black
Copic multiliner 0,1 0,5 black 
White gelé pen from sakura 
You can use any color you like for this tutorials
Have a great time;)


Step 1

First I drew a sketch 
I did some patterns with COPIC multiliners black 0,1 


Step 2
I started to color many blue parts
B04 BG02 BG13 and BG09
Blend with a lighter blue I have used BG000

Step 3
Add B04

Step 4
Add FRV1 and FY1
Blend them together


Step 5
Add Y04 and FYG2 and blend them together

Step 6
Now I just color all the details and blend at some parts.
For the background I have use Y04 R12 and YG03


Step 7
Add some highlights with a white gelé pen sakura if you like


Step 8
I added more parterna with a COPIC multiliner 0,1 and 0,5
Also used Copic BS black for the tricker lines
I used a stamp from penny black

Have a wonderful Day everyone
Lots of HUGS and SMILES
Cicci
;)


Saturday, February 18, 2023

Winter Fairies

Hello Copic lovers!

Today is my turn to get you inspired by using Copic markers! As i said.......I love fairies. Today I am sharing my colouring of two cute winter fairy . They are  called Talva and Hala  by Mos digital pencil.

My skin color combo is E0000, E000, E00, E11, E21 and R20 for the cheeks. I always start with E0000 all over the skin. Maybe  i should try some other skin combos....

I go over my E11 with E21 in order to darken my shadows . Cheeks I color with R20.


I've done the skin twice.... I always do. Now I'm happy and I'm going to color 
the dresses.

I decided to use some of my new markers from the BV family.
I used BV 00,01,04 starting with the lightest one by marking the folds of the dresses in order to make them look more realistic.


I do this always twice or until I'm satisfied with how the clothes look like.

I decided to make the hairs blond so I used E 31,33 and a little bit of E 35.


The wings are colored with B00 and B01 where the icicles are and C00,C01,C02 under the icicles.


Aren't they cute? 
Now I'm going to give you a promise...... no fairies in my next post.... Be inspired!

Happy coloring!
See you soon!

Tuesday, February 14, 2023

Soft Heart

February is the month of love, so I created an illustration full of hearts.

Here is the tutorial:

Drawing with Copic Multiliner


R000,YR00 and E02 for complexion


BG72 and YG41 for hair


BG72 and YG01 for eyes and C1 for shade


C1,C3 and YG01 for tank top


R22,R35,R46,R59 and C7 for heart-shaped pillow, small hearts and mouth


I use a white gel pen for the light points


Here is the final result
Thank you all
Bye bye
Antonella