Followers

Thursday, March 26, 2020

Dance with the Waves

Hello dear Copic friends.

 For today's blogpost I have used a lovely mermaid by Stéphanie Sybile Art. The photographs will show my colouring process and the colours that I have used. 


I always start with colouring the skin first. The first layer is E50. For shading I use BV00. 


Add E00 on top of the BV00 to create a warm skin tone. 


Blend all layers together with E000. 
Sometimes the colours fade out too much while blending with E000. In that case I add some E00 and BV00 again to bring back some of the depth.


Use the  RV04 to add some blush on her cheeks  and blend out with RV02 and E000. 


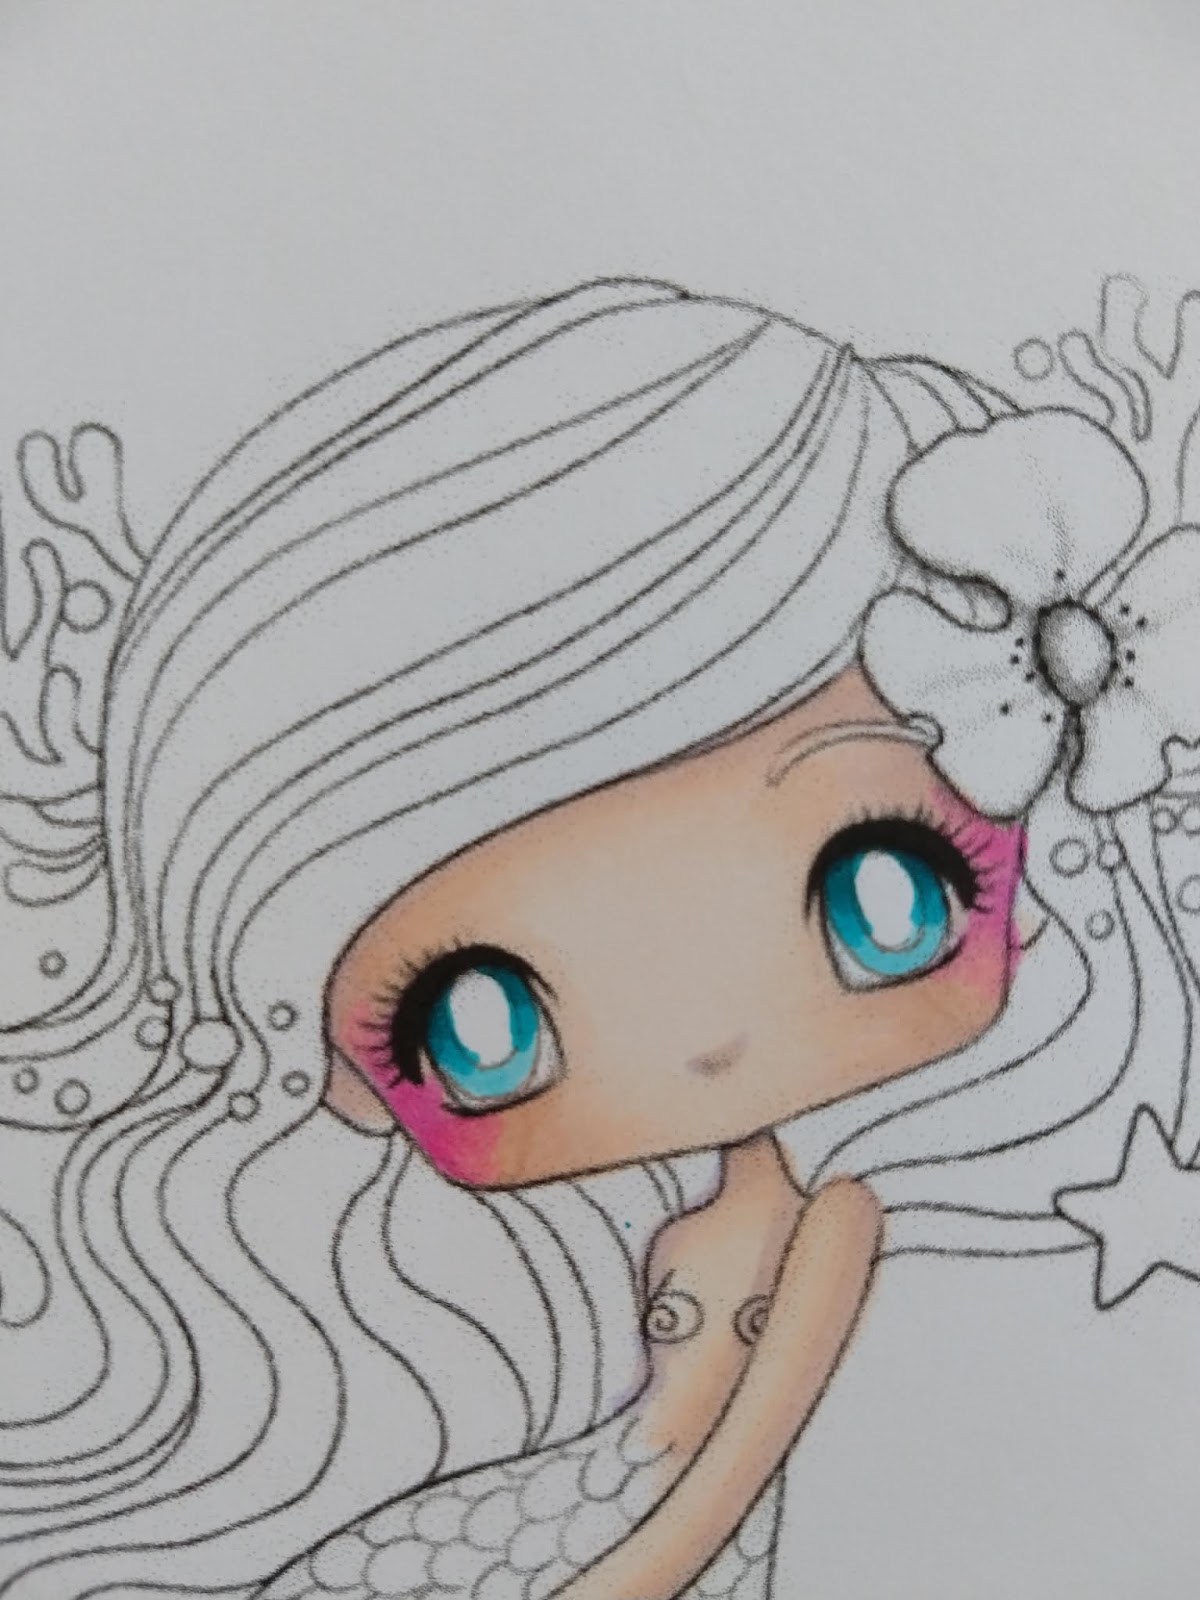
I use the BG02, BG05 and BG07 for her eyes. 


 The eyes rarely have just one colour, normally you can find different colours if you take a closer look. To make the eyes more sparkling I add some green, YG23 (the photograph is a little out of focus but luckily you can still the effect of adding some green to the eyes). 


Further more I use a black Copic multiliner and a white marker for the eyes too. 


Her tail will be pinky orange and I start with  RV02, Y13 and YR12. 


Then I use the  RV09, RV06, RV04, RV02, YR18, YR16, YR15 and YR12. 


I use the same colours for the rest of her tail: RV09, RV06, RV04, RV02, YR18, YR16, YR15 and YR12. This time I add some yellow too to make the transition from pink to orange a little bit easier. I use the Y13, Y18 and Y19. 


For the tiny tail use the YR18, YR16, YR15 and YR12.


I have used warm colours for the mermaid so I decided to use a cool colour for her hair. I start with the BG09. Using a complimentary colour make the other colours pop. 


Than use the BG07. 


Add the BG04.


And blend all layers together with BG02. 


For the cute flower I use YR12 and YR18. 


Add YR16 and  YR15 and blend together with YR12. 


For the stars use Y13, Y15, Y18 and Y19. 


I use RV02, RV04 and  RV09 for the coral and hearts (allthough later on I decided not to use the hearts any longer, because they were too tiny to cut out, I drew some myself). 


And this is the end result. I have used a quote by C.A. Martine. 

Stay safe and we'll see each other again in April
Miranda

Sunday, March 22, 2020

Cicci color some Spring leaves

Hi Copic Lovers
Cicci here posting from Sweden.
Today was a great day here in Sweden with a blue sky and spring in the air so I was thinking to color green spring leaves here today

I have used this copic markers
YG00, YG03, YG17, YG28

Step 1
I started to draw some leaves with YG00

Step 2 
Fill with YG03 over YG00

Step 3
Fill with YG17 over YG03

Step 4
Add YG28 over YG17

Step 5
Here I start to blend a little at all places with YG03

Step 6
Blend with YG00

Step 7
Add YG17

I did not make any photos from here because its just the same way to do

Now Im just start to blend out the colors I start from here with YG03 then I blend with YG00
After the at I add more of YG128 and Blend with YG17

Then I just go over the hole process again  I hope you try this and if you like you can do a little background with some nice color. Its a great idea to use Varous ink


DONE :0)


Have a Wonderful day everyone

Big Hugs and Smiles
See you soon again

Friday, March 20, 2020

Just Flying By


Hello everyone! It's Delphine here today to share some colouring inspiration using a Penny Black butterfly, from the Butterfly Trio set.


Because purple and blue are my favourite colours, I decided to use them together on my card.
I started by creating a purple stripe, colouring from the left in vertical lines with my V01 and I blended and continued further to the right using V000.


I then created a blue rectangle in B000, 00, 01, 02. I coloured from right to left, starting with my darkest colour B02 and ending with my lightest on the left. 


For the blue on the wings, I coloured with my B39, then B28, 16, 04, 02 colouring from dark to light and starting from the butterfly's body. I added a bit of C10 and C7 near the body to add a bit more depth.


The rest of the wings was done in V09, 17, 15, 12.


As a last step, I used a black Copic multiliner to go over the little spots that did not have enough stamping ink, I stamped a sentiment and added touches of gold and white gel pens on the wings. 


Blue wings: B02, 04, 15, 28, 39, C78, 10
Purple wings: V09, 12, 15, 17
Background: B000, 00, 01, 02, V000, 01

Thank you very much for stopping by, have a lovely day everyone! Hugs,
Delphine xx

Thursday, March 12, 2020

Magic Iris Card with Flowers

Hi all, 

March is a month full of birthdays  so today I am sharing a special card I have made for a special friend of mine.

I have fallen in love with the magic iris die...from Lawn Fawn love the wow factor!

And recently  I have bought these flower stamps from Sheena, the die and flower go well together.

First of all I have added EZ mount on the back of the rubberstmap, stamped it with Memento desert sand ink to create a kind of no-line colouring.


To colour the flower I have used :
RV000, RV 91, RV 93, RV 95, RV99

Please see my little video below 


After having coloured the flower stamp  I have realised it was a bit too big next to the magic iris die so I have cut a piece. The rest was fussy cut around the image.


I have cut the letters with a die from Marianne Design, first out of purple foam and later also out of perfect colouring paper.

With a V91 marker I have coloured the white letters, to match the flower perfectly. These letters were glued on top of the foam letters in able to create a 3D effect.

When you open the magic iris this text will appear ( in the video you can see it moving )


Hope Stefania will like it and that I have inspired you today, thanks for your visit,

Hugs Blankina

Thursday, March 5, 2020

Through the Window | Making a Scene

Hi everyone! Today I'm sharing my colouring of a little scene I created using some masking to bring two stamps together. I used Fall Window and Gnome Backdrop and changed the scene outside the window. 


To change the scene was an easy process, but I didn't take any pictures of it so I will explain. 
First I covered the centre part of the Fall Window stamp with a piece of card while I inked it up. No ink got on the centre part. I stamped the window onto Perfect Colouring Paper using memento black ink. I stamped the window again onto some regular copier paper, I cut out the centre piece, leaving a hole, and placed the paper over the original stamped image. Then I stamped the gnome backdrop. As all the image was covered with the copier paper, except for the centre part, only part of the image transferred. 

Once I had the images merged I started the colouring process, beginning with the grass. 
I tried a different combination of YGs on this one, I normally use G's and finish with YG03. 

I started with YG17, which is quite dark, and I went around the edges and under the toadstools. 


I then applied YG23 dragging out some of the YG17 too. 


My lightest colour was YG13. 


For the ground I used E41, E42, and E43
When I had all the colours down I dotted the E42 and E43 to add some texture. 


On the flowers I used 2 shades of blue and 2 shades of pink. 
B91, B34. R81, R83 


For the toadstools I first coloured the underneath and the stalk using E41, E42, and E43. Then I coloured the top using R35 and R37. 


I coloured the sky using B01 and B00. 
When using red I would normally first colour around the element I'm going to colour in red as red is easily transferred onto lighter markers and gets dragged out. So when going around red, be very careful not to hit the tip of the marker off of it. 


I left the window white, I simply applied C1 and C3 for shadow. 


I coloured all around the window using R12, and applied E97 for darker areas. 


Behind the window, to give the appearance of frosted glass, I first coloured in R01. I then went over the R01 with BG10, and then went back in with R01. I applied R12 for shadow, and finally some BG11. 


Lastly, I went around the window with E93


That's it from me for today. 
Thanks for dropping by. 
Sandie