Hi all,
Today I have a lot of photos for you!
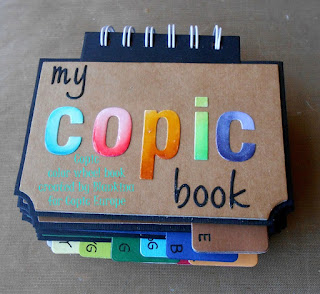
My old little handmade Copic color wheel book was falling to pieces
so I have decided to make a new version.
As you might know Copic has a color wheel with all colour groups
E (Earth ) , B ( Blue ), BG ( Blue Green ) , G ( Green ) , YG ( Yellow Green ) , Y ( Yellow ),
YR ( Yellow Red ) , R ( Red ) , RV ( Red Violet ) , V ( Violet ) , BV ( Blue Violet ),
the Grey Tones W ( Warm Grey ), T ( Toner Grey ) , N ( Neutral Grey ) , C ( Cool Grey )
and all these groups are separated in natural blending groups.
Those of you who have followed the ECCP Copic classes know all about it.
As the color wheel is quite small
I have preferred to divide all groups into a handmade color wheel book,
each page for each color group,
easy to consult whenever I need to match colours
or if I want to see which colours I have.
It is like a bingo card!
What about your Copic collection , is it growing?
Here is my little scrapbook project, perhaps you can get inspiration to make one yourself.
I have found a "funky" way to design my color group blocks,
I have used a mask from Dutch Doobadoo
and have traced the blocks with a pencil onto a sheet of paper.
With a black multiliner ( small tip 0.1) I have written all the Copic numbers underneath.
You have to do a little of counting to get the right amount of blocks :).
But it is fun to do and when you are ready so easy to use.
I have photo copied these sheets onto Perfect Colouring Paper and have
cut the shape with a die from Studio Light.
After having colored each block with the Copic marker I have,
I have accentuated the outlines with another black multiliner .
This time with a broader tip ( 0.5 ).
Now it was time to choose the background sheets,
one colour for each color group.
Gladly I have lovely plain coloured paper stock.
Aren't the papers just perfect?
These coloured sheets were cut with the matching Studio Light die
( slightly bigger than the one of the PCP sheets ).
To add a bit of contrast I have decided to use black card stock for the booklet base.
With a MFT die I have cut the small tabs for each page .
I have glued the parts together,
the pages of the colour blocks
onto the coloured sheets with tabs
and that onto the basic black card stock.
It looked like this when I was ready.
With my Cinch I have binded the whole book.
On the left side you can see the stencil I have used to make the "funky" blocks.
I have added some extra empty black card stock pages at the end,
two pages were used to add my hex chart from Sandy Allnock.
She has developed a sheet of Visual Organization of Copic Colors.
Printed out on a A5 sheet of PCP,
cut in half with the same die which I have used for my created pages.
Now each page will get a coloured stamp in the colours of the page,
my first page of the E group has a small Gorjuss stamp.
Perhaps I will add some doodling too.
On the tabs I have added the letters of each colour group.
Below the blocks of markers that have ,
I have added a black dot
to indicate which colours are available in the CIAO version ,
In this way you can see at a glance .
I have added also a black triangle to some colours,
of this colours I have the re-fill ( Various Ink ).
Now I have a lot of information all together.
Next step was the front cover…
I have cut the letters with a Marianne Design alphabet die out of a sheet of PCP.
Each letter was colored with some Copic markers.

The first "c" with BG 11, BG 13, BG 15, BG 18.
The "i" with YG 03, YG 06, YG 09.
The "o" with RV 11, RV 14, RV 17.
The "p" with YR 23, YR 24, YR 27.
The last "c" with BV 23, BV 25, BV 29.
I have coated the letters with some resin similar to glossy accents
( I have used Cristal Drop ).
Here is the final result…
At least perhaps I want to add some other details to the cover,
what do you think? Some doodling or perhaps some stamps?
To make my Copic book I have used:
Copic : all colours I have , black multiliner 0.1, black multiliner 0.5
Perfect Colouring Paper
paper : black card stock , coloured paper from Avec, kraft card stock
dies : Studio Light ( pages ) ,
Marianne Design ( alphabet dies ) ,
My Favorite Things -MFT (tabs)
Stamp: Gorjuss mini stamp n 40 the owl
Mask : Dutch Doobadoo Circles
Binding tool : Cinch , Cinch white binding wire 1.0"We R Memory Keepers
Resin : Stamperia Crystal Drop
Thanks for your visit!
Hugs Blankina


