Followers

Tuesday, December 15, 2015

Penguins in love!


Hi Everyone, it's Faye here today :)


 Well, it's time to face the music. Christmas, despite my best efforts to ignore it, is coming and it's time to address two facts:

  • I don't have enough Christmas cards for all the people I need to give them to

  • It's time to start making some of the cards I don't have enough of

Ok, crack open the Mulled Wine!

So, I love Penguins, these two from Little Miss Muffet Stamps are adorable. And obviously, Penguins love Penguins. How else do we get Baby Penguins after all? Really? We need to have THAT chat? Hmm, maybe another day. For now, here's a card for a Boy Penguin to give to a Girl Penguin he likes the look of at Christmas. He's shy, you know. Maybe she'll get the hint...


Copics Used... 
Sky; BG70, BG72
Cheeks; R11
White; C0, C1, C3
Black; N5, N7, N9
Yellow; Y11, Y15, Y35
Green; YG03, YG17, YG67, N5
Red; R35, R37, R39, N5
Pink; RV52, RV55, RV66

Thanks so much for stopping by... Have a great day.

Monday, December 14, 2015

Love you more than Coffee

Hi Everyone.
This is my 2nd post this month...

I took a break from Christmas cardmaking to make this card. I wanted to make a special card for a dear sister.
When I saw this image, I knew immediately that this was the right one for her.


 We are both Vanilla Latte Macchiato lovers.
And  I  love my sweet sister Wendy above anyone else.
This image says everything I want to say to her....love you more than coffee. 


 This image is by Mo's Manning and is called Coffee.

Here are the colours I've used for this card:
Skin: E000-00-04-11-21
Hair: E43-50-53
Pink shades: RV00-R81-83-85-89
Turquoise shades: BG11-34-45-49 
Background: G0000-000-00 and Blender

Thank you very much for your visit, have a great day! Hugs,

Sunday, December 13, 2015

Winner challenge #45: Christmas

Hello dear Copic Fans,

It's me again, Deborah, with the announcement of the winner of challenge 45.

"Christmas", it is....

#19 Lizland!

 Check out this gorgeous Christmas card!


Congratulations, Lizland! Please send us an email to copiceurope@gmail.com

with your request for 3 Copic Sketch markers.


Hugs Deborah

Saturday, December 12, 2015

dreams are forever

This month I have 2 posts to share...
On the 7th I had an art journal page with a skin tutorial for you. Today I have  an art journal page to share, using the same techniques as on the 7th.
Again I used an image by the East Wind. 


First some layers with E00 and E01. Instead of using BV00 for the shading I used a blue hue, the B41. Keep adding layers until  you're happy with the result and then blend all layers together with the E0000. For the lips I used R20 and E04.


For the hair I used the B12, 14, 18 and 41. I started with  B18 and work my way back to the lightest blue, B12. Then go back to the darkest colour, add another layer to get more depth. 
For the dress I used YR61, 65 and 68.
The flowers and ribbons are coloured with Y19, 23,15 and YG03,05,17 and 67. I used the YR61, 65 and 68 for some of the flowers too. 


and this is the finished page...
The background is made with Dylusions Paints and stencils

The quote was found on the internet and handwritten with Molotov Markers and Multiliners by Copic. 

Have a fab Xmas and a very happy and creative 2016.
See you next year.


Miranda

Friday, December 11, 2015

Challenge #46: Anything goes!

Challenge #46

Hi everyone!

Deborah here for you with the super fun NEW challenge #46!
Thank you for all who participated to our latest challenge, it will be a hard time to choose a winner!
There are so many great entries!
The winner will be announced on sunday December 16. 

Our new challenge is:

Anything goes!

So no excuse for not entering the challenge, right?


Here's my inspirational card for you. I've used "Holly Wreath Fairy", a digital stamp by Crafts and Me. The design of my card is pretty simple.


I've heat embossed the die cutted sentiment in silver and added some sequins on my card for the extra bling bling. I didn't wanted to have a traditional Christmascard, so I've used a lot of pink in my creation.


Here are the Copic colours I've used:
skin: E04, E11, E21, E00, E000, RV32
hair: RV10, R89, R85, R83, R81
eyes: E37, E35, G17, G11
wings: R85, R83, R81, RV10
white: C3, C1, C0
greens: G28, YG17, YG13, YG11
red: R59, R37, R24
yellow: E35, YR23, Y17, Y15
blue: B00, B000

We made a Facebook group Copic Marker Europe and from now on, the challenges will be played over there. So be sure to add yourself to the group!

To enter, enter your picture in the right folder in the photo section of the new Facebook group
before the end of January 10 2016.
The winner will be announced on the 12th of January.

 So now, it's your turn! Show us your work, and you can win
3 sketch markers of your choice.
Please be aware that only entries from those living in Europe, North Africa and the Middle East are possible.

Hugs


Deborah

Thursday, December 10, 2015

Facebook group!

Hi everyone!

I'm here to announce something special...

We made a Facebook group!!!


Whoohooo! Be sure to add yourself to the group and from now on, the challenges will be played over there! Feel free to show us your work!

See you over there!

Deborah

Making clouds with the activatorspray

 Hi Copic friends,

This is my first Copic Tutorial for the Copic Marker Europe Blog.
 I decided to teach you how to make clouds with the Activator Spray.

Start with making a background with your Airbrush.


For the next step you will need a rubber stamp (I'm using a cloud-stamp  by Katzelkraft), an acrylic stampingblock, a bottle of Copic Activator and a tissue.


Spray the Activator on the rubber Cloud stamp.
 
Remove the excess of the Activator Spray from your acrylic stamping block with a tissue.

Tip: Do this immediately after spraying because Activator Spray evaporates very quickly.
 

Stamp the clouds on your background. 

Press it gently and let the stamp rest for a few seconds so the Activator Spray can react with Copic Ink.

When you remove the stamp, you will see that the ink has been diluted  by Activator Spray.
It  looks a bit smudgy now, but the print will get more crisp if you give the spray a litte time to dry.

I've  used different cloud stamps  to create  a beautiful cloud cover.
 

I've used a limited range of Copic colours.

So you can see that you can create maximum impact with just a few colours.
All the stamps I have used, are by Kaztelkraft.


Here are the colours I've used for this project.:

Sky: B04

Grass: YG05
Blue shades: B000-B00-B01-b02-B05
Orange/yellow shades: YR02- YR04-YR07-YR09 and Y11-Y13-Y17-Y19
Yellow shades:Y11-13-17-19
Orange shades: YR02- YR04-YR07-YR09
Green shades: YG01-YG03-YG05-YG09
Grey shades: C0-C1-C3
Pink: R20
Thank you very much for your visit, have a great day! Hugs,
 

Tuesday, December 8, 2015

Tutorial - coloring bricks

Hi you all!

It's Christina and today it's my turn to show a tutorial. I have really thought about this one and tried to come up with a good idea. The other day, when I was colouring a stamp for a Christmas card it hit me. I can make a tutorial of how to colour a brick wall. Or in my case - a brick chimney.

I had an idea of Santa going down the chimney or should I say - getting stuck going down.


I have masked two Magnolia stamps together as you can see below.


 Instead of showing you picture by picture how I have made my tutorial I made a little movie.


My first one ever when I colour. I was a bit nervous. I wanted the bricks to have that rough way of looking, filthy and old. I got some editing help with my film from my daughter. We took away all the background noise (otherwise you would hear my husband doing Spanish with my son ;) ) and we sped it up a bit. Hope you will enjoy it.

Here is the final result:


I have used the following pens:

Bricks E19-17-15-13-43-W7
Boots W9-8-7 / Y26
Snow N2-1-0-BG70
Shadow C6-4-2-0-00

That's all from me! Have a nice week!

Hugs Christina


Monday, December 7, 2015

skin tutorial

The days are getting shorter,  the weather over here in the Netherlands is getting colder....it's surely wintertime, but that means lots of time to colour with my Copic Markers and drinking hot cups of tea or cocoa. How about you?  

I did a lot of colouring lately and I thought it would be nice to show you how I build up the facial layers when I use my Copic Markers...(have a cup of tea first, I've got quite a few photographs to share). The image is by The East Wind. 


I start with a thin layer of E00 leaving out the highlights. So at this point you already need to know where you want your shadows and highlights. I also drew a nose in this first layer. 


Then I start on my second layer, still using the E00. Still not colouring the highlights and I do not colour the nose...because the nose normally catches a lot of light (it sticks out LOL) so it should be a lot lighter than the rest of the skin. On the other hand the eye sockets are situated deeper in the face and therefore have a lot of shadows. So those parts should be much darker. 

The colouring doesn't look smooth , but I'm not worrying about that yet. Still many layers to do. 


For the third layer I used the E01. The facial characteristics are getting more visible now, 


For my fourth layer I used the R20, to get a warm skin tone. You can use the R20 for the lips too. The upper lip is darker than the lower lip. The lower lip sticks out a little and should have a  highlight. 


Now all the fun starts, For this fifth layer I used BV00 to add some shades. this might be a little scary, but you really should give it a try, the effects are super. The BV00 adds more depth to the face. 


Repeat the shading part with the BV00 to get more depth. For the deepest shadows I used the BV02 . And blend all the layers together using E000. With E000 you go over the whole face, even the highlights. The E000 blends all the colours together and it will remove all the harsh marker lines. 

For the eyes I used B21, 24, 29 and 39.
Add a thin layer of B21. Than add the darker colours. In the eyes there are shadows too. The eye sockets lie deep in the face (to protect the eyes) and the cast a shadow on the eyeball too. The upper part of the eyeball is therefore darker than the rest of the eyeball. 


The hair was quite a  lot of work. I can do a tutorial on the hair too if you like. I have been using the BV08, V01, 05, 06 and 09. Start with the darkest colour and work your way back to the lightest. When finished I go back to the darkest colour again to add more depth. 


And this is how the finished page looks. The birds and feather are coloured with YR61, 65, 68, RV06 and BV00. 
Cutting out the hair was quite a job to do....it took me over an hour to fussy cut all the hairs....and cutting is not really my favorite thing to do LOL. 

The background is made with Dylusions paints and stencils, I also used some Dutch Doobadoo stencils. Found the quote on the Internet. 

Have a fabulous day

hugs
Miranda


Thursday, December 3, 2015

Magical Emi, fan art by Suki Manga Art


Dear Copic friends, today I will show you a fan art inspired in "Magical Emi"
It is an anime series that I enjoyed when I was very young.

Mai Kozuki wants to become a magician herself, just like her hero, the fabulous legend Emily Howell. Unfortunately, because she is still a young girl, she is very clumsy and unsure.
One day, while helping her grandfather move things, Mai sees a strange light enter an odd, heart shaped mirror and turn into a mirror fairy named Topo.
 He takes over the body of her favorite toy, a stuffed flying squirrel, and explains that he must give magic to the one who can see him. He gives her a bracelet with the symbols of the 4 card suits which produces a magic wand. By waving the wand, Mai becomes " Magical Emi". She uses magic to help solve problems.


These are the Copic colours I used to create this illustration:


Skin: E000 - E00 - E21 - RV10
Hair and eyes: BG01 - BG05 - B000 - B05
Clothes: Y08 - Y38 - 100 - C7 - C5 - C3 - R29 - R59 - V15 - V12 - V09 - B60 - RV04 - 


I used also white ink for little details.

I hope you like it   (^____^)/

See you!


Suki Manga Art


Facebook
Deviantart

Tuesday, December 1, 2015

December's here!


Hello everyone! It's Delphine here today to share a winter/ Christmas card - it is December 1st after all! I combined three digis to create a 100% Copic scene as I like doing.


The character I used is called Reindeer Games by Tiddly Inks and I combined it with Make it Crafty Snow Village and Winter Fence in MS Word. I coloured my scene in Copics and added a bit of Distress Inks on the edges of the sky. 


Skin: E000, 00, 11, 71
Hair: E49, 55, 59
Red Hat and Dress: C5, R35, 37, 39, 89, Y02, 26, W0, 1, 3
Boots: E42, T5, 7, 9
Reindeer: E30, 31, 33, 35, 40, 41, 42, R20
Fence: E41, 42, 43, 44, Y26
Houses: E50, 51, 53, Y35
Sky: B69
Snow: BG000, C0, 1, 3


Thank you very much for yor visit, have a lovely day! Hugs,
Delphine xx

Monday, November 30, 2015

Tilda and Frosty

Hi!

It's time for me, Christina, to inspire you and I do it with a Christmas card. It's almost time to send them. A couple of weeks more and then they are off! 
I just love to do Christmas cards and I'm usually finished by now because the past years I have made 1-2 card a month but not this year. 

Not only do I love Christmas cards, I love doing them clean and simple.


Here is Tilda with Frosty the Snowman wishing Merry Christmans or God Jul in Swedish.

Don´t you just love coloring in red? I know most of you think it´s difficult but I think if you practice and practice you will come to love it! 

Here are the pens I have used:

Skin E04-11-02-YR00-000
Här E51-53-99
Red T5-E19-08-R27
Dark Grey C8-6-4
Mittens/hat C4-2-1
Shadow C2-0

Have a wonderful day!

hugs 
Christina


Saturday, November 28, 2015

For the love of art

 Hi Copic friends.
I took a break from the Christmas card making to make this card. One of my favorite images, actually. I find it difficult to colour dark skin, but I think it turned out okay :) 

I wanted to let the image be the main focus on this card. Besides the papers I used a couple of die cut stars, some lace, and flowers.


The image is Jaqui Painting by Mo's Digital Pencil/Mo Manning.
Copic colours used:
Skin: E27-25-23-21
Hair: E49-29-25-23-21
Reds: RV29, R59-27-24-22-20, W5
Pants: BG75-72-71 (homemade)70, W7
Shoe: B34-32-23-21
Dotted background: BG73-1-70, W1-00, C1-00
Floor: W7-5-3-1-00
Water: B000, Pencils and details: E35-31-30


Here's a peek at the inside of the card too.

Hope you like it!

Thanks for stopping by today,


Hugs, Elizabeth 

Thursday, November 26, 2015

Almost time to start decorating your trees

It's that time of year again - Christmas.....well, almost!

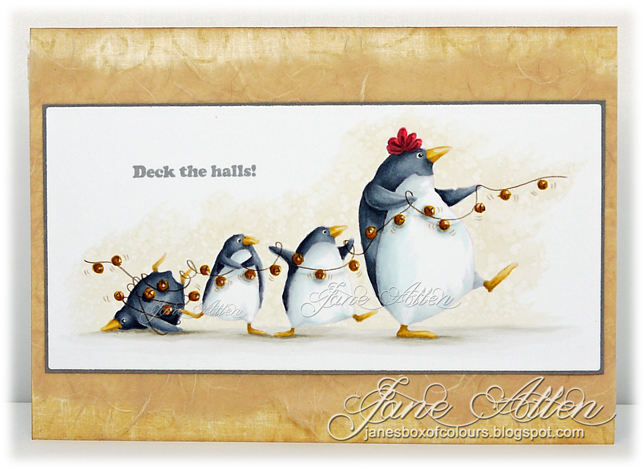
Anyway here are some adorable penguins helping out with the decorations......

For such a simple image there were quite a few challenges......

Primarily colouring black and white!
In order to obtain the depth and dimension on the penguins I opted for shades of grey rather than black on their bodies whilst their tummies are a combination of pale blue and very pale grey.

As always I chose to stamp out my image using Memento Angel Pink to give my finished piece a softer no-lines look.

The upper background was created using my trusty YR30, a small natural sponge and some Isopropyl.
I coloured the chosen area with the copic marker, then sprayed the sponge with Isopropyl, dabbing it on some waste card to remove the excess before dabbing it onto the marker. As you can see it gives a lovely mottled texture to the background.  Once dry I then coloured the ground before moving on to the penguins themselves, enhancing some of the finer details with coloured pencils.

Image: Stamping Bella - Christmas Penguins
Sentiment: Happy Christmas set by CC Designs
Memento - Angel Pink and London Fog
Copic colours:
Ground - W00, W0, W1, W2, W3, YR30
Penguins - YR20, YR21, E31, C00, C0, C1, C2, C3, C4, C6, C8, YR31, E33, E34, R32, R56, R59
Bells - YR21, YR24, YR27
Coloured pencil
DP & Mulberry paper from stash

Happy Crafting

Wednesday, November 25, 2015

Thinking of you


Good Morning Everyone, this is Sarit here.

Most of the cards we make are to put a smile on someones face, 
But sometimes it's just to give a hug and say "I'm thinking of you"

I found this lovely image at Wikipedia, (when I want to colour flowers this is the best place to find a beautiful line art flower)

I started colouring with the petals, as they take most of the attention.
  
Mostly when we colour small area we colour from dark to light. 
trying to be very gentle with the dark red colour. 
Don't  want the paper to absorb a lot of ink otherwise the red colour will expand outside the line.
And the red colour cannot be wiped off with the blender.

Don't  be afraid to use reds, just pay more attention when you colour it in small area.

Here are the Copics I used:
R24,R27,R29,R59
YG93, YG95, YG97, YG99
N5, N7

Big Hugs