Followers

Showing posts with label Sarit Sabbag. Show all posts

Thursday, January 5, 2017

Necklace with Copic

Hi everyone,

Lately I find myself playing with copic and drawing jewelry. (never learned Jewelry design, one of my dreams)
For the most coloring I used  grays for the silver and Y family for the gold,
adding colours just for the stone and gems.
It feels different then colouring a digi stamp
Today I want to share a necklace I draw


Its free hand drawing , tracing the pencil sketch with gray multi-liner with a little black multi-liner to emphasizes the dark areas.

Here are the copic I used:


Pearl: N0,N1,N2,N3,N5, RV00, B91, White colour pencil
Stones: B21, B24, B26, B29, White colour pencil, White gel pen
T3, T5, T6,
Shadow: N8, N7, N5, N3, N1, Blender
Gray & Black 0.1, 0.5 Multi-Liner

Wishing you a wonderful day


Wednesday, December 7, 2016

Christmas Shaker card


Hi Everyone!!!

Christmas is almost here.... and one of the best things about the holiday is making Christmas cards!
I love to make interactive cards and shaker cards are one of them.

This time I didn't use the traditional Christmas colours for the base of the card. The lovely bear image is Lili of the Valley.


Here are the Copics I used:

Bear: E31, E33, E34, E35, E37, E99
Hat: R17, R29, R59, N0, N1, N3. Blender
Scarf: YG09, G17, G29
Ground: W0, W1, W3, W6.

Wishing you all a beautiful day and Merry Christmas.


Monday, November 7, 2016

Enjoy the little things in life


Good morning Everyone.

A few days ago we had the first rain. Everything around us received a good wash (including my car - lol)The rain was such a nice change from the heat. I love the smell after the rain.
On my way to my washed car I saw this little one... It just decided to go for a walk after the rain.


Isn't it cute? When I came home and looked for an image to colour, this digi caught my eyes.


The image is called Boo & Snookie from The Emerald Faerie Garden.

Here are the Copics I used:

Fairy Body: E50, E51, E53, E55
Hair: C3, C5
Wings: R0000, R000, Y0000, Y000, Y11
Hat & Pants: B00, B02, B04, B06 Snail - YG0000, YG91, YG93, YG95, YG99
Snail: E81, E84, E87, E89
RV91, RV93, RV95

Background: Distress ink

Wishing you a blessed day.
Hugs,

Friday, October 7, 2016

Friends


Good Morning Everyone.
This is Sarit for some colour inspiration.
Today I want to share a friendship card.

Who doesn't love a teddy bear hug?
When my daughter was little she had a favourite stuffed animal. She went to sleep hugging it.
This cute digi stamp from Kanban remains me of her special friend.


There are several ways to "make" fur.
I used dot colouring to emphasis the fur.
I coloured the bear with basic colour coat and the shading I made with dots.

Here is the Copic list

Face: E000, E00, E11, E13, E21, E93
Hair: YR04, YR18, E08, E18, R14
Shirt: G00.G02, RV00, RV02
Bear: E33, E15, E18

Wishing you a blessed day
hugs,


Wednesday, September 7, 2016

Hello..... do you hear me


?Hello..... do you hear me


 .Hi everyone, it's Sarit here Today

.When I was a child we used to take 2 cans and a thread and make a phone. 
.It was so much fun
  .This card is for the old days, before the cellular phone revolution

.For this card I used a Saturated Canary Image
 .I cut the card and made a window so each girl can peep from window
.The Hello I made with cotton thread


:Here are the Copics I used
Body: E000, E00, E11, E21, E93, E95
Eyes: B01, B02, B05
Lips: R21, R22
Hair: E51, E53, E33, E57
Shirt & Bow: YG11, YG13, YG17, YG67
Dress: YR61, YR65, YR68
Can: C1, C3, C5, C7


Body: E000, E00, E11, E21, E93, E95
Eyes: E41, E44, YG41
Lips: R21, R22
Hair: E51, E53, E33, E39, E18
Shirt : RV25, RV29, RV69
Can: C1, C3, C5, C7

Hope you like it.
.Thank you for your visit & have a wonderful day

Hugs

Monday, August 8, 2016

Tiddly Ink - Slider Card


Hi Everyone,

Just came back from a wonderful vacation in beautiful Italy.
We visited a Buffalo Farm.
The Hostess was extraordinarily kind. I decided to send her a card with some goodies to say thank you.

 I want to share with you, a slider card I made for her.
I used Tiddly Inks - girl with pot of flowers digi stamp.

Here is the open card:

Copics used:
Skin: E000, E00, E11, E04, E21, R20
Hair: E53, E55, E57, E59
Dress: R35, R27, R39
Shirt: G000
Shoes: Y35, Y38, YR16
Pot: E41, E42
Flowers: RV02,RV04

Wishing you a wonderful day
Hugs,


Thursday, July 7, 2016

Tutorial: Dry & Wet embossing


Good morning everyone, today it's my turn to share with you a tutorial.
I made this technique before I met Copic, and now I wanted to see if I can ado the same thing with Copic.
Today I made a tea bag folder, so let's start.

Material needed:
* Glossy Paper
* Embossing Folder
* Versamark
*Embossing Powder
* Heat Gun
* Copic Refill (colour of your choice)


1. Cut your glossy paper and emboss it with your embossing folder
TIP: Don't use very delicate design, it will be hard to achieve a good heat embossing 


2. With the Versamark  Gently sweep the ink on the raised areas 
TIP: Use a juicy Versamark pad, it will give you a better result.

3. Apply embossing powder, with a small brush clear the unnecessary powder


Tip: Delicate powder will give a better result


4. Now we do the fun part.
Take your Copic refill and start to apply drops on the paper.
Here are the colours I used:


This is how it looks when its done:

5. Now its the second fun part: apply it to a card or in my case to my tea folder
My finish tea bag folder is 3"X 3"


6. Cut cardstock "3 x 9". Score it at 3" & 6"


7. Cut it as shown in the picture. 


8. Glue the triangle wing & decorate


Voila... the teabag is done!
Hope you enjoy.
Wishing you a wonderful day.

hugs,

Thursday, June 9, 2016

Fantasy Fairytale


Hi Everyone.
Happy to be here.

Today I want to share with you a card I made with the Fantasy Fairytail from The Paper Shelter. I wanted her skin to be pale so I didn't used my usual skin colours.

For this lady I used E50, E30, E11 & V93.


On the wings I added the Zig Sparkle Pen to get some shimmer.

Here are the Copics I used:

Skin: E50, E30, E11, V93, R20, R22
Wings: YR0000, YR000, BG0000
Dress: BG70, BG72, BG75
Ribbon: BG72, BG75, BG78
Hair: T3, T5, T7, T10
Hair Pin: R22, R24, R89

Wishing you a beautiful day
Hugs,


Saturday, May 7, 2016

Notebook Cover

Hi everyone,

My friend asked me to colour a girl image for a second birthday.
The idea is to put the image on a notebook cover to make a notebook with all the smart sayings.

We looked over digi stamps and when she saw Two Jill stamp that was it.

I must say that I love this adorable girl. 


:Here are the colours I used:

Face: E000, E00, E11, R20
Hair: E51, E52, E53, E55, E57
Shirt: B63, B66, B69
Pens: E71, E74, E77, R20, R21, R22

Wishing you a wonderful day
hugs


Thursday, April 7, 2016

I'm ready, lets go.... Shopping


Hi Everyone!
Today I want to share with you a simple card.
Decided to let the image be in focus.
I choose the image Yvonne from Saturated Canary.
she is so cute and ready to go and have some fun.
The curly hair is easy to do,
its more loose hand without flicks at all.


Here are the colours I used:
Skin: E11,E13,E15,E18,R20
Lips: R35, R39
Hair: E57, E37, E39, E59
Top: YR12, YR14, YR16, YR18
Hair Band: BG02, BG05, BG07, BG09
Pans: C00, C0, C1, C2, C4, 0

Wishing you a wonderful day
hugs,


Wednesday, March 9, 2016

Monochromatic coloring


HI Everyone.

Today I want to share with you my card.
I wanted the image to look like an old photo.
For this card, I used Little Eden digi stamp by Elizabeth Bell
isn't she gorgeous?


I used E50-E9 for this image

Body: E50-E53 and tiny E55 on the shadow spot
Hair: E51, 53,  57, 59
Dress: E55, 57, 59

Hope you like it.

Wishing you a beautiful day
until next time
hugs,


Thursday, February 18, 2016

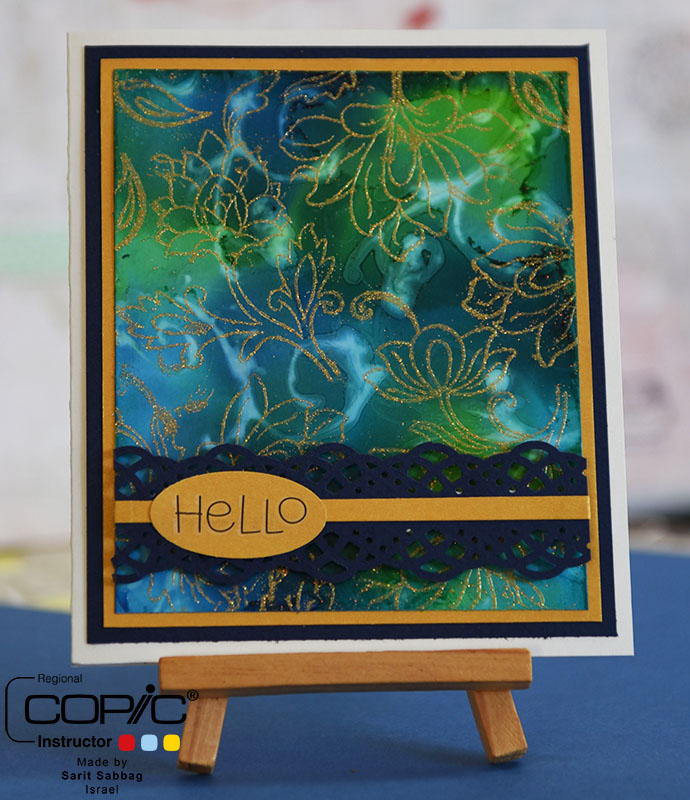
No Coloring card - Copic Re-inker with hand Sanitizer

Hello everyone.

So happy to be here today and to share with you a tutorial using Copic Re-inker & hand sanitizer.
I enjoy this technique very much, hope you will like it too So let’s get started….

Materials needed:
Craft sheet
Glossy cardstock (I used Ranger)
Copic re-inker: B000, B02, B05, B97, YG03, YG23
Hand sanitizer that include alcohol in it (I used one with 70% alcohol)
2 Stamps: one for the background and one that will be embossed
Versamark
Gold embossing powder – STAMP-n-STUFF
Embossing heat gun

1.     On the glossy cardstock I drop a few drops from each colour, its beautiful to see how the colours spread. I play with it until I am pleased with the final look. Let it dry.

2.  pour a small amount of the hand sanitizer on the craft sheet, with my finger I spread it to a thin layer. The hand sanitizer will be my “ink”.


For the background I used a swirl stamp from Inkadinkado. I dab the stamp in the hand sanitizer and stamp it on the card. Don’t lift your hand quickly. Let the alcohol in the hand sanitizer work. Let it dry. 


If you want another layer you can do it. I made another layer this time I put a tiny amount of hand sanitizer for more detailed look.
Tip: it’s important to let it dry in between layers of stamping.
After finishing stamping let dry completely.

3.   This is how it looks after stamping 2 layers with the hand sanitizer.


4.   For my main image I used Persian Motifs set stamps from ALTENEW. I stamped with Versamark ink, spread Gold Tinsel embossing powder and heated it with an embossing gun. 


5. Now its time to assemble the card, and here is the final card.


6. Hope I gave you new ideas to play with this technique.

Until next time.
Hugs,