Followers

Showing posts with label pencils. Show all posts

Thursday, March 17, 2016

Up, up and away!

Here is a simple card with a detailed image
a combination that I love!


Apart from the central image, everything else is drawn by hand and I think it sets the scene for this adorable young pilot and his passenger.


Airplane by Mo Manning
Papers from stash
Copic Markers:
Background - YG0000, G12, G20, G40, B0000, W0, W1, Y0000, W00
Plane - C00, C0, C1, C2, C3, C4, C6, W00, W0, W1, W2, B91, B93, B95, B97, N1, N3, N5, N7, N9, T1, T2, T3, T4, BG93, BG96
Pilot - E40, E41, E42, E43, E44, G40, G43, G46, B91, YR20, YR21, R27, YR23, E70, E71, E74
Skin - E0000, E000, E00, E40, V20, B12, B14
Dog - TR30, E81, E11, E13, N7

Image enhanced with Caran D'Ache Pablo and Luminance pencils

I hope you like this little card and that it inspires you to add a few details of your own......set the scene and avoid having your coloured images floating in mid air!

Happy Colouring


Thursday, November 26, 2015

Almost time to start decorating your trees

It's that time of year again - Christmas.....well, almost!

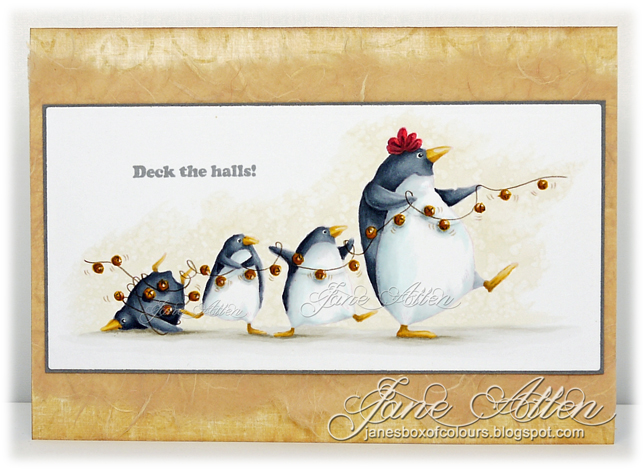
Anyway here are some adorable penguins helping out with the decorations......

For such a simple image there were quite a few challenges......

Primarily colouring black and white!
In order to obtain the depth and dimension on the penguins I opted for shades of grey rather than black on their bodies whilst their tummies are a combination of pale blue and very pale grey.

As always I chose to stamp out my image using Memento Angel Pink to give my finished piece a softer no-lines look.

The upper background was created using my trusty YR30, a small natural sponge and some Isopropyl.
I coloured the chosen area with the copic marker, then sprayed the sponge with Isopropyl, dabbing it on some waste card to remove the excess before dabbing it onto the marker. As you can see it gives a lovely mottled texture to the background.  Once dry I then coloured the ground before moving on to the penguins themselves, enhancing some of the finer details with coloured pencils.

Image: Stamping Bella - Christmas Penguins
Sentiment: Happy Christmas set by CC Designs
Memento - Angel Pink and London Fog
Copic colours:
Ground - W00, W0, W1, W2, W3, YR30
Penguins - YR20, YR21, E31, C00, C0, C1, C2, C3, C4, C6, C8, YR31, E33, E34, R32, R56, R59
Bells - YR21, YR24, YR27
Coloured pencil
DP & Mulberry paper from stash

Happy Crafting

Saturday, September 26, 2015

What counts as a good excuse to eat cake?

Celebrating a birthday anyone?


          Cupcake Henry - CC Designs

          Hat - B000, B00, B02, YR20, YR21, Y28, N0, N1, N2, N3
          Skin - W6, W8, B12, B14, V20, E0000, E000, E00, E41, V20, 
          RV32, B0000
          Cake - E50, E51, E21, E23, E27, E34, C00, C0, C2, YR20, YR23, 
          YR82, W5, B00, B02, N1, YR30, E40, E41, E42, E81, W3
          Shirt - YR30, YR20, YR21, E55
          Jeans - B41, B91, B93, B95, B97, C2, C4
          Hair - E40, E41, E42, E43, E44
          Shoes - W0, W1, W2, N1, BG0000, BG000, B00, BG01
          Background - YR30, B0000, B00, C0, C1, C2, C4

I have enhanced my Copic work with Caran D'Ache pencils and sealed it with
Winsor and Newton Professional Fixative to prevent smudging.


Thanks for dropping by today,
 I hope my work has inspired you to get creative with your Copic markers!

Happy Colouring

Monday, August 24, 2015

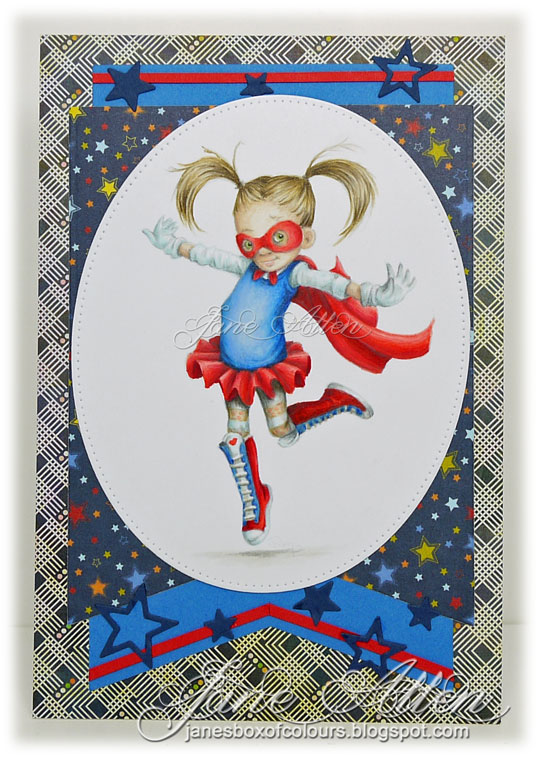
Let's hear it for the girls!

Wow, it seems like ages since I last sat here in my studio to blog......
.......not surprising really as it's harvest time here in the UK, I'm married to a farmer and normal life gets put on hold at this time of year!

So it feels quite an achievement to be able to say here is my latest post for Copic Europe - 
I hope you like it!


As is my preference of late I have opted for the no lines technique i.e. printing the image at reduced opacity if using digital images or pale ink when using a stamp.

Super Day by Mo Manning
Papers - June Bug Pad by Basic Grey, Blast Off pad by Bo Bunny
Star and large flag dies


Skin: E0000, E000, E00, V20
Hair: E40, E41, E42, E43, E44
Cape: R20, R21, R22, R24, R29
Sweater: B32, B34, B41
Tights: YR30, E81, B0000, B000, N1, N2
Shirt: B0000, B000, N0, N1, N2
Shoes: R21, R22, R24, R29, B0000, B000,
 B21, B23, N0, N1, N3, N5, W1, W2
Ground: N0, N1

Please note - image has been enhanced with coloured pencils

Thanks for dropping by and I hope this has inspired you to get crafty

Monday, July 27, 2015

How to add detail to your Copic colourings

Hello there, it's Jane again,
I thought I would do something with a real summery feel this time!

So here is Wryn from Tiddly Inks enjoying a day at the beach.


Sweet treat Wryn & Wryn Beach Bonanza - Tiddly Inks

Copics
Sand - YR30, E40, E41, E42, E50, E51, W0
Sky - B0000, B000
Brolly - E70, E71, E74, B34, B32, B60, B41, N3, N2, N1, N0
Cone - E50, E51, E41, E42
Ice cream - R30, R20, R21, R22, G0000, G000, G00, W0, W1, W2
Bucket - N0, N1, N2
Shell/Fish - BV20, V20, YR21, YR24, E11, E01, R11, R12, E31, E30, E00, YR12, E08, T0, T1, T2, N0, W0, W1, R00
Hair - E40, E42, E43, E44, R89, R83
Flowers/Sandals - E33, E37, R11, R12, W1, R00, R01, W0
Girl - E0000, E000, E00, R20, V20, B41, B45, W7

Enhanced with coloured pencils

Sometimes when using Copics on small fiddly images you can't quite add the detail you would like to.  That is when additional coloured pencil enhancement can make all the difference!
I use Caran D'Ache Pablo's and Luminance pencils - and they are especially good for adding definition to hair.
Just remember to have a can of fixative to hand as the smooth cardstock usually used for Copic work is not overly suitable for pencils and it tends to rub off/smear if you don't seal your work.
(I use Winsor & Newton Professional Fixative)

Thanks for dropping by

Tuesday, August 5, 2014

The Desolation of Smauglock


Hello Copic-Fans!
This is my 2nd entry and today I'll show you a fanart.
I'm not only a Copic artist, I also love to draw comics/doujinshis(Japanese term for fan-comics)/mangas.
As a huge fan of the BBC TV-show Sherlock and the Lord of the Rings
/the Hobbit, I started a few month ago a crossover-comic/doujinshi and this is the cover.
It's a parody and I thought a funny illustration in Chibi-style would fit well.


At first I made a digital concept picture.
Making a digital sketches can help a lot and gives you an idea how to colour
the outlines with Copics.


I started with grey outlines an marked the highlights with a yellow Multiliner.


For the gold I used the confetti stroke/technique.


Alternative scan


Copics I used:

RED: R89, R59,R46, R43, R37, R22
BLUE: V95,  R22,B99, B97, B95, B91, B45, BV29
EARTH: E87, E84, E74, E71 E55, E44, E43, E37,E35, E33, E31,E27. E18, E15, E13, E04  
YELLOW:  Y35,Y32, Y26 YR00,Y17, Y15,  YR13, Y11Y04.Y21 Y00
YELLOW-RED:  YR23, YR20, YR14, YR13, YR12,YR00
YELLOW-GREEN:  YG95, YG67, YG23, YG21 
BLUE-GREEN: BG99, BG01
GREEN: G94, G46, G28,
GREY: N3, C3, W3, W1

I'm sorry, I mixed a lot of colours an can't tell exactly which one I used for what.
I can only tell for sure, that I used
for Skin: E53, E50, E21, E00, R12
and for shadows:  B60, BV31, BV25, BV23, BV20, BV11 (these are my secret weapon, I use them for EVERY picture)

Additional Material:
 Multiliners in different colors an pencils for the background


I hope you like the picture.
If you want to read the doujinshi/comic,
you can find it on Deviantart and Animexx.

See you next time!
Regards

Sunday, September 16, 2012

Copic Markers and Pencils


When I saw this lovely Squirrel from Wee Stamps, I knew this image is perfect
for a tutorial about Copic and Derwent Pencils
***
Als ich dieses süße Eichhörnchen von Wee Stamps gesehen habe, wusste ich, dass das das perfekte Motiv für ein Tutorial über Copics und Derwent Buntstifte ist.

Copic Markers combine very well with Derwent pencils, Prismacolor pencils or any kind of
high pigment pencils.
School pencils are less suitable because the don't have enough pigment and the blend not so well.
***
Copic Marker lassen sich gut mit Derwent Buntstiften, Prismacolor Buntstiften und vielen anderen stark pigmentierten Buntstiften kombinieren.
Schulbuntstifte funktionieren nicht so gut, sie enthalten zu wenige Farbpigmente und lassen sich schlechter verwischen.

Final result...
Das Endergebnis...


The basic for my card is blue Bazzill cardstock.
 The design paper is Black & White Timeless from Kaiserkraft.
The edges I distressed with distress ink "Broken China"
I love this line, you can do so much with it, in every color you like.
The heart, swirls, corners and leaves are Cheery Lynn dies.
***
Die Basis meiner Karte ist blauer Bazzill-Cardstock.
Das Designpapier ist Black & White Timeless von Kaisercraft. 
Die Ränder habe ich mit Distress Ink "Broken China" gewischt.
Ich liebe diese Papierserie, man kann soviel damit machen, in jeder Farbe wie man mag.
Das Herz, die Schnörkel und Blätter sind Schneideschablonen von Cheery-Lynn.


Inside I use a Marianne Design die on a piece of
dessin paper
***
Innen habe ich ein Stück Designpapier mit einer 
Schneideschablone von Marianne Design geschnitten.

How can you color with Copic Markers and Pencils....??
***
Wie koloriert man mit Copic Markern und Buntstiften...??


Have fun....
Habt Spaß...


Thank you for watching my video tutorial. I love to read what you
think about it.
***
Danke, dass ihr mein Vidoe angeschaut habt. Ich würde mich darüber freuen
zu lesen, was ihr davon haltet.

A close up
***
Eine Nahaufnahme


I used these colors:
Ich habe diese Farben verwendet:

Squirrel/Eichhörnchen: E43 E42 E41& Mid brown C600, Pale Brown C530,
Pale Peach C570 Rose C100 
Flowers/Blumen: B00 & Blue C330 & Blood Orange C090
Stem/Stängel: G43 G40
Basket/Korb: E70 E71 E74

Friday, April 13, 2012

Colouring with Copics in combination with pencils, a tutorial

Hello!
Hallo!
Today I'm going to show how you can give more live to your images by using pencils in combination with your copics. I haven't learned this in a class, just wanted to show you my way of doing this.
When I started coloring with Copics I'didn't have so many markers. Sometimes I was missing some colours to give my images the look I wanted to. I also found it very hard to use my darkest markers and get a good result. Then I used some Prismacolor Pencils in combination with my Copics.
Heute zeige ich euch, wie ihr mehr Leben in eure Motive bringen könnt, indem ihr Buntstifte mit euren Copics kombiniert. Ich habe das nicht in einem Kurs gelernt, ich möchte euch einfach zeigen, wie ich das mache. Als ich angefangen habe, mit Copics zu kolorieren, hatte ich noch nicht so viele Stifte. Manchmal fehlten mir genau die Farben, um mein Motiv so aussehen zu lassen, wie ich es wollte. Ich fand es auch schwierig, mit meinen dunkelsten Markern ein gutes Resultat zu erzielen. Da habe ich dann Prosmacolor Buntstifte mit meinen Copics kombiniert. 
Let's get started.... 
Lasst uns loslegen...

You need a image coloured with Copics.  This is Sweetheart Marci from LaLaLandcrafts. I have stamped her on Perfect Coloring Paper. 
Ihr braucht ein schon mit Copics koloriertes Motiv. Das ist Sweetheart Marci von LaLaLandcrafts. Ich habe sie auf Perfect Coloring Paper gestempelt.

For this tutorial I'm going to use only brown and grey tones on my pencils. I think they go well with most colors. I also use some thinner to fade the colors , a paper stump and some sandpaper. I need the sandpaper to clean the tip of my paper stump.
Für dieses Tutorial werde ich von den Buntstiften nur Braun- und Grautöne verwenden. Ich finde, sie passen gut zu den meisten Farben. Ich verwende auch Verdünnung, um die Farben zu verwischen, und etwas Sandpapier. Ich brauche das Sandpapier um die Spitze des Papierwischers zu reinigen.

First step is giving some live to her face. I use my Sienna Brown pencil and make lines at the parts I want to be darker.
Im ersten Schritt gebe ich ihrem Gesicht mehr Leben. Ich benutze mein Sienna Brown und male dort Linien, wo ich es etwas dunkler haben möchte.
Then I use my paper stump to fade out the lines. You have to dip it in the thinner before you start. Otherwise you will not be able to fade the color from the pencil.
Dann verwische ich die Linie mit dem Papierwischer. Man muss den Papierwischer zuerst in die Verdünnung. Sonst kann man die Farbe nicht verwischen. 
And her face is finished!
Und ihr Gesicht ist fertig!

I do it the same way with all the parts of her skin. Make sure you clean your paper stump after you used it on the face.
Ich mache das auf den anderen Hautflächen genauso. Achtet darauf, dass ihr den Papierwischer reinigt, nachdem ihr ihn für das Gesicht verwendet habt.
On her dress I've used Cool Grey 70% and 90%. And I've also used my paper stump to fade out the lines from the pencils.
Auf ihrem Kleid habe ich Cool Grey 70% und 90% verwendet. Auch hier habe ich die Linien mit dem Papierwischer verwischt.
On the hearts I used my Cool Grey 90% again.
Auf den Herzen habe ich wieder mein Cool Grey 90%  verwendet.
 And the hearts look like this after fading the lines out.
So sehen die Herzen nach dem Verwischen der Linien aus.
 On her hair I've used two different brown tones.Sienna Brown and Dark Umber.
Auf ihren Haaren habe ich zwei verschiedene Brauntöne verwendet, Sienna Brown und Dark Umber.

I start making lines with the lightest color, Sienna Brown. On her hair I don't use the paper stump and the thinner. I only make lines that follow the flow in her hair. You can see that her hair already has got a bit more live.
Ich ziehe zuerst mit der hellsten Farbe, Sienna Brown, Linien. Bei den Haaren verwende ich den Papierwischer und die Verdünnung nicht. Ich ziehe Linien, die dem Fall ihres Haars folgen. Ihr seht jetzt schon, dass das Haar lebendiger wirkt.
At the end I use the darkest brown, Dark Umber. With this one I also make small lines.
Dann benutze ich das dunkeltste Braun, Dark Umber. Ich mache damit auch kleine Striche. 
And this is what she looks like when her hair is finished!!
Und so sieht sie aus, wenn ihre Haare fertig sind!!

Copics and pecils used:
Verwendete Copics und Buntstifte:
Skin/Haut: E0000-E000-E00, Sienna Brown
Hair/Haare: Y00-YR31-E31, Sienna Brown, Dark Umber
Dress, shoes/Kleid, Schuhe: V0000-V000-V01, Cool Grey 70%, Cool Grey90%
Hearts/Herzen: R32-R35-R37, Cool Grey 90%


And here I wanted to show you the difference between this image and one image colored only with Copics!
Und hier möchte ich euch den Unterschied zwischen dem mit Copics und Buntstiften koloriertem Motiv und dem nur mit Copics kolorierten Motiv zeigen!

This is the one colored with only Copics.
Das ist nur mit Copics koloriert.

Copics used:
Verwendete Copics:
Skin/Haute: E0000-E000-E00-E11
Hair/Haare: Y00-YR31-E31-E23-E27
Dress,shoes/Kleid,Schuhe: V0000-V000-V01-RV93
Hjerter/Herzen: R32-R35-R37-R39

A card with the image colored with pencils and Copics.


Hope you like my little tutorial.
Ich hoffe, mein kleines Tutorial gefällt euch!
Hugs,
Hanne