Followers

Showing posts with label Colouring Step by Step. Show all posts

Monday, October 12, 2020

Halloween Card with Kraftin' Kimmie Stamps


Hello,
How are you ? Hope all safe..

Today I have a little inspiration for you. I have created a Halloween scene with a mix of super fun clear stamps from Kraftin Kimmie.

During the colouring I have made photos of the combination of Copic used.
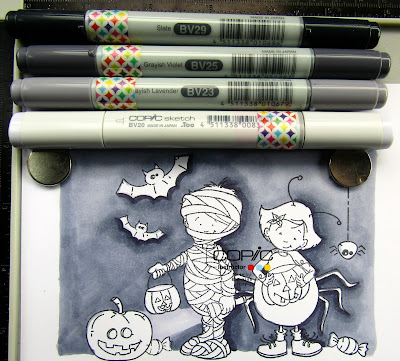

I have started to colour the background with the BV 20, BV 23, BV 25, BV 29 .
I love this combo..it creates a nice dark background with a violet hint.


The skin combo a bit different than usual
E 99, E 97, E 02, E 00..
and for the cheeks R 39


The spider costume of the girl was coloured in a purple combo
V 12, V 15, V 17, V 09


The pumpkins were coloured with my favorite combo
YR 14, YR 18, YR 07, E 15, E 18


The green combinations has almost a fluor look
YG 01, YG 23, G 14, G 29
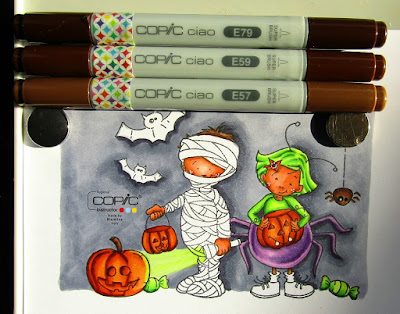

The spider and hair of the boy were coloured in a brown combination
E 57, E 59, E 79


The bats were coloured in a "black" combination
using N 4, N 6, N 8 and a hint of 110 and a black multiliner 0.3


The bandage of the boy was coloured with
E 40, E 41, E 43 


...and last but not least the floor was coloured with
N 4, N 6, N 8


Here is my finished card,

The shape die is from Studiolight Essentials STENCILSL116
The circle label die is from Sizzix , 660060 Tim Holtz 
The spider web die is from Marianne Design LR 0430
Various ribbons from my collection

The stamps are from Kraftin Kimmie 
(You're a scream ( boy and girl , sentiments boo, dressed to spook ) , 
I want candy ( pumpkin, bats, spider , candies )

The circle stamp is from Prickley Pear CLR013E
trick or treat sentiment is from Papertreyink Tag-its #7 


The part with the coloured images can actually be opened
to find the hidden message inside


Hope my card will inspire you to create your own Halloween card,
thanks for your visit here on the Copic Europe blog..

Hugs Blankina

Sunday, January 12, 2020

Love Bugs...


Hi all,

A New Year has started ...
so I thought why don't we start 2020 with a little love?

I have coloured up some of the the brand  new stamps from Kraftin Kimmie,
I love this " Love bugs " set as it has many different images and some fun sentiments too..

To use several images together I have  masked some stamps to create various layers,
just a little reminder  when you are masking stamps  the first stamped image will actually be the one in the front at the end.


So that means that these ladybirds and the big flower (my first stamped images) will be in the front of all the later stamped images in the end.

You will need :
 Perfect Colouring paper, masking tape and stamps...


this is during the masking...


This is during the colouring of the flowers

Below you can watch my video from the start until the finished card,
step by step.


Thanks for watching! 


Copic :
Flower Combo 1: R81, R83, R85, R89
Flower Combo 2 : R81, R24, R29, R59
Heart Flowers : E42, E44, E47, E49
Ladybirds :R14, R17, R12, R27
YR23, YR21
T5, T7, T10
Greenery : G14, G94, G99, G24, G21
Copic multiliner SP0.3 BLACK

Stamp: Love Bugs by Kraftin Kimmie
Ink : Krafty Kolours hybrid: Crisp Crimson by Kraftin Kimmie
Die: MFT
Cardstock: avec

Thanks for your visit !

PS Next Sunday in Rome ECCP 1 and ECCP 2 colouring classes!!

Hugs Blankina 

Thursday, September 12, 2019

Autumn Wishes..Lady Mushroom (Glimps)


Hello Copic friends,

One thing I love about Autumn are the lovely warm colours...
So today I am showing you a card in autumn colours with a lovely digital stamp from Glimps.

I have printed the image onto Perfect Colouring paper with my printer.
Below you can find some steps of the colouring;


 Mushroom :
E 40, E 43, E 44, E 47, E 79


Skirt :
RV 93, RV 95, RV 99


 Mushroom :
R 32, R 37, R 56, R 59


Shirt/ Boots :
E 93, E 95, E 97, E 99


 Hair: 
YR 20, YR 23, R 27, E 44

As you can see on the photos during my colouring I had in mind another kind of background,
but when I have started to assemble the card I thought it was too dark.

So I have chosen some other papers and background colours to give it a different look.


Here you can see the final result.

The image : 
Lady Mushroom ( Glimps ) 

 Dies, 
Hearts (Cuttlebug)
Circles ( Studiolight)
Little Mushrooms (Marianne Design)

Inks : 
Ground Espresso (distress oxide ink).
Berry Bliss ( Kraftin Kimmie )

On the mushrooms I have added some crystal drops  ( white dots ) 

Enamel dots:
  Kraftin Kimmie.

Glitter :
Stamperia

Paper:
Plain ( Avec )
DP ( Tedi )


Copic : 
Skin : E 51, E 53, E 55, E 93
Hair : YR 20, YR 23, R 27, E 44
Mushroom :  E 40, E 43, E 44, E 47, E 79, R 32, R 37, R 56, R 59
Skirt : RV 93, RV 95, RV 99
Shirt and Boots : E 93, E 95, E 97, E 99

Thanks for your visit, 
Hugs Blankina


Wednesday, June 12, 2019

LOTV happy birthday card with video


Hi all Copic friends.

Today I have a bright birthday card for you,
I have coloured up my new LOTV rubber stamp.

A fun card, 
completely coloured with Copic
including the flowers!

My card started like this 


I have stamped the stamp onto Perfect Colouring Paper
 with my Memento Tuxedo Black ink.
Some white card stock for the flowers and some green card stock for the leaves.


Here I am half way colouring…

The flowers were also coloured with Copic and some Activator spray.


I have prepared a video,
but I have had many difficulties to upload it as it was a long video.

Here is a super short version..


But after  help from our lovely Virginia from our DT
below you should be able to see the long version too,
please play it forward now and then have to learn how to show the video faster :) .


And here you can see the final result of the card..

HAPPY BIRTHDAY
 to all of you who celebrate their birthday this month!


The card base was cut with a Studio Light die,
the flowers were cut with the stitched flower die from My Favorite Things
the leaves were cut with dies from My Favorite Things and Marianne Design.

The paw prints stencil and the enamel dots are from Kraftin Kimmie

The stamp is from Lili of the Valley; Little friends

The paste is from deco glass ; moonlight dust 

Copic :

bear : E 50, E 51, E 53, E 55
cheeks bear : R 12, R 14
background : BG 05, BG 07, blender "0"
text ; YR 16, YR 17 , RV 63, RV 66, RV 69
grass : G 82, G 85 
flowers : RV 66, RV 69, YR 16, YR18 , Activator
details : black multiliner 0.3

Hugs Blankina

Wednesday, April 3, 2019

My little snuggle bunny rosette card and box

Hi Copic friends.

As we are getting closer to Easter 
I have decided to colour up this cute digital stamp designed by Cheryl Grant,
it is called "my little snuggle bunny".

Such a sweet image and not only for Easter!
Love her designs.

Of course I have prepared you a step by step video of the colouring.


Here is a sneak preview,
please find the colouring process on the video below.


Did you like my video?

 I have decided to use the rosette card as cover for the open circle in the box. 
This box will contain lovely yummy Easter chocolate eggs.


I have used my brand new die set from Studiolight to make the top and bottom of the box.
Inside I have added a box base made with my Crafters Companion Multi-Pro,
this was glued onto the lower piece I have cut with my die. 

Now this box will open as a book .


Here you can see the box from the top.


Mmmmm chocolate eggs..


You can take of the rosette card to get some eggs or you can completely open the box.
Please get yourself a chocolate egg. Thanks for your visit and lots of bunny hugs.

Have a nice chocotastic Easter!

Buona Pasqua, Happy Easter, Vrolijk Pasen

Copic :

fur bunny : E 30, E 33, E 35, E 39
skin : E 04, E 21, E 51, E 11
cheeks : E 93, E 95
hair : T 9, T 3
hat : E 30, E 33, E 35, E 39
dress : RV 21, RV 23, RV 25
shirt / socks: YG 21, YG 23, YG 25
flower : Y 15, Y 18, YG 16
ladybird : R 46
shoes : T 3, T 5, T 9

other :

die Studiolight ( STENCILSL165 )
die Nellie Snellen ( rosette )
die ( MFT ) stitched circle
die ( Lawn Fawn ) scalloped circle
ribbon
enamel dots Kraftin Kimmie

Hugs, Blankina