Followers

Friday, January 5, 2018

Winter Scene

Hi everyone! It's Sandie here and today I want to show you how I colour a Winter scene. The stamp I'm using is Winter Backdrop by Stamping Bella. 

I first start to lay down some colour where I want to add shading. I use C1. 


I add in some B00 over the C1 and pull it out  a little. 


I keep layering up the B00 until I am happy I have enough. 


I go back in and apply more C1 and this time I also apply C3


To blend the colours together I use either the Colourless Blender marker (0) or I use a cotton bud and colourless blender solution and roll the cotton bud along the lines. 


For the trees, I apply some G21 


Then I go over the whole tree with YG03


I finish the trees with G24, adding some texture lines. 


For the windows I apply some Y17 in the bottom corners, then pull the colour out using Y15 and then Y13


The door is R35, R37 & R39


On the rooftop and chimney, I use the Warm Greys - W1, W3, W5 & W7. 


On the tree trunks, as they are so narrow, I just use one colour - E25


To finish off, I add a little bit of shadow underneath the trees and house. 


Thanks so much for dropping by
Sandie


Monday, January 1, 2018

Happy New Year. *Stamping with Copics.*

Hello readers,

A new year lies ahead of us, so this is the moment to wish you a good, loving and especially creative year in 2018.  
The CME Team hopes you will visit our blog as often as you did in 2017, we want to thank you for these visits. 
We will continue to the best we can to inspire you in the coming year with workshops, tutorials and video instructions.
In our team we will welcome two ladies, who were in the team before. Faye from the UK  and Cristina from Spain, welcome back.

***********************************************

Today I would like to inspire you with my stamping technique “Direct on stamp colouring”with Copic Markers.
I have made already a lot of flower and Christmas cards with this technique.
In a photo-video I show you the instructions for this technique.
Here is the link (excuse me; I could not include it for unknown reasons.)
https://youtu.be/eDGeOJDOh00

In this post I love to show you some of my cards, made with this technique...


first imprint


second imprint


third imprint


For a live video of the stamping proces, you can watch this video...


Thanks for watching, have a nice day.


Thursday, December 28, 2017

Copic airbrush

Hi Copic lovers; welcome to the Copic Marker Europe Blog.


For my DT inspiration today I'm using my Copic Airbrush in an "not usual copic colouring project".


This is the finished project picture (some mixed media candles), but after that, you've got step by step pictures on how I made it.


I'm using Fimo Light Modelling Paste as it quickly air dries.

Start modelling the design you desire

 I covered the outside of the candle metal support with my clay

 Time to colour my clay. I always when I'm using the Airbrush usually start by refilling my marker

The usual position (we could use either nib but this explanation could be for an another tutorial) for the marker into the Airbrush gun looks like this

Start airbrushing the clay

You can also skip the clay step and go directly to colour the metal surface of the candle holder directly

Now take one stencil of your choice and put it onto the top of the candle to airbrush a little design directly to the candle wax

Your project will look something like this

Add some wax to the Fimo and.......voilá.......some pretty tealight personalised candle in mixed media style using your Copics.

I hope you have enjoyed my post and hope you found it inspiring

Have a nice day.


Monday, December 25, 2017

Cicci 25th Dec Mo Manning

Hi Friends.
I hope you all have a great Christmas time :0))
We celebrate Christmas here in Sweden 24th December, so we saw Santa yesterday, but I know some of you are still waiting for him :0)

Today its my turn (Cicci) to show you some colouring here at Copic Europa Blog.
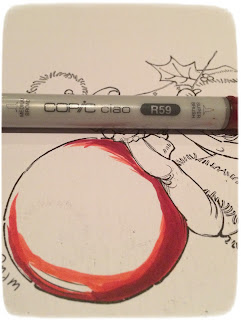
 I want to show how I coloured this Christmas bauble.

Copic Markers used for the Bauble:
R24  R27 29 35 39 59  R14

The image I have used is Little Elf Finn, by Mo Manning.


Copic Markers Combo:
Skin: E50 51 0000 000 13 11 04 R22 20 24
Red: R24 14 27 29 37 35 39 59
Pants: Y21 26 E23 29 25 Y00
Hat: W1 3 5 E41 E31 
Shoes: Y00 Y02 FY1 Y26 

I start with R24.

Continue with the darkest marker R59.

Add R29 on the place that I  have coloured with R14.

Add R24 like this.

Add R37 to the area that you have coloured with R24.

Add R39 at the bottom of the bauble.

Blend out with R37.

Blend that part with R35.

Here I have coloured a half circle for extra highlights. I used R37 and R59.
Blend with R27 in the little circle.

Add some R29 like this.
In the white area you see in the photo above I added R24 and then I blend with R24 27 35.

I also draw one more little circle in the same way I did the first one.

Blend over the whole image with R24.


At the end I add a lot of the darkest marker to create more depth in the colouring. I add R59 on the side where I stated to colour at the beginning.

If you want to make some more shine in your bubble you can make that with your Blender. It can look like this:


Done!!

  It's a wonderful image that I love to colour. I think I made a new tradition for myself :0)) 
- Always colour this image at Christmas time.

Happy Holidays!!!!

HUGS 

Saturday, December 23, 2017

Joy to the world...

Hello Everyone!

It's Sue here today to show you how to create a really quick, simple and very pretty background with your Copic markers.

You will need a stamped image, (I have used the beautiful 
Christmas Horns by Jennifer Dove for DoveArt), Copic markers and some Colourless Blender in a spritzer bottle.
First I coloured the background around the image with
RV93 - it doesn't need to be too neat.
Then, the rest of the background was coloured with RV91.
Then I sprayed the entire design with Colourless Blender.
The Colourless Blender creates a lovely dotty pattern on the coloured background.  It doesn't matter that it goes on the image too as it will dry leaving you able to colour the image as usual.  Don't worry about the blender making larger blots as it looks really pretty when it is dry.  (I took the picture below while the blender was still wet so you can see the effect.)

I carried on colouring the image with markers as shown - 
silver horns C0, C1, C3, C4.
...bow with R35, R37, R56, R59.
...holly leaves with YG03, YG63, G85 and BG99.
...frame with R35, R37, R56.
Finally I added some Clear and Silver Copic Glitter pen to the horns.  This doesn't show very well in the photo but it does look really sparkly!
I had such fun doing this!  It would be great if you could try this to and show us your cards at
Copic Marker Europe on Facebook.
To find us just follow the link
Thank you for popping by.
Happy Copic colouring
from Sue...xxx

... and thank you so much to you all for your support for my projects this year.
I hope you enjoy a very special holiday season.