Followers

Monday, February 12, 2018

Sunflower Tutorial


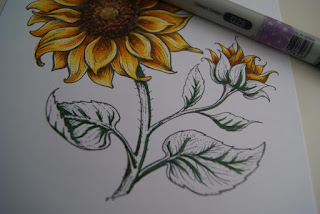
Good Morning! I'm Cristina Valenzuela, and this month I come with a flower not exactly from this time, but it's a beautiful flower, and one of my favourites, a sunflower.


I'm going to do a simple step by step with the colour process.


I start with Y11 to decide and to leave marked the highest parts, of more light, of each one of the petals of the big sunflower, and the small one.

To have volume the lightest part will be in the center of the petals, towards the outside.


With Y19, a pretty intense colour, I coloured the interiors of the petals and the exteriors to give them volume, to give the effect of curves.


 I add a darker colour, YR24 to the interiors of the petals.


And I obscure these more by laying down E17.

Everything that is around the center of the flower has this colour, but the petals that are above have a lighter colour on both sides of each.


Now I blend the Y19 from before with a bit of Y18, they are similar, you can change to a similar one, Y17, Y15 or use the one before.


I colour the center of the sunflower, it has a base with a very light greenish yellow, YG00.

If you do not have it, something that looks like it.


I add a greener tone to add dots, YG13.


 I continue adding dots with E47, a dark colour, especially for the outermost part.


I use E37 which is clearer towards the center.


One clearer, E34, also dotted, covering more center.


Very dark, E49, you can use any brown, add more outside.


I use E34 again to cover and unify tones.


 To colour the leaves I made it very simple, dark green, in my case G28, I have coloured the centers of the leaves, the stems and the parts that are below or need to have more shade.


I have blended it by using a much lighter green, G21, I have covered everything except the high and outer parts of the leaves.


An almost colourless green, G20 for the exterior of the leaves.


And sunflower finished!!!


Copic colours that I have used:

Sunflower: Y11, Y19, YR24, E17, Y18, YG00, YG13, E47, E37, E34, E49.
Leaves etc: G20, G21, G28.
Background: B000, BG0000, Blender 0.


I hope you put it into practice and you liked it, see you again soon ...

Thanks for your visits and comments!!!

Thursday, February 8, 2018

Spring Bling Wryn...

Hello everyone!

Happy Thursday!

It's Sue here today with a super technique for creating a background with stamps and Copics.


You will need a stamped image, (I have used the beautiful 
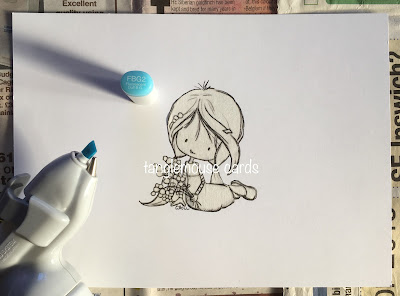
Spring Bling Wryn by Tiddly Inks), a background Stamp (I have used Notable Blooms Background by Taylored Expressions), Masking sheet, Copic Airbrush System, Copic Markers and some Colourless Blender.
First I created a  mask of my stamped image Wryn with masking sheet... 
...and placed the mask over the image I intend to colour later.
Then, as I will be using an airbrush I covered my desk with paper (Do not forget to do this or you will end up with a very interesting looking desk)!
I decided (with a little help from our lovely Faye) to use FBG2 in the Airbrush to create the background.
Then, I started to colour the background using the airbrush.
You can get a lovely effect with the Airbrush.  It uses less ink than direct colouring and the trigger is pressure sensitive so you can vary how much ink you use.  Remember that the ink will cover the card in front of where you are pointing the marker and the chisel nib gives a smoother effect.  (the brush nib is lovely to use for some projects as it creates a splatter effect but you don't need that here)!
I airbrushed the card about three times in order to get a depth of colour I liked.
I removed the mask carefully with a pair of tweezers so that I didn't get any marks on the inky background.
I love it when you remove the mask and see the image underneath sat inside a beautifully coloured background.
Next, I stamped the background with the Notable Blooms stamp.
It is important to work quickly here as the Colourless Blender will evaporate quite rapidly.
It's a good idea to get everything ready before you put the blender in the pot!
I used a spare top to a Tim Holtz 'dabber' bottle to apply the blender to the stamp, it holds quite a bit of blender and I was able to cover the whole stamp quickly.
Then I stamped the background onto my airbrushed design.  The secret here is to make sure you haven't used too much blender and you don't press down too hard.  A light touch will be all you need to apply the blender to the design.
Your design will now look something like this and you can carry on colouring sweet Wryn with Copic Markers.  Don't worry if some background ink has seeped under the mask - you can ease it out with a colourless blender pen.
Copic Markers Used
Skin - E04, E11, E21, E00, E000
Hair, E29, E25, E23, E21
Clothes E33, E31, Y17, Y15, Y11, BG99, BG72, BG0000
Background FBG2

I had such fun doing this!  It would be great if you could try this too and show us your cards at
Copic Marker Europe on Facebook.
To find us just follow the link
HERE.


Thank you for popping by.
Happy Copic colouring

from Sue...xxx


Thursday, February 1, 2018

Bee Mine!

Hi Everyone, it's Faye here today :)

With Valentines Day fast approaching, I thought it might be fun to colour this cute little bear. I love that he is trying to be a bumblebee! The adorable image is Stamping Bella Bee Mine.

I'm heavy on the photo's today, as I thought you might like to see the stamp coloured, step by step...

Firstly, I lay down some E42. This colour will actually be the medium colour. I apply this first to give the darker colour something to sit on. I add the colour with a dabbing motion, I don't want the blend to be smooth. By laying down a lighter colour first, quickly, it is still wet when I add the second colour. The second colour smooshes out a little, which gives a softer texture.

 E43

 E42

 E41

 Repeat to add more dimension and texture. Add W3 under the nose as a cast shadow

 Use E04 and R30 for the inside of the ears with W3 for cast shadows

 Start on the nose and paw pads with N9. I want a smooth blend this time

 N7

 N5

 I am going to work on the yellow bee stripes next, again with a dabbing motion so the end result looks textured and furry. I start with Y17

 Y15

 Y04. Repeat with Y17, Y15 and Y04

 Moving onto the black bee stripes, starting with N9

 N7

 N5

 I will colour the wings next, firstly using B41

 BG70

 This just leaves the heart, which I will colour smoothly, starting with R39

 R37

 R35

 Add cast shadow throughout with W5

To finish I have used some White Gel Pen on the nose, the eyes and I've highlighted the writing on the box. Of course no cute teddy bee is complete without glitter on his wings! 

Copics Used...
Fur; E41, E42, E43, W3
Ears; R30, E04, W3
Wings; B41, BG70
Yellow; Y04, Y15, Y17
Black; N5, N7, N9
Cast Shadow; W5

I hope you enjoyed seeing this image come to life :)

Thanks so much for stopping by... Have a great day.