Followers

Showing posts with label Copic Opaque White. Show all posts

Friday, October 12, 2018

A special Autumn Fairy card with a surprise!


Hello dear Copic friends,

First of all... thank you for all your visits and kind comments 
on my post last month ( DIY color wheel book here ).
I feel honoured.

But enough , now I will talk about my new creation.

Autumn. I love the warm colours of this season!
So today I have prepared a special Autumn fairy card.

I have started to print out this cutie, 
a digi from the Greeting Farm,
onto Perfect Colouring Paper.

 I have gathered some of my lovely Copic 
which according to me were perfect to colour an Autumn card. 
Please find the complete list below.

Besides the digi 
 the die cuts have got some Copic ink colour too.

I prefer to use white colour stock for my small die cuts
 instead of cutting all small pieces out of all different types of coloured cardstock.

We have enough Copic markers to create some fantastic embellishments I would say!


Before colouring they looked like this…..a little boring right?

Please watch the little colouring video below to see 
what happened to these white die cuts.


Did you like the surprise? 
I thought it was a fun effect !

The text stamp is in Italian but it means:
I wish you to find love, happiness and … a bit of magic!
Suitable for this fairy card, ha ha.

Here is the complete list of Copic which I have used to create this card;


* Copic Opaque White was used to add the dots on the cute little mushrooms.

Copic ;

Fairy  

skin : E 00, E 02, E 13, E 95, R 21
eyes : E 55, E 57
hair : E 09, E 29, E 99
hair clips : R 24, R 29, R 59, opaque white
skirt / top : YR 27, E 97, E 18, E 29
wings : YR 21, YR 23, R 21 ( and some glitter )

die cuts

corn : YR 23, YR 24
mushrooms : E 70, E 74, R 29, R 59, Opaque white *
leaves : YR 23, YR 27, E 35, E 39, E 57
branches : E 47, E 49
other brown : E 55, E 57, E 59
pumkins : YR 14, YR 18, YR 27


other : 

digi:  the Greeting Farm - anniversary fairy
clear stamp (text) : la coppia creativa
dies: Marianne Design, Studio Light , Lawn Fawn
papers: dp and glitter cardstock Avec 
glossy resin : crystal drop Stamperia
glitter glue :  Rayher  
glitter : brillantini Stamperia
satin ribbon 

PS For all Italians or people that live in Italy :) 

I will be demonstrating coloring 
at the Copic stand at Abilmente Vicenza
18th of October - 21 th of October 
 ( Hall 1 stand 271 )

Would love to see you there!

Hugs Blankina


Monday, March 12, 2018

Tutorial Copic anti-stress colouring


Hello Copic lovers,

Today I am sharing a photo tutorial which I have made for the Italian Copic Blog.
This is also Copic colouring..but a bit different!
Perhaps you are interested too?

I call it anti - stress colouring, 
sometimes you need those moments to relax yourself, don't you?
And what is better than to get out some of your fab Copic colours?

It is important that you let your emotions and mind free,
do the colouring without programming or thinking about it.

How?
Okay I will explain how to do it, 
please have the following products ready to start;

 Copic markers of your choice , 
a Copic Gasenfude pen , 
Copic  Multiliners ( black and / or coloured ones )
a white gel pen or Copic Opaque White.
a sheet of white paper and / or a sheet of Perfect Colouring Paper 
a pencil ( and a rubber )


Please take a white sheet of paper and a "hard" pencil,
do not use a "soft" one as it leaves too much graphite on the paper 
which might damage your Copic tip.

You can design directly on a sheet of Copic Perfect Colouring Paper,
but personally I start on a simple white sheet 
which I  scan and print out onto a PCP sheet afterwards.

In this way you can always re-use the original design.

Now "switch off your brain" 
and start designing lines without thinking.

My lines are rounded and they cross each other.
This will become your original design to start with,
 later you can always add more lines while colouring.


Now start colouring on the sheet of PCP,
 the one you have made with the lines or the copy printed out onto PCP.
Pick a colour group which you like and start colouring between the lines.

I have made a multi coloured design with lot of colour groups
 but if you like you can also use only one colour group .

After colouring
 I have accentuated the lines which divide the coloured spaces
  with a Copic Gasenfude pen, this pen is very suitable as the tip is long and flexible.

When you add some pressure to the tip the line will become thicker
and if you use the pen in a straight position without pressing, 
 the line will become very thin.
Love how this creates fun wavy lines.


Afterwards just get out another group of Copic colours to finish the design as you like it,
and the Gasenfude to accentuate the lines.
 If you like you can also add small white dots on the black lines as I did.

Some of the spaces in the design  I have filled up with some black Copic Multiliners doodles
but of course you can also use your coloured Multiliners .


I have used  full A4 sheet, 
but you can also start with some smaller pieces of paper first.
Basing it on how much time you will have to finish it.

You could use your smaller anti- stress designs to create cards. In case you have done a big size it could become a cover.

But the most important thing is to relax while colouring!


Who knows what the psychologists will say?
Ha ha, anyway I did relax myself and I am happy to have this design too.

What are you waiting for?
Please try it yourself!


Copic:
I have used these colours ( see photo above ) 
Copic Gasenfude , Copic Multiliner black 0.3 

Thank you for visiting my post,
Hugs Blankina

my personal blog
Italian Copic blog


Friday, June 30, 2017

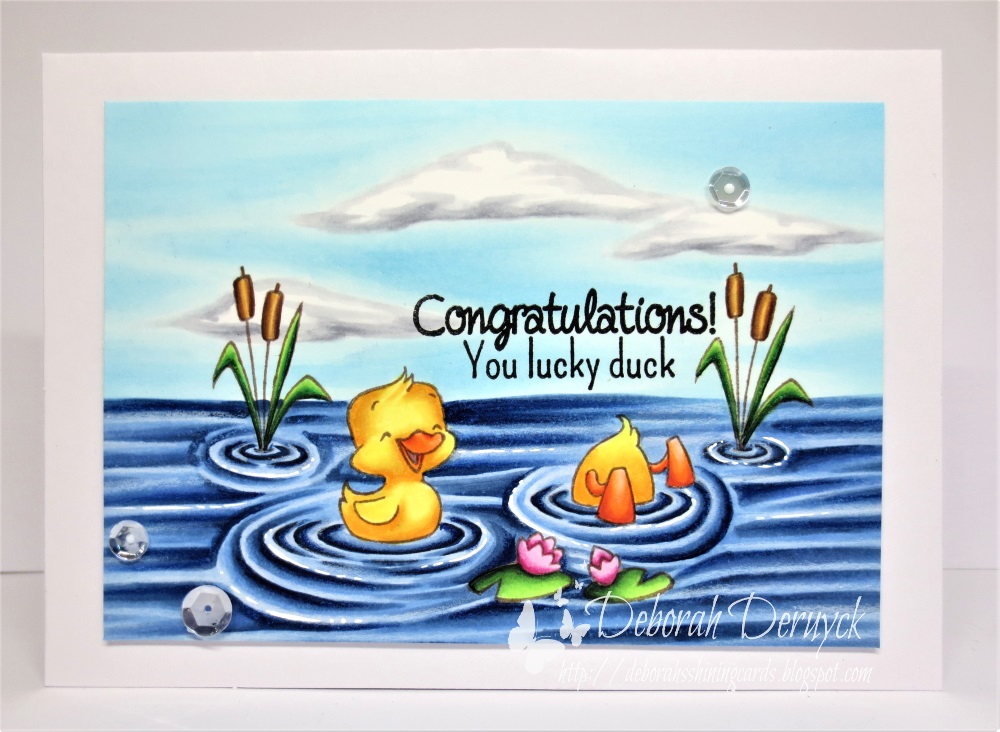
Lucky duck!

Hi Copic marker Europe fans!

Sadly today it's my latest post for Copic Marker Europe.  I needed to stop because I hardly have some free time left and it's going to be so busy for me. Thank you so much for all your visits to my blogposts!!


I've used the stampset Quackers by SugarPea Designs, they are really cute!
First I stamped the ducks and the plants in brown Memento ink on some colouring cardstock.
Then I mapped out the water with a light blue sky colour B000. I drew some clouds with C1 and added some texture to it using C3.


Then I added some more depth in the clouds using C3 marker again.


Then it's time to fill in the blue between and around the clouds using B00 and B000. I always keep it a little bit lighter around the clouds.


I blended the  blue sky colours together using B000 en B0000

The sky is ready so it's time for colouring the water. I used B60 to map that out and I used B37 to go over the lines in the water.


I blended the harsh line out using B34.


And blended again using B32 and added some marks to look like moving water.


I went over it using B37.

Blended again using B34.


And blended again using B32


Blended everything together using B21 and that is the lightest colour.

Then it was time to colour all the other things, like these plants.

The ducks were awesome to colour.

So here you can see the finished project using Copic markers.


I've added some more light using a white Derwent coloursoft pencil. You can do it with any white colourpencil. I also added some white highlights using the Copic Opaque White paint, that finished the colouring.


And here you can see the finished card:

All the colours I've used:
sky: B00, B000, B0000
clouds: C3, C1
water: B60, B37, B34, B32, B21 (+ white colourpencil and Copic opaque white)
ducks: Y17, Y15, Y11/ YR07, YR04, YR02,  YR00
green: G28, YG17, YG13, YG11
pink: RV17, RV55, RV52
brown: YR21, YR23, E37, E35

Thanks for your visit!

Deborah

Friday, June 2, 2017

Dreaming of a blue green sea!


Hi all,

Well summer is coming..
the weather is getting warmer 
and that made me dream about a nice refreshing blue green sea!

 So I have made this special blue green special fold card, 
when I will look at it I can dream away.

For the background I have used some glossy paper 
(I have used Chromolux paper)
 two colours of Sketch pens and the Activator Spray. 

I have made several photos during the process,
are you ready?? 


I have started to add some Copic colours on a craft sheet
(G14 and BG07)


Afterwards I have sprayed some Activator on the ink


Now I have pressed some Chromolux paper onto the 
Copic ink with the glossy side down


This is the result..


Now I have put the paper onto my stamptool with the magnets
and have used my "goutelettes/drops" stamp from Katzelkraft.
I have used olive green Stazon ink .


These are some of the products I have used.


Here you can see the result after the stamping..


I have added some highlights on the drops with some Copic Opaque White


As for the shells , 
I have used my new Marianne Design die and used some white foam.

I have heated the foam shells with my heat gun
and when they were warm I have shaped them,
once they are cold again the shape will remain.

They've got a touch of colour too, using my G12 and BG0000 Sketch pens.


A sentiment from Joy Crafts stamped with olive green Stazon ink ,
 afterwards when the text was dry I have added some BG01 on the text sea.

I had found some pearls from HeroArts in matching colours too .


Some dots with Copic Opaque White were added with a tooth pick.

I have stamped a shells background stamp from Impression Obsession
onto the aqua coloured design paper from Marianne Design.
 Later I  have torn the edges of the design paper and also of the plain green paper. 


This is the photo of the whole card.
All dies I have used are from Marianne Design.


This is a close up of the panel made with the Copic pens and the Activator Spray.

As you can see I am ready for summer , I can dive into my blue green sea .

Copic:
BG0000, BG01, BG07
G12
Copic Opaque White
Copic Activator


Friday, April 7, 2017

Squirrel

Hello Copic lovers

Here is Juanita again from Switzerland.

Sometimes I don't know what to draw, then I take a look on Pinterest
and then I get my inspiration.
This time I saw a squirrel and then I searched for trees. 
This is what came out!


 First I started with E40 and coloured the whole head.
Then I took E97 and started flicking in the direction from the fur.


Then  I go in with E31 and do the brighter parts.


 Then with E07 the darker parts.


With E79 I did  the eyes, the dark shadow parts and  a little bit of fur.


I used R01 for the paws, the ear, around the eye and nose.


Then I flicked in small strokes,
everywhere I thought needed some more colour.

 The acorn is coloured with  E13 - E15 - E19 - E27
The eye with E79 - W10 - B91


I started the tree with W1, 
just do it like you feel it, don't consider to long, do it quickly.


Do the same with E81 and E44,
 don't tremble with the Copic, you can't do it wrong.


Go on with E55.


And E59.


I used E89 - E87 - E44 - E43 for the inside of the tree.
With Opaque white, I added highlights and the beard of the squirrel.


And this is the finished card.
I hope you like this sweet little squirrel!


Here one more time are the colours I've used

Squirrel: E40 - E97 - E31 - E07 - E79 - R01
Eye: E79 - W10 - B91
Acorn: E13 - E15 - E19 - E27
Tree: W1 - E81 - E44 - E55 - E59
Inside Tree: E89 - E87 - E44 - E43

I wish you all a nice day and see you next time!

Hugs Juanita