Followers

Thursday, November 28, 2024

Santa by the Fireplace

Hi.
Helen here today.
I could colour Santas all year long so now I´m in heaven. I love the ones that are a bit quirky and not perfect. I found this one, Naught or Nice stamp set from Polka Doodles and I wanted to place him by the fireplace as I laid my eyes on him. Hope you´ll enjoy the video.

The colours I used are now included in the movie.


Until next time: Happy colouring!
Helen


Saturday, November 23, 2024

Part 2 Snow in the City by Cicci

 Hi COPIC lovers  

Cicci here again with 

Here  comes the second part of yesterday tutorial -with lots of snow!!

In this second part of tthis tutorial Im going to blend a lot 🫶

You Will find the first part

 Yesterdaypost and First part of this tutorial

Step 21 

Add BG11 

Step 22 

Add BV17

Step 23  

Add B01 

Step 24  

More of BV17

Step 25  

Blend with BG02 

Step 26  

Blend all over the coloring with BG02


Step 27

Add B01


Step 28 

 Blend all over with BG000

Step 29 

Continue blend with BG000 

Step 30  

Add B39

Step 31 

Blend with BG000

Steps 32  

Add BG10

Step 33  

Add BG70

Step 34  

Add some lights with Y08

Step 35

Blend with Y000


Setp 36 

Add  some snow with a gelepencil


Step 37 

Go over all the coloring and blend with BG11 

Done !!


Thank you so much for Stoping  by !! 

Welcome anytime you feel like it 

HUGS amd SMILES 

Cicci

Friday, November 22, 2024

Winter in the city part one by Cicci

 Hi COPIC lovers

Cicci here posting from Sweden.

Surley the first snow of the year is something special? 

Todays tutorial will of course be about the first snowin the city

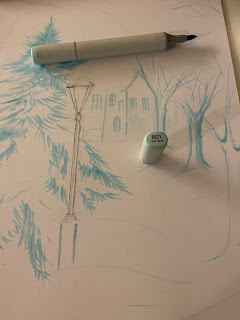
Step 1 

I started to make a simple sketh of a lantern and some trees, and windows

Then I erased all the lines from the pencil and filled them with a very light markers.

BG000


Step 2
Continue with B01

Step 3
BV000


Step 4
B60

Same step
(4)


Step 5
Blend with BG000

Step 6
FBG2

Step 7
Comtinue with FBG2 for more depth

Step 8
Add B34

Step 9
B37

Step 10 
Blend  with B91

Step 11 
Add more of B37

Step 12 
Add B39

Step 13 
Blend  with FBG2

Step 14
Now I add more of tB39 B37 and FBG2 twice.
Everytime  I used one of the darker markers I blend with a lighter one

Step 15
I did one more three

Step 16
B12

Step 17
B34

Step 18
B29

Step 19
Blend with B91

Step 20
B12

Step 21
Blend with B12 
Last step for todays tutorial...

I hope you pop over tomorrow for the next part 
Happy Coloring 


HUGS and SMILES 


Wednesday, November 20, 2024

Santa in a hurry!

Hi.
Helen here today.
Just poppin by to show you my latest colouring.
It´s Santa running trough my city to be abel to deliver presents for all loved ones.

My colours are now included in the film.

Hope you´ll enjoy and that Santa makes it in time for you as well.


You´ll find the stampset here.
Happy colouring til nex time!


Thursday, November 14, 2024

The magic of Studio Ghibli

Hi everyone

For the November post I drew and colored a scene from the film Totoro. This is a sweet image of Totoro and May.

Tutorial:


Drawing with Copic multiliner


This time I started coloring the background with:
G99, YG23, G21, YG41, BG72, G07, BG15, G29, 100, G02, BG75 and W9.


May : C0, Y08, YR31, RV06 and RV19 for the dress.
R35 and R59 for the hair clip.
YR000 and YR00 for the complexion.
R20 for the cheeks.
E15 and E18 for the hair.


Totoro : C1, C3, C5, E41 and E43.


This is the final result.

Thank you
Bye bye
Antonella