Home

Saturday, January 31, 2015

Cheerleader :)

Hello everybody Copic friends!
Franz here again with a CAS card today and a super lovely Saturated Canary Girl :)

She's a funny Cheerleader, so I coloured her with some different bright colours:


I used blues, yellows and pinks for her outfit and I coloured the background with Prismacolor Pencils this time:


Papers and washi tapes I used are from different brands and they come from an italian shop called Scrap It Easy.


Here is the complete list of Copic Markers I've used:

Skin: E0000, E000, E00, E11 +  Prismacolor Pencils for cheecks
Hair: E00, E13, E15, E18
Outfit - Pink: RV000, R81, R83, R85
Outfit - Blue: B0000, B91, B93, B95, B97, B99
Outfit - Yellow: Y000, Y15, Y23, E13
Eyes: B91, B93, B95
Background: Prismacolor Pencils and Zest It Pencil Blend


 thanks for watching!
 A big hug everybody :*
Franz.

Thursday, January 29, 2015

Ready to read and relax

Good morning everyone! It's Sarit here.

Just came home after 2 amazing weeks in Cuba!!! 
OH, What a beautiful place, it's like going back in time….

Since I had a LONG flight I took with me books to read, the only thing I need to add are bookmarks to my books. 
I made 2.


here is the first one

I love nature and wanted to make a bookmark with quote in it.

The leaves pic I took from Wikipedia when I search for leaves.

Wanted to give the copics  look like water colors effect.


I used the following colors: BG09, BG49, BG45, BG32, G43, YG01, YR31, YR21, YR24
Started from the middle to the sides. (I wrote the colors in the order I used them)

For the background I used: E71, W3, W1, W0, and blender to soften it. 

For my second bookmark I used fairy sleepy digi stamp from Mo Manning. 
I wanted to give it a magical touch, so I add a magical quote and started to color the little cute angel.

Here are the colors I used:
Skin:  E000 E00 YR000 R20 E11
Hair:  E21, E11, E13, E15, E18
Wings: B26, BG15, BG34, YG11, YG03, YG06 + stardust stikless
Grass: YG93, YG97

I had so much fun doing them. it will a beautiful addition to a book gift

See you next time

Hugs, Sarit

Tuesday, January 27, 2015

Thinking of you

Good morning  all Copic lovers, here is Sandra from Italy how  goes  in your countries?
In Italy these days came the snowFinally came the real winter season because temperatures until now were more  like autumn than  winterReally a situation a bit strange!
So to warm up a bit  our hearts  I decided to make a card for Valentine's Day that will be in a couple of weeks.
I chose the digital stamp "Gardenia" from Aurora WingsThis stamp is really wonderful, beautiful, elegantchic ... Describe it is  almost uselessThe stamp shows itself  all its beauty!
I chose  to color the Gardenias (flower which I love) respecting real colorsso very soft colors.
The flowers of the Gardenia in nature are whitemaximum yellowish or very light green.

So I go with a base tones from  W familyand only then I added a little green shades with the  G20.
ThenI wanted to create a strong contrast with the delicate colors of the flowers and so  I go  with nice bright colors for the hair.
I really like the result, and to embellish and complement the character I applied over the pearls a little of Rock candy Stickles glitter from  Ranger.
The card is made with bazzilpattern Maja Design,  La La LandCraft die and  Ranger sticklesThe sentiment is a stamp Avery Elley.
Thank you for having me followed, I hope you enjoyed my project and I wish you all a romantic Valentine's Day.

Hugs, 
Sandra

Copic used:
Skin: E 000/00/01/11/93 +  R 20 / 22
Eyes: G000 / 00/02
Hair: YR 12/14/18 + E 08/18
Pearls: N 0/1/3
Gardenia:  W 5/3/1/0 + G 20
Leaves: G 20/24 + YG 61

Monday, January 26, 2015

Candy 1500 Followers

Hello followers, 

ONLY 2 DAYS TO GO


I think it is time again for a nice Candy.
 We have almost reached 1500 Followers,
 we want all our great followers to have a change in winning a Copic Carrying Case. 
(Sorry, it will be without markers)
This is our way to say thank you girls and guys for staying with us, visiting our blog and giving us your nice comments.

There is place in this case for more than all your 358 Copic markers, you can also put your Spica's or Multiliners in it.
It is very lightweight, incase you want to travel accompanied by your markers.
We will send it only to European contires and the Middle East.


What do you need to do:
1. Be or become a follower from both 
and our Pinterest 

2. Enter your name in Mr. Linky .

3. Place our candy on your blog, or share it on Facebook

4. Put a comment under this post, were you tell us what you think about this blog.
Good luck
The CME team
Diny Sprakel 

We  will draw the winner on January 31

Sunday, January 25, 2015

A Fairy

 Hello everyone, Vili's here with my first post for the year!

Today I'd like to present you an album/diary, which I made for the 12th birthday of one little princess. As all the 12 years old princesses are in love with fairies,
I chose the ScrapBerry's - Fairy Tale papers.
I really like the blue-green range of colours so I thought it would be perfect for the occasion.


For the cover I preferred one of the gorgeous Sara Burrier's stamps - Lady of Opal.
I've coloured this fairy a couple of times in both pastel and bright colours and I liked it every time.


As I couldn't find proper blue flowers I had to made some on my own, using silk fabric.


One of the paper patterns was used for making a charm.


I decorated a box, too, where I put the album/diary.


Copics used:
Skin: E50, E51, E53, E55
Hair: E53, E55, E57, E59, E49
Clothes: YG21, YG93, YG97, BG000, BG72, BG78, W0, W3, W7
Wings: YG21, YG93, YG97, W1, W3

As you can see, sometimes I just don't always mix consistent marker numbers :)
Have a lovely day and thanks for stopping by!

Vili  xxxx

Saturday, January 24, 2015

Daria Myagkikh - Hush! Someone sweet took a nap!

Hi everybody!

How is your January going on so far? Mine was very busy to be honest. :)
Couple of weeks ago I became a godmother of  the beautiful girl - she has very rare name - Lada!
The day was absolutly magical and unforgettable!
So! for my beloved goddaughter I prepared special present and decided to decorate it.

That is another reason I just love Copics - you can make stunning things with limited supllies.

For my project I used image of Mo Manning - Hush! Isn't it just ADORABLE?!


I wrap present into simple craft paper, tie it with two different ribbons and than attached several pieces of patterned papers. In the end I attached colored image.


I think that this image is so sweet - can't imagine something better for this occasion.
And the best part of it - that it can be either girl or boy!


Anyhow....:) The key numbers for image are:

            Skin  - E000, E01, E11, R11(for blush)
Hair - E34, E44, E47, E49
Clothes
 - V0000, V000, V01, RV0000, RV02,RV14, RV21,RV17
Background  - C00, C01, C02


Wishing you a great day and very creative mood!

Friday, January 23, 2015

Winner challenge 35

Hi everyone!

Deborah here today to announce the winner of challenge 35!

It was so hard to pick a winner from so many gorgeous card!
The winner is...

This card rocks! Love the black and white with the blue accent.


Congratulation, Lisa! Please send us an email to copiceurope@gmail.com
with your request for 3 Copic Sketch markers.

Big Hugs,
Deborah Deruyck

Thursday, January 22, 2015

New Copic classes in Italy

Hello,
 new Copic classses will be held in Italy.


Courage


It's January already and I can't believe February is almost there again...well time flies when you are having fun and I surely have a lot of fun using my copic markers. 

For this creation I used my copic markers in combination with the air brush, because you can make such lovely backgrounds with an airbrush. If you want to know more, join me here on this blog on February 5th.

In the background I used the airbrush with copic markers and some of the Dutch Doobadoo masks. Because the copic ink is transparant you can create some wonderful layers with the different masks. 
I used the same colours in the background as for the image. 

The image is by The Eastwind and they have some wonderful images.
the colours I used are:
YG 61,17
Y21
BV00,23,08,04
E000,00,11,21
RV02,04,06
R35,39,37,32

The quote is by E.E.Cummings and I found it on the internet.

see you next month with an airbrush tutorial

hugs
Miranda

Wednesday, January 21, 2015

Challenge #36: Flowers!

Hi everyone!

Deborah here today for you with a brand new challenge!

First of all, I would like to thank you for entering our past challenge. We love to see those awesome cards!
The winner will be announced on friday january 23.

Our new challenge is very easy and fits so many cards:
Flowers

We want to see flowers in your image or on your card, so let's get started!

Here's my inspiration for you:


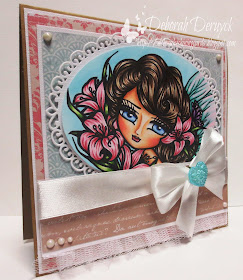
For this card I've used an image of  one of my favourite designers: Hannah Lynn. I love to colour their faces and hair! 
I kept my card very simple, because the image was already big enough.


The beautiful papers are from Studiolight, I think they are so romantic!
I've added some tule under the paper and added a bow in white satin with a blue embellishment.
I didn't use a sentiment, now it's an all-round card ;-)


Here are the colours that I've used:
skin: E13, E11, E00, E000, R32, R20
hair: E59, E57, E55, E53, E50
pink: R85, R83, R81, RV10
eyes: B37, B34, B32/ W1
lips: R89, R85, R83
wings: BG13, BG11, BG10, RV10
green: G28, YG17, YG13, YG11
butterfly: V17, V15, V12
sky: B00, B000, B0000

So now, it's your turn! Show us your work, and you can win
3 sketch markers of your choice.
Please be aware that only entries from those living in Europe, North Africa and the Middle East are possible. 

To enter visit our Challenge page and enter your link in Mr Linky
before the end of 17th Februari 2015.

The winner will be announced 20th of Februari 2015.

We are looking forward to see your creations!
Hugs
Deborah

Tuesday, January 20, 2015

Tutorial how you can use the Copic Blender


Today I'm going to show you three ways of using the Blender (nr 0).


 It is excellent to "erase" with, if you happen to color outside the lines on the image.
Use it to 'soften' transitions when adding shadows around the subject.
Or make a dotted fabric on a dress.


When I sit and paint, sometimes a little colour will go over the lines on the image. The blender is perfect to "push" the color in again.


Usually I use the wide tip for this, hold the stylus a little inclined, and push the color a bit at a time.


When I have colored the image, I like to add a shadow around the entire subject. I think it enhances the picture more and makes it more alive. I usually add a brown shade, eg W3 in the places where it is shaded most. Next, I take W1 thinly around the whole subject, and then I follow with W0. It is now I follow with the blender to make a smoother transition between W0 and the white paper.
Finally, I use the soft brush and make circular rotating brush strokes just next W0.


W3


W1,0


Blender (0)


And last but not least, the blender is perfect to make cute little dots in the fabric on a dress.


Using the soft brush tip, I hold the pen upright properly so I get nice round spots, placing it gently on the color that I want to be spotted. 


I do this several times and in the same places all the time,
so I get just the right emphasis of dotty fabric.


The stamps I am using are from Bildmålarna. I chos to do a painting of my pre-painted motifs.


 Copic Markers I have used:
Girl
Skin: E000,11,30
Hair: E41,42,43
Dress: V91,93,95,99 and Blendern to the dots
W0,3
Wings: C0,3
Rabbit: E40,41, T3, R11, W00,
Flower: Yr 24, W0
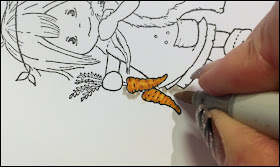
Carrot: YR000,24,27 and YG95

Boy
Skin:E000,11,30
Hair:E41,44, W1,3,5
Owl: E40,41,71,74,77
Nose: E70,YR24 and eyes: YR24
Shirt: E81,84,87
Trousers: T1,2,4,5,7

Ground and around the image: W0,1,3 + Blender

Hugs from Rozzan
My blogg: RozzanScrap
My FB: Rozzan Scrap


Sunday, January 18, 2015

Soap Bubbles Tutorial

Hello! I'm Cristina Valenzuela, and this is my new tutorial for Copic Europe.

It is difficult to find a theme that has not been explained here.
But there is always something to explain.

My tutorial for today is bubbles, but no water bubbles or drops of water.
This tutorial is all about soap bubbles.

There are many stamps with children playing with bubbles and one never really knows how to colour them... This is my step by step on how I do it.


Soap bubbles always have some shades of colour, created by the soap.
That is why I added a bit of colour.
Like when the rainbow is formed, the colours are those created by the reflection of the water.
You can change the colours I used, for some other numbers, but they should only be low intensity, because what we want is just a bit of colour.

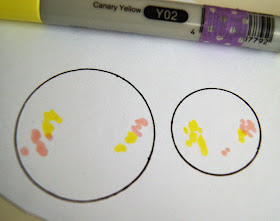
I add a few touches of my R30.
Neither in the centre or touching any edge.


I add a few dots with my Y02, although it's a little intense for me.


And also a bit of V01.


Now I draw a circle with my colour C0, but I still don't touch the rim.
Also with this grey I colour on the colour dots, to faint them a little.


Bubbles and water is always a little blue.
At least, in our minds when we color ...
I colour with my B000, on the previous colours, leaving without colouring the center and edges of each bubble.


I colour the middle with BG70.
I try to leave the centre uncoloured, always in a circular form.
But if you are not completely round, you can use the blender 0.


 With C1, I give some volume colouring near the lower edge.


Then I draw a circle with BV20 inside, leaving only the top without colouring.
The soap is heavier than water, so give more colour around.


Then I blend it all with BG70.


And finally I add a little Opaque White, to create points of light.

My colouring is softer than the picture, the contrast is a bit marked so you can see the transition between steps of colour.

I hope you liked it and you find it useful.


And this is my card with bubbles, the stamp is Mo's Digital Pencil.

Copic Colours:
Floor: W1, W3.
Skin: E000, E00, E01, E02, E11, E21.
Hair: E51, E53, E35, E37, E49.
Dress: R37, R35, R32, R30// N3, R81, RV32.
Chair: E31, E33, E35, E37, E47.
Bubbles: B000, R30, Y02, V01, BG70, C0, BV20.
Bubbles pot: N3, N5, E93, E97, B32, B38.


See you soon here! Hugs!