Hello! I'm Cristina Valenzuela, and this is my new tutorial for Copic Europe.
It is difficult to find a theme that has not been explained here.
But there is always something to explain.
My tutorial for today is bubbles, but no water bubbles or drops of water.
This tutorial is all about soap bubbles.
There are many stamps with children playing with bubbles and one never really knows how to colour them... This is my step by step on how I do it.
Soap bubbles always have some shades of colour, created by the soap.
That is why I added a bit of colour.
Like when the rainbow is formed, the colours are those created by the reflection of the water.
You can change the colours I used, for some other numbers, but they should only be low intensity, because what we want is just a bit of colour.
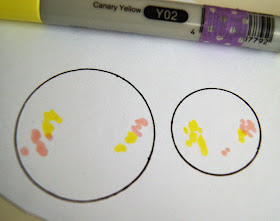
I add a few touches of my R30.
Neither in the centre or touching any edge.
I add a few dots with my Y02, although it's a little intense for me.
And also a bit of V01.
Now I draw a circle with my colour C0, but I still don't touch the rim.
Also with this grey I colour on the colour dots, to faint them a little.
Bubbles and water is always a little blue.
At least, in our minds when we color ...
I colour with my B000, on the previous colours, leaving without colouring the center and edges of each bubble.
I colour the middle with BG70.
I try to leave the centre uncoloured, always in a circular form.
But if you are not completely round, you can use the blender 0.
With C1, I give some volume colouring near the lower edge.
Then I draw a circle with BV20 inside, leaving only the top without colouring.
The soap is heavier than water, so give more colour around.
Then I blend it all with BG70.
And finally I add a little Opaque White, to create points of light.
My colouring is softer than the picture, the contrast is a bit marked so you can see the transition between steps of colour.
My colouring is softer than the picture, the contrast is a bit marked so you can see the transition between steps of colour.
I hope you liked it and you find it useful.
And this is my card with bubbles, the stamp is Mo's Digital Pencil.
Copic Colours:
Floor: W1, W3.
Skin: E000, E00, E01, E02, E11, E21.
Hair: E51, E53, E35, E37, E49.
Dress: R37, R35, R32, R30// N3, R81, RV32.
Chair: E31, E33, E35, E37, E47.
Bubbles: B000, R30, Y02, V01, BG70, C0, BV20.
Bubbles pot: N3, N5, E93, E97, B32, B38.
See you soon here! Hugs!


Wonderful tutorial and a gorgeous card!
ReplyDeletexxx Margreet
Graet tutorial cristina!
ReplyDeleteThank you so much.
Hugs Jessica
Thanks Cristina. Always learning with your tutorials
ReplyDeleteAwesome tutorial.
ReplyDeleteGreat tutorial and beautiful card. Thank you very much!
ReplyDeleteThank you for this beautiful clear tutorial!
ReplyDeleteGreat tutorial and what a lovely card x
ReplyDeleteExcelente tutorial!! Me fascino!!! Gracias por compartir!
ReplyDeleteThat was a great and helpful tutorial
ReplyDeleteCristina. Thank you for sharing xx
Great tut, Thanks!
ReplyDelete