Hello everyone,
It's Sue here today.
I'm going to show you a really simple and effective technique with
Copic Various Inks (refills) and glitter card.
I tried this technique several times until I had found the way to do it which I decided gave the best effect!
Here are the things I used:-
Glitter Card (I used Lawn Fawn Pixie Dust Card)
Whimsy Stamps Dies - Snowy Trees
MFT Die namics Dies - Stitched Stars
Copic Various Inks - 0 Colourless Blender,
YG63, YG03, YR23, YR21
You will see I die cut the glitter card before applying the inky technique. I found that if I inked the glitter card first, and then die cut it, the card lost some of its sparkle and it really spoiled the inky finish as it pressed the inks together into one colour. It gives a much nicer, brighter finish to die cut the glitter card first.
I dabbed some spots of YG63 onto my glass mat
...then some YG03
...and finally some Colourless Blender - you need to work fast as the ink evaporates and dries quickly!
Then I placed the die cut trees onto the ink, glitter side down and gave them a little wiggle - there's no need to swipe the card through the ink, this technique works fine with just a bit of movement.
You will end up with something like this!
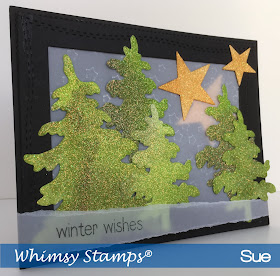
You can see the different shades of green ink on the glitter card - it really does look lovely!
I then repeated the same process with the die cut stars and YR23 and YR21 Various Inks
I am so happy with this technique. I love glitter card and I use it a lot for my card making. I am so excited to think I can use my Copic refills to make my own glitter card which will perfectly match my image colour palette!
Here is the card I made with my inky glittery trees and stars...
I hope you have enjoyed this tutorial!
It would be great to see your inky glittery backgrounds! Please share your cards with us at Copic Marker Europe by following the link
Thank you for popping by, happy Copic colouring,
from Sue...xxx


That is so clever and so cool! Love it! <3
ReplyDeleteWOW. LOVE THIS
ReplyDelete