Hello Copic lovers!
It's Sue here today with a short tutorial to show you how you can achieve a Copic Airbrushed look for your cards even if you don't own a Copic Air System!
Oh my word, this was fun! I practiced for a while with different colours and 'mixes' until I found one I was happy with - and this all seemed to work fine!
Here are the things I used for this technique:
Make it Colour Blending Card
Masking Sheet (I use Stix 2)
Snowy Trees Die Set and Dash Away Clear Stamp Set by Whimsy Stamps
Copic Refill B39, Copic Colourless Blender Refill
Mini Mister, Mist-It! or similar small spray bottle
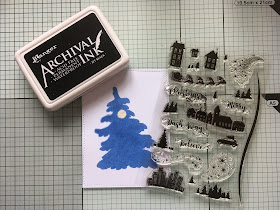
Archival Ink Pad in Black (Archival ink is very good for stamping over the top of alcohol markers)!
Small hole punch (Approx 1cm)
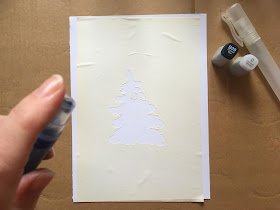
First I created a mask by using the largest Snowy Tree die and a small hole punched circle.
The part of the page I want to make is the area around the tree, I want the tree to be inky!
The part of the page I want to make is the area around the tree, I want the tree to be inky!
...then I poured about half and half Colourless Blender and B39 Copic refill into a small spray bottle and gave it a shake.
I sprayed the card, holding the spray bottle well over 25cm's away from it. (It's a good idea to have a few practice spays on some spare paper first so you can get used to how the ink comes out. The faster and finer the spray the better the finished image will look).
I sprayed the card a few times until I was happy with how the ink had covered the card and how smooth it looked.
Here's my completed card!
HERE
I sprayed the card a few times until I was happy with how the ink had covered the card and how smooth it looked.
...and here is the fun part! I hope I'm not the only one who finds this bit exciting!
I slowly peeled the mask away to reveal the tree image!
I have to say, I was fairly happy with the result! The ink ran little under the mask but I simply pushed the ink back with Copic colourless blender.
...I coloured the little moon with Copic Sketch YR82, YR30, W0
...then I trimmed down the image and stamped my Christmas Design!Here's my completed card!
I hope you have enjoyed this tutorial!
It would be great to see your air brushed backgrounds! Please share your cards with us at Copic Marker Europe by following the link
Thank you for popping by!
Enjoy your Copic colouring
from
Sue...xxx
...and...the spray bottle of Copic B39 will keep if the lid is firmly closed so you can use it again, and again....and again!


So adorable is your card
ReplyDelete