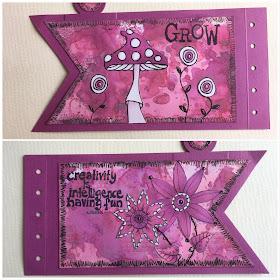
There are quite a few fabulous dies available for making tiny books. So for today's blogpost I have made you one. The background is made with inks. All the images are by Studio Light and they are coloured with Copic Markers.
In the next few photographs I will show you how I have coloured the images with my Copic Markers.
I start with a layer of BG01. Add BG05 and blend the layers together with FBG2 and BG01. For the darker part I have used BG09 and BG07.
Start with the G14. Add some G17 for shading and blend the layers together with G14 and G17.
For the leaves I used YG11. Add YG13 and YG17. Blend the layers together with YG11 and YG13.
For the cute pink flowers I start with RV21. Add some RV23 and RV25. For the darkest shadows I used RV29. Blend all layers together with RV23 and RV21.
This cute toadstool will be violet. Start with V04. Add V05 and V06. Because this colour is still too violet for my taste (it doesn't fit the background) I add a thin layer of FRV1. When gluing down the image I noticed that the colour isn't matching the background. So I decided to add another layer of R32.
The next few photographs will show you all the pages in my tiny booklet and all the used Copic colours.
Used colours: BG01, 05, 07, 09 and FBG2.
Used colours: G14, 17, 19 and YG11, 13 and 17.
Used colours: YG11, 13,17, 21,23 and 25.
Used colours: Y32, 35, 38, 17 and YR07 and 16.
Used colours: RV21, 23, 25 and 29.
Used colours: V04, 05, 06, FRV1 and R32.
Used colours: V01, BV02, 04 08.
The booklet looks nicier when put together, so I have made a little video to show how it looks now:
Wishing you a creative summer,
Miranda


No comments:
Post a Comment