Hello Copic Marker Fans!
Today, it is all about how to make background or shadows over the image.
Heute geht es darum, wie man einen Hintergrund oder Schatten des Motivs erarbeitet.

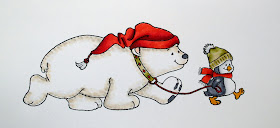
This is my colored imaged but I think it really needs some shadow and background to give it more depth.
Das ist mein coloriertes Motiv, aber ich finde, es braucht wirklich Schatten und Hintergrund, damit es mehr Tiefe bekommt.

I used these markers CO, C2, C4, C6 to make the shadow.
Für den Schatten habe ich die Copic Marker CO, C2, C4 und C6 verwendet.

First, I used C6 Copic marker and put a little colour under the polar bear and the penguin’s feet … just a little shade of colour otherwise it will be darker.
Zuerst habe ich C6 Copic Marker benutzt, um Akzente unter die Eisbären- und Pinguinfüsse zu setzen… gerade ein leichter Schatten, und nur ein wenig Farbe, da es ansonsten zu dunkel wird.

I used C2, then C6 and C4 – I want to make it a bit lighter and spread the color away from the image.
Ich habe C2, dann C6 und C4. verwendet. Damit es etwas heller wird, habe ich die Farbe vom Motiv weg aufgetragen.

I used B02, B01, B00, BG11 Copic Markers. I want to add more colour on the background.
Um dem Hintergrund mehr Farbe hinzufügen, habe ich die Copic Marker B02, B01, B00 und BG11 verwendet.

Then I used a little bit of B02 Copic Marker around the image.
Um das Motiv herum habe ich dann den Copic Marker B02 verwendet.

I used B01, B00 and BG11 and then do blend the colours.
Die Farben habe ich mit B01, B00 und BG11 vermischt.

This is the result. It created a smooth background shading and shadow. I also used Opaque White onto the image.
Und das ist das Ergebnis. Eine weiche Hintergrundschattierung und Schatten. Ich habe auch Opaque White auf dem Motiv verwendet.
Hope you enjoyed the tutorial!
Ich hoffe, mein Tutorial hat euch Spaß gemacht!
Hugs, Marley


what a sweet image and beautiful colored.
ReplyDeletethank you for the tutorial.
greetings karin
Great tutorial! Thanks a lot!!!
ReplyDeleteSandra
this is a cutiepie bear - great tutorial!
ReplyDeleteThanks for the tutorial! What a lovely stamp with the ice bear, it 's my favourite animal, love it very much!
ReplyDeleteGreat tutorial and very sweet image!
ReplyDeleteHi Marley, wat een duidelijke uitleg. Dank je wel. Groetjes
ReplyDeletehoy marley
ReplyDeleteleuk om naar te kijken en een erg duidelijke uitleg van de schaduwen!
groetjes van corry
Sweet image and perfect colored! Thanks for the tutorial.
ReplyDeleteHave a nice weekend
Annacarin
great explanation, now we see great shadows in the projects LOL
ReplyDeleteHugs Lydia
Hallo Marley, ich danke Dir für diese ausführliche Erklärung und Dein Eisbär mit dem Pinguin ist wunderbar coloriert.
ReplyDeleteLiebe Grüße
Petra
Hi Marley,
ReplyDeleteGreat and clear tutorial ! Thanks,
Helga
Stunning, thanks so much for this tutorial.
ReplyDelete