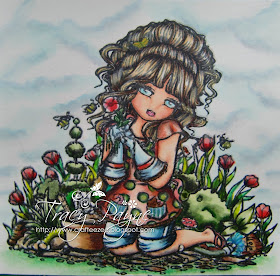
I have been asked a few times how I draw clouds on my scenes, so I have a little tutorial for you. Firstly what I will say is that if you look at the clouds in the sky, they change everyday and are so random that you can't get this wrong as there is no right way or wrong way of doing it. If you don't feel confident then stamp your image but don't colour it and practice drawing the clouds.
***
ich wurde bereits öfters gefragt, wie ich die Wolken auf meinen Szenen gestalte, darum habe ich Euch eine kleine Anleitung geschrieben. Zuerst möchte ich sagen, dass Ihr, wenn Ihr in den Himmel schaut, seht, dass sich die Wolken jeden Tag ändern und immer zufällig sind. Ihr könnt hier also nichts falsch machen, da es kein Falsch oder Richtig gibt. Falls Ihr Euch trotzdem nicht sicher seid, dann stempelt Euer Motiv, coloriert es aber nicht, und übt ein wenig Wolken-Zeichnen.You will need B91, B000, C1, C00 and your colourless blender and of course your image. I have chosen "Gardening Girl Dawn" by Hannah Lynn from Crafts and Me.
***
Ihr benötigt B91, B000, C1, C00 und Euren Colourless Blender - und natürlich das Motiv. Ich habe "Gardening Girl Dawn", gezeichnet von Hannah Lynn, von Crafts and Me verwendet.First I draw random outlines of the clouds using B91. Remember to make sure you have very small lines towards the bottom of your scene. This will give the impression that they are far away bringing depth to your scene.
***
Zuerst zeichne ich zufällige Wolkenumrisse mit B91. Denkt daran, die Linien, die näher am Boden des Motives sind, sehr klein zu machen. Das wird später den Eindruck erwecken, dass sie weit entfernt sind, und so Tiefe in Eure Szene bringen.
Then I added the B000
***
Dann habe ich B000 hinzugefügt.
***
Dann habe ich B000 hinzugefügt.
Then I added some C1. Think of this as your shadows.
***
Anschließend verwendete ich C1 um damit die Schatten zu zeichnen.
***
Anschließend verwendete ich C1 um damit die Schatten zu zeichnen.
Then I go in with the C00 and blend
***
Dann benutzte ich C00 um die Farben zu verwischen.
***
Dann benutzte ich C00 um die Farben zu verwischen.
Then I use the colourless blender pen to blend all the colours together, which tones down the colours and gives you subtle clouds.
***
Anschließend nahm ich den Colourless Blender um alle Farben zu verwischen - das mindert die Helligkeit der Farben und erzeugt dezentere Wolken.
***
Anschließend nahm ich den Colourless Blender um alle Farben zu verwischen - das mindert die Helligkeit der Farben und erzeugt dezentere Wolken.
These are the colours I have used to colour the image:-
***
Mit diesen Farben habe ich das Motiv coloriert:
***
Mit diesen Farben habe ich das Motiv coloriert:
I hope you will experiment, you can add some B00 to make your clouds bluer or add some oranges, reds and yellows and create a sunset.
***
Ich hoffe, Ihr werdet mein Tutorial ausprobieren und damit experimentieren. Ihr könnt zusätzlich etwas B00 benutzen um die Wolken blauer zu machen oder etwas Orange, Rot und Gelb hinzufügen um einen Sonnenauf-/-untergang zu zeichnen.
***
Ich hoffe, Ihr werdet mein Tutorial ausprobieren und damit experimentieren. Ihr könnt zusätzlich etwas B00 benutzen um die Wolken blauer zu machen oder etwas Orange, Rot und Gelb hinzufügen um einen Sonnenauf-/-untergang zu zeichnen.
Whatever you decide, have fun!
***
Für was immer Ihr Euch entscheidet, habt Spaß dabei!
***
Für was immer Ihr Euch entscheidet, habt Spaß dabei!


great tutorial Tracy - definitely, fun!
ReplyDeleteFantastic tutorial, I can't wait to try it!
ReplyDeleteThank you Tracy for sharing you wonderful clouds.
ReplyDeleteI can't wait to try it. I alway make my clouds with the airbrush. This way is so great.
Hugs
Hi Tracy, thanks for sharing your secret with us. Next time I create a card, I will try it. Greetings Diny
ReplyDeletehallo tracy
ReplyDeletewat een schitterende kaart heb je ingekleurd en een duidelijke uitleg over de wolken,dus weer iets geleerd om uit te proberen
groetjes van corry
Hello Tracy, I will translate the comment of Corry for you, she is telling you that she loves your card, the explanation is very clear. She learned again something new to try.
ReplyDeleteTake tjhe compliment from Corry
Hallo Tracy,
ReplyDeleteWat een prachtig kaartje.
En wat duidelijke uitleg
Groetjes Margreet
Thank you everyone for your lovely comments and thank you Diny for translating.
ReplyDeleteHugs Tracy x