Colorieren im Farbverlauf und Amazing Glaze

Color the whole background with Y11,
color then with the following markers; Y15+Y17+YR07 , created a nice blending of the colors.
***
Den Hintergrund zuerst mit der hellen Farbe Y11 ausmalen und wieder im Farbverlauf von hell nach dunkel mit kreisenden Bewegungen arbeiten. Dazu habe ich noch die Farben Y15+Y17+YR07 verwendet.
This are Copic Markers i have used in this tutorial
Y11+Y15+Y17+YR07 / E71+E77+E79
BG93+BG96 / BG09+BG15+BG49
BV02+BV08 Spica Atyou Yellow, Orange, Violet and Turquoise.
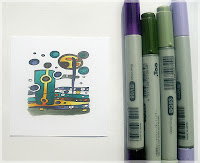
Stamp your image with Memento Black Tuxedo. The used stamp is from Heindesign. Color your image with Y11-Y15-Y17 and YR07, start with the lightest shade. Take the ink of the middle tone marker at the point of the brush tip from the lightest marker, make a nice blending. Take the ink of the third marker at the tip of the second marker and blend the colors. Do the same with the darkest markers.
***
Das gewünschte Motiv mit Memento schwarz abstempeln. Ich habe ein Fantasie-Motiv von Heindesign gewählt. Mit den Farbtönen Y11+Y15+Y17+YR07. colorieren. Zuerst mit dem hellen Gelbton beginnen und danach mit der Markerspitze den dunkleren Farbton aufnehmen und im Farbverlauf colorieren.
Color the other parts of the image the same way. Use the Blue Violets BV02 and BV08 and for the brown parts: E71, E77 and E79. In stamps like this you can change the placement of the shadows.
***
Auch alle anderen Farbtöne werden so miteinander coloriert. Nachdem das ein Fantasiemotiv ist, habe ich den Farbverlauf von hell auf dunkel immer abwechselnd gestaltet. Hier habe ich bei den Violett-Tönen BV02 und BV08 und bei den Brauntönen E71+E77+E79 verwendet.
Auch alle anderen Farbtöne werden so miteinander coloriert. Nachdem das ein Fantasiemotiv ist, habe ich den Farbverlauf von hell auf dunkel immer abwechselnd gestaltet. Hier habe ich bei den Violett-Tönen BV02 und BV08 und bei den Brauntönen E71+E77+E79 verwendet.
For the last parts use the Green shades BG93 and BG96 and the turquoise shades BG09, BG15, BG49. Work again tip to tip as above. Working this way will give you a colored image with nice shades and deep contrasts.
***
Die letzten Farbverläufe sind mit den Farben der Grüntöne – BG 93 und BG 96 sowie mit den Türkistönen BG09+BG15+BG49. gestaltet. Auch hier wieder mit der hellsten Farbe beginnen. Die jeweils dunklere Farbe mit dem hellen Stift aufnehmen und colorieren – so entsteht ein schöner Farbverlauf.
Die letzten Farbverläufe sind mit den Farben der Grüntöne – BG 93 und BG 96 sowie mit den Türkistönen BG09+BG15+BG49. gestaltet. Auch hier wieder mit der hellsten Farbe beginnen. Die jeweils dunklere Farbe mit dem hellen Stift aufnehmen und colorieren – so entsteht ein schöner Farbverlauf.

For the circles we use an other technique; color the circle with the darkest color, let a part in the middel uncolored. With the lightest marker start in the middle and color in circles outwards, this will push the darker color to the outside. Use BG93 +96 and BV02+BV08.
***
Die Kreise zuerst mit der dunkleren Farbe ausmalen, in der Mitte eine helle Stelle freilassen und mit der helleren Farbe von der Mitte weg in Kreisbewegung colorieren. Die dunkle Farbe wird dadurch verdrängt und so ist auch in einem Kreis ein schöner Farbverlauf möglich. (BG93+BG96 und BV02+BV08)
Die Kreise zuerst mit der dunkleren Farbe ausmalen, in der Mitte eine helle Stelle freilassen und mit der helleren Farbe von der Mitte weg in Kreisbewegung colorieren. Die dunkle Farbe wird dadurch verdrängt und so ist auch in einem Kreis ein schöner Farbverlauf möglich. (BG93+BG96 und BV02+BV08)
Color the whole background with Y11,
color then with the following markers; Y15+Y17+YR07 , created a nice blending of the colors.
***
Den Hintergrund zuerst mit der hellen Farbe Y11 ausmalen und wieder im Farbverlauf von hell nach dunkel mit kreisenden Bewegungen arbeiten. Dazu habe ich noch die Farben Y15+Y17+YR07 verwendet.
Use the Copic sparkle markers (Spica Atyou) to put some accents, I have used Yellow, Orange, Violet and Turquoise.
These markers are versatile, you can also use them to created higlights.
***
Mit den Copic Glitterstiften (Spica Atyou) gelb, orange, violett und türkis noch einige Akzente setzen. Diese Glitterstifte sind besonders ergiebig. Damit können noch zusätzliche Highlights gesetzt werden.
These markers are versatile, you can also use them to created higlights.
***
Mit den Copic Glitterstiften (Spica Atyou) gelb, orange, violett und türkis noch einige Akzente setzen. Diese Glitterstifte sind besonders ergiebig. Damit können noch zusätzliche Highlights gesetzt werden.
This are Copic Markers i have used in this tutorial
Y11+Y15+Y17+YR07 / E71+E77+E79
BG93+BG96 / BG09+BG15+BG49
BV02+BV08 Spica Atyou Yellow, Orange, Violet and Turquoise.
***
Diese Farben habe ich verwendet:
Y11+Y15+Y17+YR07 / E71+E77+E79
BG93+BG96 / BG09+BG15+BG49
BV02+BV08 Glitterpen in gelb, orange, türkis und violett.
Diese Farben habe ich verwendet:
Y11+Y15+Y17+YR07 / E71+E77+E79
BG93+BG96 / BG09+BG15+BG49
BV02+BV08 Glitterpen in gelb, orange, türkis und violett.
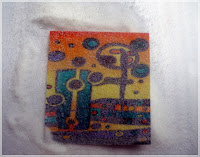
Cut the motif to a square and put embossing ink on it, you can use an ink pad or or a sponge.
***
Das Motiv quadratisch schneiden und mit dem Embossing-Tupfer (es ist auch ein Embossingkissen möglich) einstreichen.

***
Das Motiv quadratisch schneiden und mit dem Embossing-Tupfer (es ist auch ein Embossingkissen möglich) einstreichen.

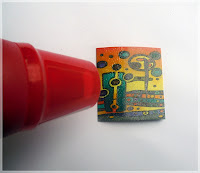
Sprinkle Amazing Glaze in the ink (a kind of embossing powder) and emboss the powder with a heat tool.
***
Das Amazing Glaze (das ist klares, grobkörniges Embossingpulver) einstreuen und mit dem Heisluftfön embossen.

***
Das Amazing Glaze (das ist klares, grobkörniges Embossingpulver) einstreuen und mit dem Heisluftfön embossen.

Put another layer of powder on it, when the powder is melted and stil hot, repeat 2 times (3/4 layers)
Tip: You also can cool down the image, in that case put first an other layer of embossing ink on it, before sprinkling it again with embossing powder.
Tip: You also can cool down the image, in that case put first an other layer of embossing ink on it, before sprinkling it again with embossing powder.
***
Anschließend (noch heiß) wieder mit Amazing Glaze bestreuen und wieder embossen. Dieser Vorgang wird insgesamt 3 -4 x wiederholt.
Tipp: Zwischen den „Embossingschritten“ kann man auch das Motiv kurz auskühlen lassen und wieder mit dem Embossingtupfer befeuchten, mit dem Amazing Glaze bestreuen und wieder embossen.
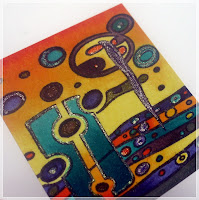
The square has a tick glazing layer. The colors are more vibrant. You can do more with this technique.........
***
Das fertige Motiv hat eine klare dicke Schicht. Die Farben kommen so wunderbar kräftig zur Geltung. Diese Art von Technik kann aber auch noch weiterverarbeitet werden ...
Das fertige Motiv hat eine klare dicke Schicht. Die Farben kommen so wunderbar kräftig zur Geltung. Diese Art von Technik kann aber auch noch weiterverarbeitet werden ...
***
Hier habe ich ein weiteres Motiv coloriert und mit einem Textstempel und Distress Ink braun bestempelt. Danach das Motiv wie oben beschrieben, 3-4-mal mit Amazing Glaze embossed.
Diese Technik lässt sich auch wunderbar mit anderem Motivstempeln wie z.B. Schmetterling, Blumen, etc. vereinbaren.
Diese Technik lässt sich auch wunderbar mit anderem Motivstempeln wie z.B. Schmetterling, Blumen, etc. vereinbaren.
After cooling down you can crackle the image and put Distress ink in the crackles. You ave created a new look.
***
Nach dem Erkalten kann das fertige Motiv noch gebrochen werden. Die dadurch entstandenen Risse werden mit Distress Ink gefärbt. So entsteht wieder ein neuer Look.
I hope my tutorial is clear for everyone. I hope to see your projects with this technique.
I hope my tutorial is clear for everyone. I hope to see your projects with this technique.
***
Ich hoffe, mein erster Workshop war für alle verständlich erklärt. Ich bin schon gespannt, wir ihr diese Technik für eure Werke einsetzt.
Barbara Meyer
Barbara Meyer


I love using glaze and just drooling on the vibrant colors - totally yummy!
ReplyDeleteI think i need to buy some off that glaze.
ReplyDeleteWhat a great tutorial.
Hugs Erna
What a great tutorial. I really like it.
ReplyDeleteHugs Lydia
hallo barbara
ReplyDeletewat een geweldig mooie kaart en de les heel duidelijk en goed,daar kunnen we van leren:-))
groetjes van corry
Das ist eine tolle Anleitung und ein absolut tolles Projekt! Ich mag deinen Stil.
ReplyDeleteGreat tutorial. Thanks for sharing. Hugs Tracy x
ReplyDeletePrima uitleg en mooie kleuren. Ook fijn om iets te zien met een abstracte stempel !
ReplyDelete