Followers

Thursday, September 22, 2011

Flowery Post Card

Hello you all!
Hallo an alle!

It's Keren here, and I'm proud to be the CME DT new addition.
Thanks Diny for the introduction and for accepting me to your wonderful group of talented ladies!

Ich bin's,  Karen, und ich bin stolz, die Neue im DT des CME zu sein. 
Danke, Diny, für die Vorstellung und dafür, dass ich in diese wundervolle Gruppe talentierter Ladies aufgenommen worden bin!

For my first project I choose a flowery post card stamp made by Stamps Happen Inc.

Für mein erstes Projekt habe ich einen florale Postkartenstempel 
von Stamps Happen, Inc., ausgewählt.

I bought it a few months' ago in my last visit in the big apple,
but only after Instructor class I took last month with Diny,
I got some courage to color it.

Ich habe ihn vor einigen Monaten auf meinem letzten Besuch im "Big Apple" gekauft, 
aber erst nach meiner Ausbilder-Schulung im letzten Monat bei Diny 
habe ich auch den Mut gefunden, ihn zu colorieren.

If you have seen my work, you know it is not my normal style.

Wenn ich euch meine Arbeiten angesehen habt, dann wisst ihr, 
dass das eigentlich nicht mein Stil ist.

I use the original designed and made the card as a post card. 
Added a few final touches as the smile stamp, a small black rhinestone and
a Tim Holtz tape
and Voilà - here's my card.

Ich habe mich am Design des Stempels orientiert und Postkarte gemacht. Hinzugefügt habe ich den "Smile"-Stempel, einen kleinen schwarzen Glitzerstein und Klebeband von Tim Holtz
und Voilà - fertig ist meine Karte.


The Copic's I used:
Die Copics, die ich verwendet habe:
Flower/Blume: R000, R02, R05, R20, R22, R25
Leaves/Blätter: YG91, YG93, YG97
Background/Hintergrund: E000, E30, E31
Stamp/Briefmarke: BV20, BV23


Stamps:
Stempel:
Rose postcard by Stamps Happen Inc.
Rose postcard von Stamps Happen Inc.

Smile - clear stamps & accessories by Technique Tuesday.
Smile - clear stamps & accessories von Technique Tuesday.
 

Untill next time....
Bis zum nächsten Mal...

Big hugs

Keren

Wednesday, September 21, 2011

Introduction two new Blogteam Members

Hello,
Hallo,
We have two team members, who have not be introduced here. Therefore I take my publishing day to do that.
Wir haben zwei Mitglieder, die hier noch nicht vorgestellt wurden. Daher nehme ich meinen Veröffentlichungstag, um das zu tun.
One of these members is Kreativmonster, she already is working with us for more than a month. She translated almost every post for us. Great job, girl!
Eines dieser Mitglieder ist Kreativmonster, sie arbeitet schon seit mehr als einem Monat für uns. Sie hat fast alle Beiträge für uns übersetzt. Großartige Arbeit, Mädel!
The second one is the new Copic Instructor for Israel, she will spread the Copic programm in her area. Together with our Jing from the UAE and Siv from Norway, she got her Instructor Ceritficate during my Instructor Class in Oslo. You see we are an international community.
Die Zweite ist die neue Copic Ausbilderin für Israel. Sie wird das Copic- Programm in ihrer Umgebung verbreiten. Zusammen mit Jing aus den Vereinigten Arabischen Emiraten und Siv aus Norwegen hat sie ihr Ausbilder-Zertifikat während meiner Ausbilderschulung in Oslo erhalten. Ihr seht, wir sind eine internationale Comunity.

Karen, we wish you a warm welcome, love to see Isrealian creativity.
Karen, wir heißen dich herzlich willkommen und freuen uns darauf, israelische Kreativität zu sehen.

Kreativmonster

By clicking on her name you can read more about her.
Wenn ihr auf ihren Namen klickt, erfahrt ihr mehr über sie.

See here an example of her work.
Hier seht ihr ein Beispiel ihrer Arbeit.

By clicking on her name you can read more about her.
Wenn ihr auf ihren Namen klickt, erfahrt ihr mehr über sie.
An example of Karen's work
Ein Beispiel für Karens Arbeit.

This is my contibution for today, next time you will see a card from my hand, but for today you have two blogs to visit.
Das ist mein Beitrag für heute, beim nächsten Mal seht ihr wieder ein Karte von mir, aber für heute habt ihr noch zwei Blogs zu besuchen.
Greetings/Grüße
 Diny

Tuesday, September 20, 2011

Just 1 copic and my airbrush ....

The wind is blowing around my house today, so i thought i am going to make a card with fall colors.
Der Wind weht heute um mein Haus, so dachte ich, ich mache eine Karte mit Herbstfarben.

I also like to show you some other things you can do with your Copics and airbrush.
Ich möchte euch gerne auch mal andere Sachen zeigen, die man mit Copics und dem Airbrushgerät machen kann.

So i made a card today for all our copics fans with my airbrush, some craft cardstock and a embozz die from Crealies. I love to use their embossing templates because you can emboss with them and after you can leave the paper in the die and then you can airbrush the embossed details.
Ich habe mit meinem Airbrushgerät, etwas Craft Cardstock und einer Embozz Schablone von Crealies eine Karte für euch Copicfans gemacht. Ich mag es, die Schablone zu benutzen, weil ich damit prägen, das Papier drin lassen und nur das Geprägte mit dem Airbrushgerät bearbeiten kann.

I airbrushed the circle from the flower and i did a little piece of paper and after i airbrushed that piece i punched out a tiny little butterfly, isn't she cute.
Ich habe den Kreis der Blume und ein kleines Stück Papier mit dem Airbrush-Gerät bearbeitet und anschließend aus dem Stückchen einen kleinen Schmetterling ausgestanzt, ist der nicht niedlich?


I want to show you a new product i like very much, It's double sided tape and i know we have many different brands of tape. And i can tell you i used many brands but this tape is really awesome.
Ich möchte euch gerne etwas Neues zeigen, das ich sehr mag. Es ist doppelseitiges Klebeband und - ja ich weiß - es gibt viele verschiedene Marken. Ich kann euch sagen, ich habe Sorten benutzt, aber dieses Klebeband is wirklich super.


You know why? Because it is heat resistant so you can put embossing powder on top of it and heat set it with your heattingtool. Just like i did with the stem of the flower.
You can use it with glitter, flowersoft and so on....
Wollt ihr wissen, warum? Weil es hitzebeständig ist, so dass man Embossingpulver darauf kleben und mit demHeißluftgerät erhitzen kann. Genau das habe ich mit dem Stiel der Blume gemacht.
Ihr könnt es auch mit Glitter oder Flowersoft und so weiter benutzen.
And what is also very important it is realy high tack so your paper will stay in place, and you get very much tape for a very good price.
Und was auch sehr wichtig ist, dass es wirklich gut klebt und dass das Papier gut auf seinem Platz bleibt, und man bekommtviel Klebeband für einen guten Preis.


This i used for my card today/ Das habe ich für die Karte heute verwendet:

Copic : BG18
Spellbinderdies: Nestabilities and a flower die for the leaves
Embossing: Crealies embozz templates
Paper: Authentique splendid
Embelishments: Hotfixstones, ribbon, stickles and a rub-on.

I would like to thank everybody that is leaving a comment i realy like them so much.
Ich danke euch allen für die Kommentare, ich mag sie wirklich sehr gerne.

X

Erna

Monday, September 19, 2011

Cloud Tutorial

Hi Copic Fans,

I have been asked a few times how I draw clouds on my scenes, so I have a little tutorial for you. Firstly what I will say is that if you look at the clouds in the sky, they change everyday and are so random that you can't get this wrong as there is no right way or wrong way of doing it. If you don't feel confident then stamp your image but don't colour it and practice drawing the clouds.
***
ich wurde bereits öfters gefragt, wie ich die Wolken auf meinen Szenen gestalte, darum habe ich Euch eine kleine Anleitung geschrieben. Zuerst möchte ich sagen, dass Ihr, wenn Ihr in den Himmel schaut, seht, dass sich die Wolken jeden Tag ändern und immer zufällig sind. Ihr könnt hier also nichts falsch machen, da es kein Falsch oder Richtig gibt. Falls Ihr Euch trotzdem nicht sicher seid, dann stempelt Euer Motiv, coloriert es aber nicht, und übt ein wenig Wolken-Zeichnen.

You will need B91, B000, C1, C00 and your colourless blender and of course your image. I have chosen "Gardening Girl Dawn" by Hannah Lynn from Crafts and Me.
***
Ihr benötigt B91, B000, C1, C00 und Euren Colourless Blender - und natürlich das Motiv. Ich habe "Gardening Girl Dawn", gezeichnet von Hannah Lynn, von Crafts and Me verwendet.

First I draw random outlines of the clouds using B91. Remember to make sure you have very small lines towards the bottom of your scene. This will give the impression that they are far away bringing depth to your scene.
***
Zuerst zeichne ich zufällige Wolkenumrisse mit B91. Denkt daran, die Linien, die näher am Boden des Motives sind, sehr klein zu machen. Das wird später den Eindruck erwecken, dass sie weit entfernt sind, und so Tiefe in Eure Szene bringen.


Then I added the B000
***
Dann habe ich B000 hinzugefügt.


Then I added some C1. Think of this as your shadows.
***
Anschließend verwendete ich C1 um damit die Schatten zu zeichnen.


Then I go in with the C00 and blend
***
Dann benutzte ich C00 um die Farben zu verwischen.


Then I use the colourless blender pen to blend all the colours together, which tones down the colours and gives you subtle clouds.
***
Anschließend nahm ich den Colourless Blender um alle Farben zu verwischen - das mindert die Helligkeit der Farben und erzeugt dezentere Wolken.


These are the colours I have used to colour the image:-
***
Mit diesen Farben habe ich das Motiv coloriert:


I hope you will experiment, you can add some B00 to make your clouds bluer or add some oranges, reds and yellows and create a sunset.
***
Ich hoffe, Ihr werdet mein Tutorial ausprobieren und damit experimentieren. Ihr könnt zusätzlich etwas B00 benutzen um die Wolken blauer zu machen oder etwas Orange, Rot und Gelb hinzufügen um einen Sonnenauf-/-untergang zu zeichnen.

Whatever you decide, have fun!
***
Für was immer Ihr Euch entscheidet, habt Spaß dabei!

Sunday, September 18, 2011

CANDY WINNER

Ohh my goodness, we have reached more than 500 followers is such a short time!
Thank you very much girls for following us. It's a great honor for us.
Ohh, wie wundervoll, wir haben in so kurzer Zeit mehr als 500 Verfolger erreicht!
Vielen Dank, Mädels, dass ihr unseren Blog verfolgt, es ist uns eine große Ehre.

So now I have great news, Random Org has done a wonderful job for us, he choose our
Big Candy Winner, the set of 36 Copic Ciao Markers.
Jezt habe ich wichtige Neuigkeiten, Random Org hat für uns eine große Aufgabe erledigt und die Gewinnerin unseres großen Candys,  des Sets mit 36 Copic Ciao Markers,  ermittelt.


On internet I filled in the numbers of entries by Random Org, 1 till 232 and clicked on "generate". 
He choose a number for us. 
I have visited the blog and checked the requirements.
Im Internet habe ich die Anzahl der Einträge (1 - 232)  bei Random Org eingegeben und auf "Generate" geklickt.
Er hat eine Nummer für uns ausgewählt.
Dann habe ich den dazugehörigen Blog besucht um zu kontrollieren, ob die Vorgaben beachtet wurden.

The lady who has win this beautiful box is....................
Die Lady, die dieses wundervolle Set gewinnt ist.............
...............

..............

.................


Congratulations Margreet, we will wish you a lot of fun.
Please send us you address by email so we can send you the box.
Herzlichen Glückwunsch, Margreet, wir wünschen dir viel Spaß damit.
Bitte teile uns deine Anschrift per E-Mail mit, damit wir dir die Box zusenden können.

Big Hugs
from all of us
Design Team Copic Marker Europe

Pirate girl


Hi everyone

I had to make a tough card for a cool girl, and I have chosen for a cool pirate stamp from Nellie Snellen. I have coloured with my favourite copics.

Ich musste eine freche Karte für ein cooles Mädchen machen und habe hierfür einen coolen Piratenstempel von Nellie Snellen ausgesucht. Ich habe mit meinen Lieblings-Copics coloriert.

The girl's hat and the cat I 've coloured with C3, C5 and C7, then I used Atyou Spica silver for a glossy effect, to make it a little smooth, I'm gone over again with C3.

Den Hut des Mädchens und die Katze habe ich mit C3, C5 and C7 coloriert, dann habe ich Atyou Spica Silver für einen glänzenden Effekt verwendet und bin mit C3 nochmal darüber gegangen.

The rest of the image I have coloured with 

Den Rest des Motivs habe ich mit
E50, E51, E53, E35,E57, W1, C1,C3, C5, C7, BG10R20, R22, R27, R59, Y11, Y17coloriert.
The paper I have used is cardstock Bazzill and magnolia scappaper

Das Papier, das ich verwendet habe, ist Cardstock von Bazzill und Designpapier von Magnolia.

Hugs Nadia xxx

Saturday, September 17, 2011

A Pen Friend


Hi Copic Fans
Hallo Copic-Fans

Today I've made a card using a fabulous image designed by Elisabeth Bell called A Pen Friend.
Heute habe ich eine Karte mit dem zauberhaften Motiv A Pen Friend von Elisabeth Bell gemacht.


Here's a close-up of the image:
Hier ist eine Nahaufnahme des Motivs:


I used the following Copic Markers:
Ich habe folgende Copic Marker verwendet:

Skin/Haut: E0000, E000, E00, E21, E93
Hair/Haare: E50, E31, E35, E37
Clothes/Kleidung: YG11, YG13, YG17, R22, R24, C00, C1, C3, Colourless Blender
Ground/Boden: W0, W2, YG63, Colourless Blender.

Other Items Used: 
Weitere verwenedete Artikel:

Stamps: A Pen Friend from Belles n Whistles. Post Card Stamp and "Sent with Love" Sentiment Stamp from Whimsy Stamps
Stempel: A Pen Friend von Belles n Whistles. Postkarten-Stempel und "Send with Love"-Stempel von Whimsy Stamps.
Papers & Card: From my stash
Papier & Karte: Aus meinem Vorrat
Tools: Nesties Large Rectangles, Magnolia Doo Hickeys and Nellies Multi Frame Heart Die all  with Sizzix Big Shot
Werkzeuge: Nesties Large Rectangles, Magnolia Doo Hickeys und Nellies Multi Frame Heart Die alle  mit der Sizzix Big Shot
Embellishments: Butterfly Charm, Gem Swirl and Doily from my stash.  Flowers from Wild Orchid Crafts
Embellishments: Butterfly Charm, Gem Swirl und Tortenspitze aus meinem Vorrat. Blumen von Wild Orchid Crafts
Ink: Memento Tuxedo Black.  Ranger Distress Ink in Walnut Stain
Stempelfarbe: Memento Tuxedo Black. Ranger Distress Ink in Walnut Stain

Thanks for looking today.
Danke für's Anschauen.

Hugs
Penni
X

Friday, September 16, 2011

Shadow/background with the copic markers


Hello Copic Marker Fans!


Today, it is all about how to make background or shadows over the image.


Heute geht es darum, wie man einen Hintergrund oder Schatten des Motivs erarbeitet.


This is my colored imaged but I think it really needs some shadow and background to give it more depth.
Das ist mein coloriertes Motiv, aber ich finde, es braucht wirklich Schatten und Hintergrund, damit es mehr Tiefe bekommt.


I used these markers CO, C2, C4, C6 to make the shadow.
Für den Schatten habe ich die Copic Marker CO, C2, C4 und C6 verwendet.


First, I used C6 Copic marker and put a little colour under the polar bear and the penguin’s feet … just a little shade of colour otherwise it will be darker.
Zuerst habe ich C6 Copic Marker benutzt, um Akzente unter die Eisbären- und Pinguinfüsse zu setzen… gerade ein leichter Schatten, und nur ein wenig Farbe, da es ansonsten zu dunkel wird.


Then I used C4 Copic marker followed by C6 marker.
Dann habe ich C4 und C6 Copic Marker verwendet.


I used C2, then C6 and C4 – I want to make it a bit lighter and spread the color away from the image.
Ich habe C2, dann C6 und C4. verwendet. Damit es etwas heller wird, habe ich die Farbe vom Motiv weg aufgetragen.


Finally, I used CO to blend and smooth the colors.
Schließlich habe ich mit CO die Farben vermischt.


I used B02, B01, B00, BG11 Copic Markers. I want to add more colour on the background.
Um dem Hintergrund mehr Farbe hinzufügen, habe ich die Copic Marker B02, B01, B00 und BG11 verwendet.


Then I used a little bit of B02 Copic Marker around the image.
Um das Motiv herum habe ich dann den Copic Marker B02 verwendet.


I used B01, B00 and BG11 and then do blend the colours.
Die Farben habe ich mit B01, B00 und BG11 vermischt.


This is the result. It created a smooth background shading and shadow. I also used Opaque White onto the image.
Und das ist das Ergebnis. Eine weiche Hintergrundschattierung und Schatten. Ich habe auch Opaque White auf dem Motiv verwendet.

Hope you enjoyed the tutorial!
Ich hoffe, mein Tutorial hat euch Spaß gemacht!

Hugs, Marley


Thursday, September 15, 2011

Weihnachtspyramidenkarte/Christmaspyramidcard


Weihnachten rückt immer näher und langsam sammeln alle Ideen.
Wie gestallte ich dieses Jahr meine Karten? Ich bin mir auch noch nicht sicher, welche Karte ich dieses
Jahr verschicken werde, aber ich probiere jetzt schon aus welche sich dazu eignen.
Die dreieckige Form dieser Karte finde ich deshalb schön, weil sie gleichzeitig einen Tannenbaum symbolisiert.
Christmas is just around the corner and slowly, everyone starts to gather ideas. Which kind of cards am I going to create this year? This year, I am not certain yet the style of card I will be sending. However, I already have tried a few in which might be appropriate.
I like the triangle card-shaped because it symbolizes the Christmas tree.


Die Schneesterne sind mit einer Sizzix-Platte gestanzt und mit Plusterfarbe bearbeitet. Auf dem Foto sieht man es nicht so gut, aber auf die Plusterung habe ich noch Glitter geklebt.
The snowflakes have been cut with a Sizzix die and applied some Plustercolour. There are glitters on it but not quite visible on the photo.


Den Tannenbaum aus Wellpappe habe ich von Hand geschnitten und um ihn edler aussehen zu lassen,
habe ich noch eine Spitzenbordure angeklebt.
I cut the pine tree out of corrugated cardbord and glued some lace on it to make it look more elegant.


Den Knopf am Rücken ist mit einem silbernen Gel-Stift gemalt; so verschwindet er nicht, sondern
liegt oben auf.
I coloured the button on the back of the image with a silver gel pen, so that it does not disappear, but it pops up.


Die Blume unter dem Holzknopf ist selbst gehäkelt und das Ticket ist von Magnolia.
The flower underneath the button is hand crocheted and the ticket is from Magnolia.

Auch hier habe ich die Schneesterne aufgeklebt, damit jede Seite miteinander verbunden ist. Zum Versenden kann ich die Karte auseinanderfalten dass sie flach ist.
I placed snowflakes on this side, too, to connect the sides with each other. When you unfold the card, it is flat so that you can send it by mail.


Mit diesen Farben sind die Stempelmotive coloriert.
These are the Markers I used to colour the images.


Mit kreativen Grüssen
Creative greetings
Eure
Andrea/Düsi

Meine Inspiration kommt von
My inspiration come from

Wednesday, September 14, 2011

Lilies / Lilien

Hallo Copic-Freunde!
Hello Copic-friends!


Ich coloriere sehr gerne Blumen. Diesmal habe ich mich für Lilien entschieden. Der Stempel "Lilies" ist von Stacy Stamps. Sehr gut geeignet sind diese Blumen für Hintergründe.
***
I love to color flowers. This time I decided to go with some lilies. The stamp "Lilies" is by Stacy Stamps. These flowers make a wonderful background.


Ich habe nur die Farben V000 und V12 sowie Y11 und BG93 verwendet.
***
I only used the colors V000 and V12 and also Y11 and BG93.


Außerdem kamen wieder meine Copic-Glitzerstifte gelb und silber zum Einsatz.
***
I also used the yellow and silver Copic Spica glitter pens.


Die einzelne Lilie wurde mit stickles glitter überzogen. Die Lilie auf weißen Hintergrund habe ich mit Distress Ink "dusty concord" gestempelt. Der Stempel "Herzlichen Glückwunsch" ist von Heindesign.
***
I covered the single lily with Stickles Glitter Glue. The lily on the white background was stamped using the Dusty Concord Distress Ink. Stamp "Herzlichen Glückwunsch" (Congratulations) is by Heindesign.

Liebe Grüße/love
Barbara

Tuesday, September 13, 2011

Papiertragetasche mit Magnolias Secret Tilda/ Paperbag with Magnolia's Secret Tilda


Hallo liebe Copicfreunde,
Hello dear Copicfriends,
manchmal braucht man schnell eine nette Verpackung für ein kleines Mitbringsel. Da ist es praktisch, wenn man etwas vorbereitet hat. Ich habe dafür gern die kleinen Papiertragetaschen denn man kann sie toll dekorieren und platzsparend aufbewahren.

Sometimes you need a nice wrapping for a small present spontaneously. Then it is good if you have prepared something. I like to use small paperpags for this case because they can be decorated nicely and stored without needing much space.

Hier kommt meine neueste Tragetasche: dafür habe ich die süße Secret Tilda, die zu meinen Lieblingsstempeln gehört, ausgewählt, mit Memento auf Perfect Colouring Paper gestempelt und mit Copics koloriert.
This is my latest Paperbag: I chose the sweet Secret Tilda, which is one of my favourite stamps, stamped it with Memento onto Perfect Colouring Paper and coloured it with Copics.


Ich hoffe, dass Euch meine Verpackung gefällt und zu eigenen Werken anregt.
I hope you like my wrapping and it inspires you to own creations.


Monday, September 12, 2011

Tutorial: Airbrushing - Background Orientation with Warm & Cool Colors


Creating a background either for a layout or card with airbrushing is always interesting. In my last tutorial, I have shown an airbrushed background with a silhouette image using the Fluorescent Colors.

Masking Technique is one of the essentials in airbrushing. There are several variations to mask an image: Masking Sheets, Masking Tapes, Draft Tapes, Frisket Film and few others that are available in the market. Stencils, templates, and other forms are also used in order to create the desired background in a project.


Let us do something for a layout page background.


Es ist immer interessant, einen Hintergrund entweder für ein Layout oder eine Karte mit der Airbrushtechnik herzustellen. In meinem letzten Tutorial habe ich mit Leuchtfarben einen Hintergrund für einen Silhouettenstempel erarbeitet.

Beim Airbrushen ist die Maskierungstechnik sehr wichtig. Es stehen verschiedene Arbeitsweisen/mittel zur Verfügung um ein Motiv zu bearbeiten: Platten, Abdeckbänder, Draftbänder, Frisket Film und einige andere Hilfsmittel, die auf dem Markt verfügbar sind. Matrizen, Schablonen, und andere Formen werden auch verwendet, um den gewünschten Hintergrund zu schaffen.

Lasst uns einen Hintergrund für eine Layout-Seite erstellen.


Sample 1

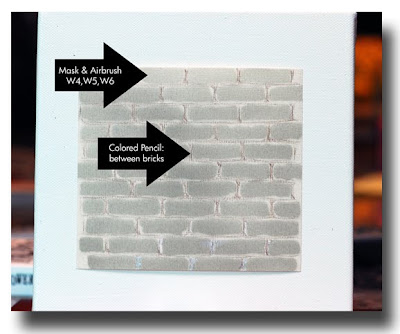
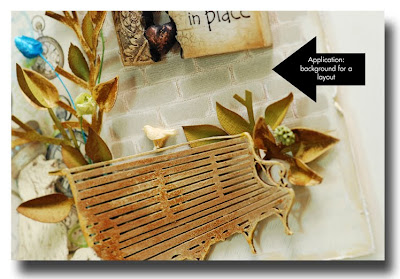
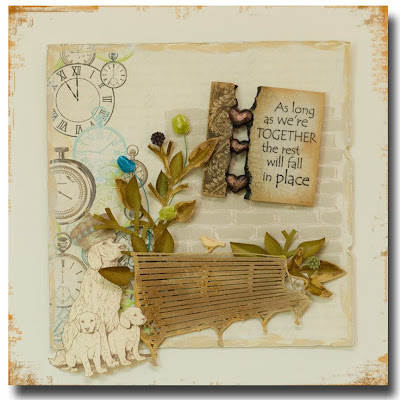
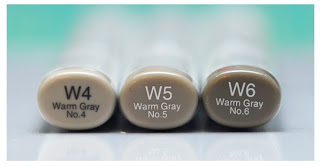
I used a 5 x 5.5in cardstock and a mini bricks template. The sequence of my colors are W4,W5, W6 markers and final touches with W4. Then I used colored pencil to emphasize the lines between the bricks. Assemble the rest of the elements on the page.


Ich habe Cardstock in 5x5,5" und eine Minibacksteinschablone verwendet. Die Marker habe ich in der Reihenfolge W4, W5, W6 und W4 benutzt. Dann habe ich mit einem Buntstift die Fugen zwischen den Backsteinen betont und den Rest der Elemente auf der Seite zusammengefügt.


Sample 2
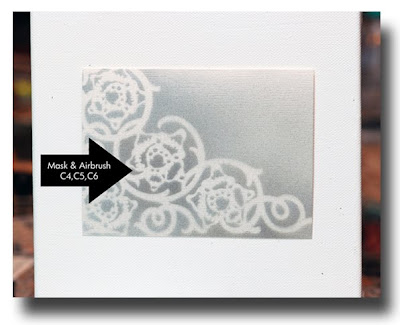
I used a 5 x 5.5in cardstock and a flower mask. I used W4 and W6 markers and then used the Mask-It to cover the whole image. I only cut few flowers from the image that I want to color.


Ich habe Cardstock in der Grösse 5 x 5.5" und eine Blumenschablone verwendet. Als Erstes habe ich die Marker W4 und W6 benutzt. Dann habe ich mit einer Maske aus Mask-It das gesamte Motiv abgedeckt. Ich habe nur wenige Blumen des Motivs ausgeschnitten, das ich verwenden möchte.


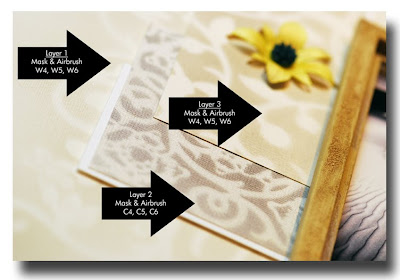
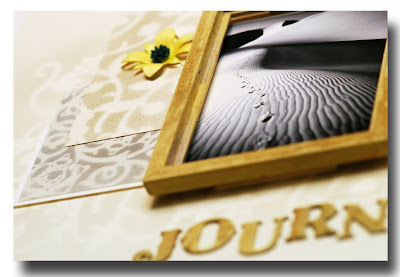
I used a 12x12in cardstock and 2 different flower masks. I used W4, W5 and W6 markers … I want to have a subtle and soft effect on my background. Then I attached the 5 x 5.5in and the rest of the elements.


Ich habe 12x12" Cardstock und 2 unterschiedliche Blumenmasken verwendet. Um eine feine und weiche Wirkung des Hintergrundes zu schaffen, habe ich die Marker W4, W5 und W6 genommen. Dann habe ich die 5 x 5.5"-Karte und die restlichen Elemente hinzugefügt.


Now it is your turn … explore and play around the technique … then slowly combine it with other mediums such as acrylic, pastels and colored pencils.

Jetzt ist es an euch, die verschiedenen Techniken auszuprobieren und sie mit anderen Medien wie Acrylfarben, Pastellen und Farbstiften zu verbinden.


Be Inspired … with Warm & Cool colors!