Home

Wednesday, November 28, 2018

Christmas is coming

Hi everyone! It's Virginia here with another tutorial for Copic Marker Europe. I suppose you're already creating your awesome Christmas projects so, I'd like to be on time inspiring you with my project this month.


I've used a completely fantastic collection of stamps which has been made especially for this album. You already know my favourite Spanish designer, El Rincón de Seter, and their sweet stamps. I'm used to ordering personalized stamps for special occasions.


Today, I'm going to show you how I colour a bear's fur in few steps. As always, here you have a video tutorial:


And these are the Copic colours I've used for all the bears:
Bear's fur: E47-E57-E35-E33-E31
Snout: E43-E42-E41-E40
Ears and claws: R21-R20-R00-R0000
Eyes: B52-C3-C1-B0000
Christmas ball: C3-C1-B52-B00-B0000
Chrismas hat: R29-R17-R24-R02
Holly leaves: YG99-YG95-YG91


I hope I have inspired you and I'd be absolutely delighted if you'd share your creative projects in our Facebook community.


Today that's all. I hope you like my project. I'll see you next month.

Bye!!

Monday, November 26, 2018

Decide to be happy


I've used a Gelliplate print as background for today's project. 


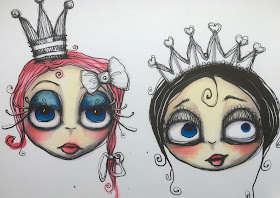
The images I want to use for my project are by Mischief Circus and off course I will colour them with my Copic markers. I decided to use a limited palette of colours, just to show you that you can get nice results with just a few colours. 


I start with a thin layer of E50 . I use the chiselnib, because the images are quite big and it's easier to use the broad nib on large areas to avoid a stripy look.


Use the BV00 for shading. 


Add some  E00 over the BV00 to create a more warmer skintone. 


Blend all the layers together using the E0000.


I use the B05 for their eyes.


Use the B06 for the upperparts of the eyes and use the B39 for shading in the eyes. 


The girl on the left will get pinkalicous hair. I start with RV10. Use this colour on the lips too. 


With the RV13 I add more depth to her hair. I use this colour on the upperlips as well. 

Use the RV14 to add some shading in the hair and on their upperlips.


Allthough the images already have some rosy cheeks, I decide to add a little RV21 to make them a little bit more pinkish. Use the same colours of blue for eyeshadow and her cute little bow in her hair. 


Blend the blues toegther with the B10.
Fot the crowns on their hats  I use Y13.


Add more depths to the crowns with  Y15 and Y17. 
Th he eyeshadow on the girl in the right will be pink, I start with RV10 and than add the 13 en 14for more depth. 


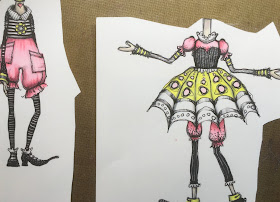
Use the same colours pink for ther dresses and bloomers. Start with the RV10.


Add a second layer with the RV13.


Use the RV 14 for shading.  


Blend all layers together with RV10.


Time to add some yellow, start with Y13.


Add more depth with Y15.


Lastly add the Y17 for more depth and blend all layers together with Y13.


Blue, start with the B00.


Add more shading with B02 and B05.


As the darkest colour blue I use the B06.


Finally keep adding layers of colours to create more depth. 


When happy I cut out all the images and glue them down on my page. . 


see you next month!!
Miranda

Thursday, November 22, 2018

Cicci Coloring an Eye

Hi Copic Lovers.
Cicci here from Sweden :0))
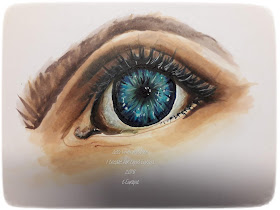
I'm going to show you how I did this realistic eye.
I hope you try it because its a lots of fun creating an eye with copics.

Step 1
First I draw an eye

Step 2
I fill the lines of the eye with a
Copic Multiliner 0.1 brown

Step 3
I fill the pupil with E15 and E95 in the eye with E15 and B95 
Maybe you wonder why I don't use black?
 Black is a rather dead colour and you're going to get a more
realistic effect if you use brown and dark blue


Step 4
Add E39 over E15


Step 5
Add B99 to the pupil


Step 6
Also add B99 around the eye

Step 7 
Add YG03 and FYG1 
You can take other markers here if you like


Step 8
I have used B12 here 
but you can take another
 blue marker if you like

Step 9
Add B32 over B12


Step 10
Now I blend a lot with C3


Step 11
I add more of YG03


Step 12
Add and blend with C5 in the middle of the eye


Step 13
Add some lines with C7


Step 14
Add some more  lines from the iris with B06


Step  15
Here I have done tiny tiny lines with the B01 04 and B97


Step 16
 Continue to make these little lines  now with B39
Use tiny flicks, starting in the middle of the iris so you get little and thin lines
'
Step 17
Here I start to colour the inside of the eye white
with  E51


Step 18
Continue with E11 15 
In this area I also have added some W3 5 7 E89 81
I have blended that colour with the Colourless Blender


Like this..


Step 19
I fill the lines of the eye with B39


Step 20
Here I started to make the line with B39 and C10


Step 21
I made the eyelashes with B39 99 79
I fill the lines here at the eyelid
 with E79 and then I
 blend with E70 and 71 74


 At the end I just colour the skin  with the some skin colours
I have used
 E51 50 53 11 15 04 70
You can use other skin colours if you like

I also used White Posca pen for highlights in the eye
and I add white highlights into the eyebrow too


Here's the Copic Markers I have used:
Eye: B99 39 06 04 YG00 FYG1  B32 12 B01 B04
Skin: E51 50 53 11 15 04 70 E000
Eyebrow: E79 51 71 74 70 E3
Eye white: E11 50 15 C0 W5 7 3 E89 81 Blender B45 
Little lines with E04
White Posca pen for highlights
and I also add white highlights into the eyebrow too

I did some combo for Brown and  Green Eues as Well


Combo
Brown Eye
E23 25 29 18 Y21 02 FY1 FYR1


Green  Eye
G29 28 24 20 YG07  67 61 01 Y02
I have Used a White Posca pen for The highlights


Thank you for visiting us today
Hugs from Copic Europa Girls.