Home

Tuesday, August 28, 2018

Colouring a Galaxy

Hi everyone!! Virginia here from Spain. This is my first post to Copic Marker Europe and I have to say that it's really exciting for me.

In order to introduce myself,  I would like to mention that I'm a Star Wars Geek! I was a child when my aunt took me to the cinema to see the Star Wars premiere. Princess Leia was, and still she is, my heroine. At that time, women were princesses, not warriors, and Leia was the first one. So I've decided to do my first post with her. 

Today I'm going to show you how I'm used to colouring a galaxy background. I know there are many tutorials on the Internet but this is my way. I hope this tutorial encourages you to try it.  I've used a digital stamp made specially for this tutorial by El Rincón de Seter.


Here you have a little step by step video tutorial:


The Copic colours I've used:

Galaxy: B39-B37-B34-BV34-B01-R81
Hair: E35-E57-E47
Skin: E11-E21-E00-R20
Dress and shoes: E43-E42-E41-E40
Weapon: N8-N6-N4

Stars are done with Uniball white pencil.

And this is the finished project.


That's all. I hope you like my project. See you next month with a new one.
Bye!!

Sunday, August 26, 2018

handlettering

The past few weeks I was enjoying my holidays and because I didn't have any travelling plans I bought myself a few online classes. One of them was by the wonderful Joanne Sharpe, a superb handlettering artist.
And guess what, Copic Markers are perfect for handlettering.


Before I start I make a sketch of the quote I want to use in my project. 


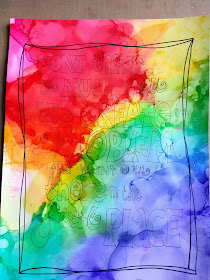
For the next step I use a sheet of stonepaper and a few nice colours of Copic Various Ink. Stone paper is a strong paper and perfect for alcohol inks. 


Drip the colours on your paper and add some Activator to blend the colours more easily.


I like to move the paper around a bit to blend the colours. Add some more Various Inks for darker/ brighter colours or add some more Activator to blend the colours or make them lighter. Just play a bit until you are satisfied with the result.  


I use a  lightbox to add the sketch (which I have made earlier - step 1) to the stone paper. For tracing the letters I use a Copic Multiliner. While tracing the letters I alter them as well. 
 In the next few photographs I show you how I colour/ draw all the letters. Use different sizes of Copic Multiliners to get the best results.


In the end I decided to add some white too. You can use a white marker or Copic Opaque White. 


And this is the end result.

Have a fabulous weekend,

Miranda


Wednesday, August 22, 2018

Folds/Fabric Cicci

Hi Everyone.
Its my turn, Cicci, to show you a Copic Tutorial here at the Copic Blog. 
 I thought I'd show you how I coloured the folds on this image by Christine Karron. 
The image is called Forget Me Not Fairy.

Copic Markers I have used:
For the folds: V09 06 05 04 17
Skin: C0 2 3 7 10 B00 RV52 Y21  E53 E00 50
Hair: V09 04 B00 RV52 FY1 
Flowers: FY! Y02
Eyes: Y26 28 Y02 FY1
Lips: RV52 C0 2 
Nails: Y26
I have also used a White Posca Pen for the White details


Step 1
I started with V09 to add the part that I want darkest

 Step 2
Add V06 over the V09 and blend a little 

Step 3
I add more V09 at the part I started with

Step 4 
Here I add V05 and blend again

 Step 5
Add more V09 ( I like dark colours :0))

 Step 6
Heres the magic V-markers :0))
V04 
I Blend all over the other colours with V04 
It's a nice V-marker and even if you find V04 
doesn't fit with the others in the V-family its going to 
be nice  and light in your colouring

 Step 7
Here I add V17 on the contour on the fabric that 
I want to be even darker and I also add a few lines with this marker 

 Step 8
Blend with V04 again


 Have a Lovely Day and I hope you visit soon again.

Hugs from the Copic Europa Girls,

Sunday, August 19, 2018

Happy Halloween


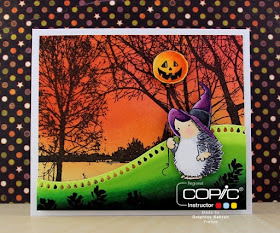
Hello everyone! It's Delphine here today :) I think by now you all know my love for scenes and also for Halloween, so I have decided to make a Halloween scene for today's post! For my scene, I used different Penny Black Stamps - they have super cute animals and great scenic stamps.


The little hedgehog with his balloon is from the Bewitched set. I did some fussy cutting and then coloured them in Copics. The pumpkin was done in Y17, YR04 and YR18. For the hedgehog, I used E50, 51, 53, RV02 for the "skin", C1, 3, 5 for the fur and V01, 06, 09, C5, 7, 9 for the hat. 
I also used a Penny Black die cut to create some grass. I cut my piece first, then coloured it using BG72, 75, 78, YG01, 03, 06, 09 and T7.

For the background, I used a rectangular piece of paper that I coloured using Distress Inks and a blending tool, then I stamped a Penny Black background in black ink.


Note: I used Distress Inks, but airbrushing that background would have been a great solution and a quick efficient way to do it too!

I decided to add some foliage at the bottom of my grass piece then mounted everything on a blank card base. And voilà:


Here is a close up on the scene and the recap of all the markers I used:


Pumpkin Balloon: Y17, YR04, 18.
Hedgehog: Skin - E50, 51, 53, RV02 
Fur - C1, 3, 5 
Hat - V01, 06, 09, C5, 7, 9
Grass: BG72, 75, 78, YG01, 03, 06, 09, T7


That's all from me today! I hope you feel like making Halloween scenes in Copics now too ;)! Thank you very much for stopping by, have a great Sunday! Hugs,
Delphine xx

Sunday, August 12, 2018

You are one of my nicest thoughts!


Goodmorning Copic fans.

Are you enjoing your Summer?

It is a very warm Summer but it does not stop me from colouring,
 I continue to colour up my stamped images . 

This time I have stamped a rubberstamp from Kraftin Kimmie 
onto Perfect Colouring Paper with black tuxedo Memento.


Are you ready ? This is how I have started the colouring.

And probably you would like to see how I have continued to colour and 
what other Copic markers I have used …

Well surprise, surprise.
You can watch my very first colouring video below :).
Please be gentle with me.


So how was the video?

To finish off the card I have also created some handmade flowers.

 I have cut flower petals with a die 
out of a sheet of thin white foam (1mm).
And this time I did not use Copic to colour them but some distress oxide inks.


Love this dreamy girl, 
perhaps she is thinking about all her lovely Copic markers.

I would say that Copic are one of my nicest thoughts,
they bring joy and happiness into my life!


This is the final result.
I did not add too many things, the frame around the coloured stamp is pretty on its own.

Hope to see you soon on the Copic Europe Blog and FB Page again,
thank you for visiting and watching.


Copic : 

E 00, E 11, E 13, E 25, E 29, E 30, E 95, E 97
B 39,B 52, B 93
BV 11, BV 13, BV 17
V 15, V 17
Y 21, Y 23, Y 26
YR 21, YR 24
multiliner lavender 0.3
multiliner black 0.3

stamps : Kraftin Kimmie ; Girls just wanna have fun, rain and shine
dies: Marianne design, Studio Light
papers : Avec
flowers : white foam 1mm , distress oxide mermaid lagoon, wilted violet, strass, glitterglue Rayher

Hugs Blankina

Sunday, August 5, 2018

Colouring a Floral Backdrop

Hi everyone. Sandie here and today I am sharing my colouring on this wonderful fairy stamp and backdrop stamp from Stamping Bella. This scene was created with 2 stamps using the masking technique. 

I always start off by colouring the skin and my go-to colours are E00 and E11 with just a tiny bit of  E04 for extra depth in the shading. 


To do the hair with split pigtails, I took the lightest colour, E50, and drew and imaginary hair line. 


Then I applied E53, flicking outwards from the imaginary hairline. 


I kept going back over with the E51 and E53 until I was happy with the hair. 


I coloured her shorts in blue, using B00, B02 and B04. 


and for her shirt I used V12, V15 and V17. 


For the wings I applied some BG11 and pulled it out a little with BG10. I leave the tips of the wings white. Sometimes I will add Star Dust Stickles to the wings to give them some sparkle. 


Once the little Fairy was finished I moved onto the flowers. 
For the yellows I used Y17, Y15 and Y13. I start with the darkest and work towards the lightest. 


The blue flowers I coloured with B41, B21 and B34. 


I used rich, warm reds for the centre flower - R35, R37, R39


R30 and R32 for the light pink flowers. 


I didn't want the leaves to be all the same colour so I used four combinations. The first one is the YG family - YG01, YG03, YG06 and a little bit of YG17


The second combination is the G40's. These are not colours I typically use a lot of but they worked really well together on the leaves. 
- G40, G43 and G46


The third combination is G20's. These are very similar to the G40's but there is a subtle difference. 
- G20, G21, G24 and G28


On the little flowers I used purple to tie the colours to the Fairy. 
V12, V15 and V17


The fourth combination of greens I used is G82 and G85. Again, this is very similar to the G20's and G40's combinations. 


To finish, I applied some N3 to the daisies to create a little bit of shadow. I blended the N3 with some colourless blender. 


The card measures 5.5" x 4.25" and I added a die cut sentiment, which I layered with white behind the black.  


Thanks for dropping by, and I do hope you are inspired to reach for your markers today.
Sandie
xXx