Home

Monday, May 28, 2018

Angel love


Hi there Copic loversElena F here from Scrap-lanak Ganbaran.

I made my very first art journal page staying out of my "comfort zone", using Copic Refills to make my copic gelliplate printed and foiled background.

Here is the finished project picture, but after that, you've got a few step pictures on how I  made the background and at the end of the post, a few step pictures to see how I coloured the angel.

(You can click the picture to make it larger)


For the background I used my Copic Refills and a large size gelliplate, inspired by You tube and videos by Diny Sprakel using this ink on gelliplate.

Add a few drops of Copic Refills in different colours on the gelliplate; you have to work quickly because alcohol inks evaporate quite quickly.

I used RV69, 63, R89, 83


Let dry completely your desired design and then add a thin layer of acrylic paint with your brayer; I choose white paint.


Well....nothing new until this step.
...but....why not FOIL your background?????

I found one simple background I love and I printed directly onto my gelli impression background (once the impression was completely DRY) with my laser printer:


....and finally I foiled it using my laminating machine and rose gold foil to match the colours of my background.

I´m being surprised when I discover the biggest and darkest Copic refill drops got foiled when blended with the ink from the hot of the machine as you can see in the detailed picture of the stamp at the top of this post.


I masked the stamp to bring some wings to my angel stamp using post-it or any adhesive paper sheet:


Then I colour my stamp as you can see in the next step pictures:

Love to colour skin in E0000, 00, 21, 11 and 13.


Then I colour in brown-reddish her hair using  E18,17,15 and 13.


For the feather dress I choose to colour slightly pink so I started colouring the darkest areas with a medium warm grey in W4.

As you can see the marker dropped ink into my dress but there is nothing impossible to fix so I decided to continue this time to see if I can fix it.


I added a few touches of R83 to the feathers.


I went back to greys and using W5 I coloured again the darkest zones to get more depth on the dress.


 A few touches with R83 to blend greys a little.


  A few touches with R81 to expand a bit of pink colour to the end of each feather.


Finally blending with W1.


Repeat steps until you are satisfied with the result. The ink drop on the dress is now almost invisible.

I decided give to the wings of the angel a light colour to make them appear translucent using 
BG000, BV00 and BV11.


Finally, I fussy cut the image to emphasize her on my project.

I added some die cuts, some stamping, I make the faux stitching using a Copic multiliner....and It´s done.

The list of markers I've used to colour the image:

Skin: E0000, 00, 21, 11, 13
Hair: E18, 17, 15, 13
Dress: W5,3,1 R83, 81
Wings: BG000, BV00 and BV11
Copic multiliners

I hope you found this post inspiring.
Thanks for sticking with me to the end!


Saturday, May 26, 2018

BLOOM

Hi Copic friends,
this month I've made a small MDF album using my new stamp line for Studio Light. All the images are coloured with Copic Markers of course.
 I have made a lot of photographs to show you how I coloured the images and which colours I have used.

A summary of the used colours:
BG:01, 05, 07
FBG2
V:0000, 01, 04,05,06,09, 12
RV: 000, 02, 04, 06, 09
YG: 03,17,67
E: 0000, 00, 50


I used a special technique called acrylic liquid pouring to make the backgrounds of my album. 


Start with the lightest colours BG01 and FBG2. Add a little BG05 and BG07, and blend all layers together with BG01. 
For the small petals I start with V04.


Add some V05 and V06. And blend all the layers with V04.


The outer petals will get the same colours from the BG group I have used previously.
The small leaves will be green. Start with  YG03. Add some YG17 and YG67.  Blend all layers together with YG03.
This is absolutely my favorite green combination.  


This sunflower will be pink. Again I start with the lightest colour first, the RV02. Add  RV04 and  RV06 and blend all the layers together with RV02. 


To get a darker pink start with RV04. Add  RV06 and RV09 and blend all the layers with RV04.

In the end I also used the RV000 for blending the layers together, but that sort of bleached out the dark ones. So I added the V02 and 04 again to gain a smooth transition. And that's what I love about the Copics, you can add many layers and still get a good result. 


The leaves again, start with YG03. Add YG17 and YG67.  In between layers I don't worry about blending. I add all the layers first and in the end I blend them all together in one go. 


The toadstool will be a violet purple. I use the V group and start with the V04. add V05 and V06 , blend together withV04. 


For the lightest parts of the toadstool I use a very light violet. V0000 and V01. 


The last flower will be blue with purple. I use BG 01, FBG2, BG05 and BG07 from the BG group and V04, V05 and V06 from the V group. 

Cut out all the images and glue them in your album. 
Every other page I painted black (mmmm this reminds me of a song....) and doodled on those pages. 

Here are the pages in my small album:


And a short video of the album together...


See you next month,

Miranda van den Bosch

Tuesday, May 22, 2018

Cicci Ice-Crean

Hi Everyone,
Cicci Here Today

I hope you all have a wonderful time!!
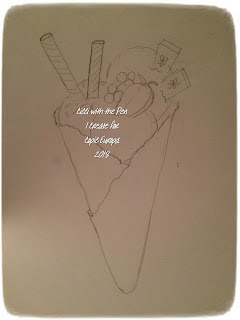
In Sweden we have nice weather with lots of sun.
And I am sitting inside and colouring. LOL.

Here's some colouring that is perfect for the summer, I think.

ICE-CREAM CONE

I am going to show how easy it is to make the ice-cream cone with Copic markers.

The Markers I used are:
E51 YR24 E33 35 31 
And the Colourless Blender

Step 1
I Start to draw an ice-cream

Step 2
Use E51 to draw the contours on the cone

Step 3
Add YR24 all over the cream cone

Step 4
Add in the edges with E35 then blend with E31 and E33

Step 5 
 Add E29 on the lines

Step 6
Blend all over the area with E55

Step 7
 And now time for the Colourless Blender
Drag the Blender in the same place a few times to see the colour disappear, it may take a few seconds before you see the result, so do not be in a hurry.
Continue until you are satisfied

After I made the lines with the Colourless 
Blender I added E53 23 and blended that with little lines of Y21
 At the end I draw small dots like the letter L on the square in the cone With E53 23
and Blend with E53

Other Copic Markers I have used:
For the Ice-cream
Pink: RV42 21 32 09 04 23 25
Brown ice-cream: E70 74  71 29 53
Light Brown Ice-cream: E51 53 57 59
Sticks: E53 23 27 21 Y21
Strawberry: R14 21 27 39 YG23 11
Sprinkles: Y38 YG23 YR04 FBG2
Blueberries: B63 39 BV02 04
Chocolate heart: E 37 39  29 18
Cherry:  R39 35  27 21

White Posca Pen

Thank you for your visit and I hope to see you again soon.
Hugs and Smiles,
From the Copic Europe girls.


Friday, May 18, 2018

No DPs? No problem!


Hello everyone! It's Delphine here today to share a CAS card with no DPs. The great thing about using no DPs and making your own is that you can create a card with perfectly matching colours.

I used Funky Mother by Make it Crafty for my card.


Skin: E000, 00, 11, 13, RV02
Hair: E25, 59, YR23
Eyes: B00, 63
Pink: RV00, 02, 04
Beige: E40, 41, 42, 43, 44


I then made a card base out of some Copic paper. I drew a line with a ruler and a Sepia Copic Multiliner (0.3). I coloured the white strip using a pink from my image - RV02. Next, I made dots with a Paperbabe Stamps Dot Stencil and with a Sepia Copic Multiliner (0.1), just the outline of the dots, so that I would create a regular pattern - which I would not have been able to do without the stencil of course. I coloured the dots with a Bronze Posca pen to remind of the colour of my character's hair.


I die cut my image with an MFT die and painted a Make it Crafty Delicate Love Oval Chipboard Frame, using the same RV02 Copic and the same Posca pen as the strip on my card base. I also added stickles to the hearts of the frame.


I added my image to my card base, mounting it on foam for a bit of dimension, and voilĂ !


Thank you very much for your visit, have a great day! Hugs,
Delphine xx