Home

Monday, November 28, 2016

Sweet Holiday Wishes

Hi everyone!

Thank you to all who participated in the last challenge in our Facebook Group, the winner will be chosen by random.org and will be announced on November 30.

Unfortunately we are taking a break on the challenges right now, but it comes back!


For this card I've used an adorable stampset by SugarPea Designs called "Ginger Snaps" and the papers are called "Happy Holidays" and is by SugarPea Designs too.

I also used Wink of Stella on the roof of the house and the blue parts but it doesn't show up on the picture.


Copic marker colours I've used:
brown: E59, E37, E35, E33, E31
red: R59, R29, R27, R24, R22
blue: BG09, BG05, BG01, BG000
pink: RV19, RV17, RV55, RV52
green: G28, YG17, YG13, YG11
dark brown: E49, E47, E44, E43

Thank you for stopping by,
Deborah

Sunday, November 27, 2016

Superman, by Suki Manga Art

Dear Copic friends, I am not good drawing DC or Marvel characters
because my style is pure shoujo manga
 but this time I tried to draw my favourite Superhero, he is "Superman"

 I hope you like it :)


I used these Copic colours:

Skin: E000 - E00 - E21 - E35
Hair: C7 - 100
Eyes: B05 - B29 - B95 
Clothes: B05 - R29 - Y08 - E21 - B29 - B66 - B24 - R59 - BV25
Background: C7 - 100 - B29 - B05 - W9

See you soon! (^_^)/ bye!


Suki Manga Art


Saturday, November 12, 2016

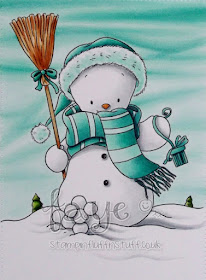
Snowman Present


Hi Everyone, it's Faye here :)


Today, I would like to share a card I made for a recent class I taught. We were discussing snow. It can be really easy to reach for the same Copics when we want to colour something. For example, my go to colour blend for snow is C0, C1 and C3. That's the three markers I reach for, without really thinking about it. Until I thought about it! In our class we played with other combinations for snow, but ironically, the sample I am sharing today is with my old time favourite.

I coloured the image with these colours to match a design paper, but when I came to make the card, it was just too fussy for the image, so I went for a very clean and simple card.

Anyway, I promise the next time I colour snow, I won't automatically reach for my favourite. Maybe I'll get a new favourite. You'll have to keep an eye on me, won't you?!


Copics Used...
Snow; C0, C1, C3
Carrot; Y38, YR14
Sky; BG10, BG11, BG23
Trees; YG03, YG63, YG67
Broom; E31, E33, E99
Light Aqua; BG10, BG11, BG23
Turquoise; BG11, BG23, BG57

Thanks so much for stopping by... Have a great day.
 

Monday, November 7, 2016

Enjoy the little things in life


Good morning Everyone.

A few days ago we had the first rain. Everything around us received a good wash (including my car - lol)The rain was such a nice change from the heat. I love the smell after the rain.
On my way to my washed car I saw this little one... It just decided to go for a walk after the rain.


Isn't it cute? When I came home and looked for an image to colour, this digi caught my eyes.


The image is called Boo & Snookie from The Emerald Faerie Garden.

Here are the Copics I used:

Fairy Body: E50, E51, E53, E55
Hair: C3, C5
Wings: R0000, R000, Y0000, Y000, Y11
Hat & Pants: B00, B02, B04, B06 Snail - YG0000, YG91, YG93, YG95, YG99
Snail: E81, E84, E87, E89
RV91, RV93, RV95

Background: Distress ink

Wishing you a blessed day.
Hugs,

Friday, November 4, 2016

The Seven Dwarfs


Hi Copic fans.

Occasionally you will work entirely in the wrong order. I've also done once again this time. In itself not a problem, you just deliver yourself a lot of work. When I bought this Seven Super Funny Dwarfs by Mo Manning, I printed them directly on Perfect Colouring Paper because I wanted to colour with my Copic Markers. During the colouring I had the idea to combine this with Gem-Tangles.


Probably, you have seen all kinds of versions of Gem-Tangles on the Internet recently.
Diny Sprakle hasshown us how you can do this with Copic markers or colouring pencils. But I wanted to go one step further. I wanted to incorporate letters instead. The letters and gems are drawn with a black Copic Multiliner 0.1mm and the fracture lines with colored Copic Multiliners.
The characters are made with a Letter Mask from the brand Dutch Doobadoo.


 After I was finished with colouring, I had a problem ....... what to do as a background? Luckily my husband had great idea ......why not a cave with diamonds?
 

 So I drew a few rocks, cut out and decorated them with modeling paste and let it dry overnight. I have them tinted with the Copic Airbrush. But still I'd not got the effect I wanted.


  So I thought I would go and see if I could find something that looked like diamonds. Fortunately, I found out that I still had some Ranger Stickles.That was just what I needed for a glitter effect. But when finished, it was still not to my liking.


Then the rest of the project should also receive a rocky appearance. First I placed a basic layer on my paper with the Copic Airbrush. I ripped white tissue paper into pieces and applied to the paper with Glazing Medium.  After drying, I have brought all tinted back with the Airbrush. By now you'd think you have what you want. 

 Fortunately there are more products I like to work with. So I added some depth with a few brown colours of Pan Pastel.

Finally, I could start building my project.
First I got the rocks and letters glued in place. Then I made a lot of little gems to bring back the colours of the gems in the background of the project. These colours I would have used on the dwarves but those details are so small that they do not stand out. By applying all those little blue and green gem it was still a beautiful whole.


These are all the colours I used :

Background with Airbrush:
Y26 - E07- E25 - E34

Dwarf on beer barrel:
Skin: E000 - E00 - E11 - E13 - E93 - R20
Beard: E35 - E37
Blouse: E31 - E33 - E34
Pants: B91 - B93 - B95 - B97 - B99
Socks: B24 - YG95 - YG97
Boots: E84 - E87 - E89
Mug: C1 - C3 - C5 - C7
Dwarf with green hat:
Skin: E000 - E00 - E11 - E13 - E93 - R20
Beard: W00 - W1 - W3
Vest: E43 - E44 - E47
Green Parts: YG93 - YG95 - YG97 - YG99
 Blue Parts: B21 - B23 - B26 - B28
Mug: C1 - C3 - C5 - C7 - R05


Dwarf with red hat:
Skin: E000 - E00 - E11 - E13 - E93 - R20
Beard: W00 - W1 - W3 - W5
Reds: R35 - R46 - R59
Blue tones B23 - B24 - B26 - B28
Yellows: Y38
Browns: E42 - E43 - E44 - E47

Dwarf with pick axe :
Skin: E000 - E00 - E11 - E13 - E93 - R20
Beard: E33 - E35 - E37
Helmet: C3 - C5 - C7 - Y11 - Y38 and E41
Jack: E08 - E35 - R59
Pick axe: C3 - C5 - E42 - E43 - Y09
Greens: YG93 - YG95 - YG97 - YG99
Browns: E25 - E27 - E29
Coins: Y38
Greys: C1 - C3 - C5 and W3 - W5 - W7

 Plump Dwarf
Skin: E000 - E00 - E11 - E13 - E93 - R20
Beard: C0 - C1 - C3
Upper: E84 - E87 - E89
Underwear: E33 - E35 - E37 - 0
Boots: E84 - E87 - E89
Pants: YG93 - YG95 - YG97 - YG99
Bracelet: Y35 - Y38 - R39
Mug: C1 - C3 - C5 - C7

Dwarf with big bag
Skin: E000 - E00 - E11 - E13 - E93 - R20
Beard: C0 - C1 - C3
Vest, bag and bracelet: E33 - E35 - E37 - E39 and Molotow Metallic Gold
Hat: B21 - B93 - B97 - B99 - E33 - E35 - E37 - Y38 - Y35
Pants: B93 - B97 - B99 - Y28 and molotow Metallic Gold 
Boots: W3 - W5 - W7 - W9
 
Seated Dwarf:
Skin: E000 - E00 - E11 - E13 - E93 - R20
Beard: E07 - E09 - E29
Blouse: YG93 - YG95 - YG97
Pants: B91 - B93 - B95 - B97 - B99 - E44 - Y38
Boots: E84 - E87 - E89 and W5 - W7 - W9
Bracelets: Y32 - Y35 - Y38 - R27 - R59
Mug: C1 - C3 - C5 - C7

Finally, the colour combination of text and gems:
Blue gems: B21 - B23 - B24 - B28 - B39
Green gems: YG01 - YG03 - YG25 - G09
Text: R29 - YR14 - YR16 - YR68

The lines are put with Molotov White.

I hope you have read this post with pleasure.
Until next time.


Wednesday, November 2, 2016

dare to fall

the bird who dares to fall, is the bird who learns to fly

Quite recently I bought some lovely images by Tanya Bond. Her drawings have cute animals in it and they are great for colouring with Copic Markers. 

So I had a lot of fun colouring this girl and her hummingbirds. After I had finished colouring this image I made an art journalbackground with paints and stencils and found this great quote about birds on the internet.  


I always start colouring the skin first. When that doesn't turn out right I will start all over again. 
For the skin I used E50, 51, 00, 000, 0000. For shading I used W1 and 3, BV000 and 00 and a tiny bit of BG0000.

For the eyes I used B39, 37, 34, 32 and for shading inside her eyes the BV0000 and W1. 
And for the lips, E93, R20 and 22.


YR23, 18, 16,14, 21 and E09 were used for the hair. I normally start with adding the darkest colour first working my way back to the lightest one. With all these layers the darkest colours tend to turn out a little lighter than usual, so I go back to the darkest colour to enhence it a bit more. 

For the leafs in the background, in her dress and in her hair I have used YG06, 17 and 67. 
In her dress there is as well BV000, 00 and 02. 

I have used quite a few colours for colouring the hummingbirds
 and the flowers.
Flowers: V04, 05, 06, YR23, 18, 16 and 15
Birds: V04, 05, 06, YR23, 18, 16 ,15  BV000, 00 and 02.

if you have any question about this creation  please pop me a message on FB

have a wonderful day and see you next month

Miranda