Home

Saturday, April 30, 2016

Winner challenge #49: Animals

Hello Copic friends!

Deborah here with the random winner of  challenge #49 Animals, picked by Random.org.
and it is.... 
Karen Akesdotter, congratulations!!!

Just take a look at her adorable card, I love it!


Please send us an email to copiceurope@gmail.com
with your request of 2 Copic Refills of your choice.

Be sure to enter the new challenge "Anything Goes!" on the Facebook group!

Let's join the fun!

Hugs, Deborah

Thursday, April 28, 2016

Challenge #50: Anything goes!

Challenge #50

Hi everyone!

Deborah here for you with the super fun NEW challenge #50!
Thank you to all who participated in the last challenge in our Facebookgroup, the winner will be chosen by random.org and will be announced on Thursday April 30.

Our new challenge is:

Anything goes!
Aha! That's an easy one! So there are no excuses for not joining us this month.
Pull out those fabulous Copic Markers and show us what you've created!

Here's a little inspiration for you. I've created a card with a gorgeous image "Punch of colour girls 11" by artist Hannah Lynn for Crafts And Me.


Here are the Copic colours I've used:
skin: E13, E11, E00, E000 /R20
hair: BV29, BV25, BV23, BV20
blue: B29, B26, B23, B21
pink: RV29, RV25, RV23, RV21
purple: V17, V15, V12
mirror: E35, YR23, Y15/ C5, C3, C1, blender
clouds (background): V25, V22, V20
hairbrush: E35, YR23, Y21/ E43, E41


rules:
- You have to use Copic markers on your creation
- Your creation have to be new
- Maximum 3 entries 

To enter, just put your picture in the right folder in the photo section of our Facebook Group before the end of May 28.
The winner will be announced on May 31.

Now it's your turn! Show us your work, and you can win 2 Copic refills of your choice.
Please be aware that only entries from those living in Europe, North Africa and the Middle East are eligible to win.

Hugs,

Deborah

Tuesday, April 26, 2016

Tutorial - Night Background


Hello!
This time my visit to Europe Copic Blog is to share a tutorial.
This is my way of colouring a night background with a moon and stars, this is a light source.

It's simple, I used a digital stamp from Di's Digi Downloads.
First coloring the stamp, then I make the background and start by ...


I add a yellow around the moon and stars, almost imperceptible, It can also be left blank.
I used Y000.


At the edge of the paper, I add my darkest colour, B99, working towards the image.


I blend the previous colour with B97, and cover more area.


Around the image I would add, without touching the moon and stars, B93, a lighter colour.


Add intense colour in intermediate parts, with B95.


I add more intense colour on the outside, B99.

And I add more colou, a little less intense near the image, B97.


Repeat the process, but by doing little polka dots for texture.
And this is all!!!

Stamp ready for my card...


Copic colours I used:

Background: B99, B97, B95, B93, Y000.
Moon and Stars: Y11, YR31, YR21.
Mice: W3, W1, N3, N1.

If you've come this far, thanks for reading.
I hope this is useful for colouring. See you soon!


Sunday, April 24, 2016

Ariel, by Suki Manga Art

"I don't know when, I don't know how
but I know something's starting right  now
watch and you'll see, someday I'll be
Part of your world"


Dear Copic friends, this is a fan art inspired in one of my favourite scenes of "The Little Mermaid" (Disney) Do you remember the melody?

I hope you like it:


To create this illustration I used these colors:

Skin: E000 - E00 - R000 - E21 
Hair: Y08 - Y38 - YR09 - R27 - R29 - R59
Clothes: BV00 - V15 - V09 - BG05 - BG49 - B12
Rock: E21 - C3 - E35 - E37 - E29 - C7
Background: B000 - B00 - B05 - B01 - Blender

See you very soon (^_^)/ Bye!


Suki Manga Art


Thursday, April 21, 2016

Fairy Landscape


Hello everyone! It's Delphine here today to share a Copic scene of course ;), with a pretty Make it Crafty fairy, skies and hills! Here is my card:


My card was inspired by Zoe from Make it Crafty and her latest fantastic e-book called Fun Techniques for Colouring Skies which I used for the sky and hills. I chose Fairy Dahlia by Make it Crafty too, flipped my digi image in Word to have my fairy leaning towards the inside of the scene and cropped it. I printed my cropped fairy and started by creating and colouring the sky and hills. I then coloured my fairy and added a sentiment by Paper Smooches. 


Sky and clouds: 0, B21, 24, 26, 28, C0, 1, 3
Hills: YG03, 06, 17
Skin: E000, 00, 11, 70, R20
Hair: 100, BV04, T7, 9
Dress: C5, R35, 37, 39, 89
Bracelet: Y11, 26
Wings: BG01, 000, V000, 01

That's all from me today, thank you very much for your visit, have a great day! Hugs,
Delphine xx

Monday, April 18, 2016

Max 15

 Hi everybody!

It's time for me, Christina, to inspire you all on this lovely Monday. I'm currently on small trip to Krakow but that is a different story =)

My son, Max, turned 15 at the beginning of April and I made him a card, of course. Last year he got a birthday card with a cool skater dude but this time he got a fisherman instead. Since we live by the coast in Sweden, it's easy for him to get on his bike and go fishing. And I couldn't be happier because he is bringing home dinner!

Now for the card!


I have used this oldie from hÄnglar & stÄnglar and coloured him with my favourite Markers, matching the image with the patterned papers. The chipboard stars made the card complete!


Close up


I always try to match the gifts with the card and I think it worked well this time.

Now for the Markers I have used!

Skin E13-11-21-00-000-R11-20
Hair E49-29-25-23
T-shirt/cap BG78-75-72-(71)-70
Shorts /shoes E49-47-44-43-41
Bucket C7-5-3-1
Fishing rod E07-23-27
Ground W7-5-3-1

Have a wonderful week!

hugs 
Christina

Friday, April 15, 2016

Here is a wobbly one!

Hello there, I have a clean and simple card
with a bit of a twist!

This was for my Dad's Birthday....


As you can see, quite a simple image on the front
but when you open the card.......


The old chaps bum has bit of a wiggle
thanks to the assistance of a wobble spring!
(the stamp set came with a spring but you can also buy them separately)

Art Impressions - Bummer Set
MFT Die Namics Blueprint 15 die
Memento Ink Tuxedo Black
Copics -
Sign: B12, C3
Shirt: B0000, C00, C0, C1, C2, C3
Skin: E0000, E000, E40, E41, R20, V20, W2
Trousers: E40, E41, E42, E43, E44
Socks: W00, W1
Shoes: E21, E23, E41, W1, W6

Have fun with your Copics.... I certainly did with this one!

Tuesday, April 12, 2016

Unicorn


Hi Everyone, it's Faye here today :)


Judging by the flurry of Unicorn images I've spotted in recent weeks, I think they are a bit of a trend right now. I saw this rather fab one called Ava, from Scrapper's Delights, and thought I'd join in! Shaker Cards are also very popular at the moment, and I thought I would combine the two. You can never have too much sparkle when a Unicorn is involved, right?! ;)


Copics Used...
Eyes; B41, B12, B06, B60, B63
White; C1, C1, C3
Black; T5, T7, T9
Red; R32, R35, R39
Orange; YR12, YR14, YR18
Yellow; Y13, Y15, Y35
Green; YG01, YG03, YG63
Blue; B12, B06, B18
Indigo; B63, B66, B69
Violet; V12, V15, V17, V09
Pink; R81, R83, R85

Thanks for stopping by... Have a great day.

Saturday, April 9, 2016

Sweet Girl

Hi everyone and Happy Saturday!
 
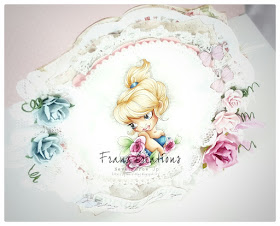
Franz here, with a super sweet Saturated Canary girl who is part of a set called "Faces".
I think she's so sweet, she reminds me of Cinderella! So I coloured her dress in blue tones:

(Image: Saturated Canary - Faces Pack)

Since she is so lovely and sweet, I thought to create a very romantic card for her  and I used shabby papers from Pion Design, doilies and lots of flowers:


I coloured her in quite bright colours, but I made the background using warm greys to give to the image a vintage touch.
I used a combination of Confetti and Smooshy Technique to colour my background:

I learnt the Smooshy Technique from our Faye at 2014 Copic Convention;
HERE you can find her lovely tutorial if you want to try!


Here is the complete list of Copic Markers I've used:

Skin: E0000, E000, E00, E11, E13 + R20 for cheeks
Hair: E50, E51, E53
Lips: R000, R20, R81
Eyes: B0000, B91, B93
Outfit and Flowers/Blue: BG000, B91, B93, B95, B97
Flowers/Pink: V000, RV00, R81, R83, R85, R89
Background: W1, W2, W3, 0

Thank you all for reading,
 a BIG hug,
Franz.


Thursday, April 7, 2016

I'm ready, lets go.... Shopping


Hi Everyone!
Today I want to share with you a simple card.
Decided to let the image be in focus.
I choose the image Yvonne from Saturated Canary.
she is so cute and ready to go and have some fun.
The curly hair is easy to do,
its more loose hand without flicks at all.


Here are the colours I used:
Skin: E11,E13,E15,E18,R20
Lips: R35, R39
Hair: E57, E37, E39, E59
Top: YR12, YR14, YR16, YR18
Hair Band: BG02, BG05, BG07, BG09
Pans: C00, C0, C1, C2, C4, 0

Wishing you a wonderful day
hugs,


Monday, April 4, 2016

Little Monsters


Hi Copic Lovers,

 It is not easy to make a birthday card with the right birthday messages for a little boy. Because boys don't like all the fuss on a card for their birthday.  But these Little Monsters by Technique Tuesday,  are perfect for making a CAS card for a boy. They are so funny and scary at the same time. I love to use bright colours, they give a little something extra on your colouring work.


The heartbeat-line stamp is from the brand Katzelkraft.

Copic Marker colour combo:
For the Orange Monster:
Y15 - Y19 - YR07 - YR09
For the Green Monster:
G07 - G14 - YG03

For the shadow on the floor:
W00 - W0 - W1 - W3

For the word Yippee:
G14 - Y15 and YR07


Have a wonderful and creative day,


Greetings

Saturday, April 2, 2016

Various ink tutorial

Today a tutorial with the Various Inks.
We all have those luscious bottles of gorgeous colours to refill our markers but you can use them in other ways as well.


What do you need?
A bottle of Copic Activator, some bottles of Various Inks and a tool for applying the ink.

The colours I used are:
RV25, R08, BG57, BG07, YG05, YG17, RV17, Y13 AND 100 (black).


An example of the tool I used for this technique, it's by Ranger.


Applying some drops of ink on your tool and spray a little Activator on the tool as well and dab on to your paper. I used YUPO paper which is a synthetic paper. 


If you drip some ink in the background it will react with the ink and alcohol that's already on your background. You will get some nice spots.


You can also spray some Activator straight onto the background. The ink will be reactivated and some great patterns will appear. Keep adding ink and Activator onto your background until you are satisfied with the results. 


A close up of all the nice layers of various ink. 


I used an image by Crafts and Me as a focal point of my page.
I coloured this lovely mermaid with my Copic Markers.
For the skin I used E50, 00, 01, BV00, BG000, W1, R20


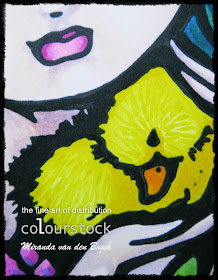
For the cute duckling I used Y15, 13 and 19.
I used the Y15 to make brushstrokes to suggest that the duckling is furry.


For the hair I used  B04, 05, 0000, 02, BG07,09 and FBG2.
the tail and leaves: YG 17, 67,05 and 06
flowers: RV 17, 11, 34, FRV 1
shadows W1 and 5


A close up of the eye, I mainly used blue, but I added a little green too, because eyes are never just one colour. 


And this is my finished page.
The words are made with puffy letter stickers which I bought a long time ago. I gave them new colours using the Various Inks again (RV17 and Y13). 

Hope you enjoyed this little tutorial.
See you next month.

Miranda